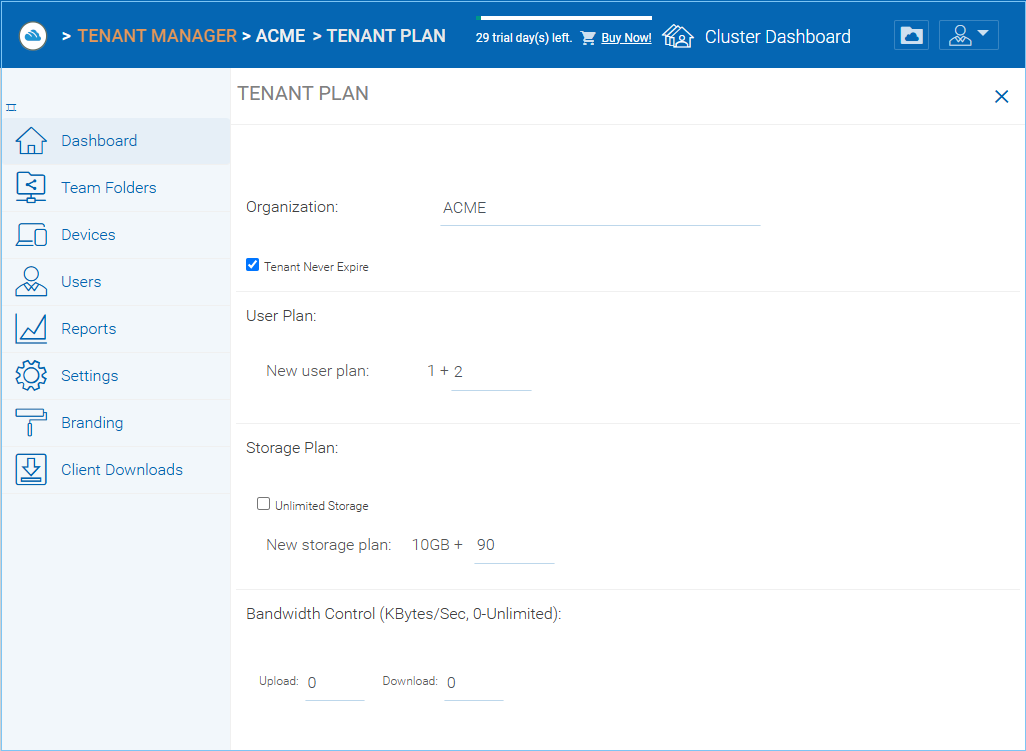
A tenant is usually mapped to a company, or a division of a company, an organization or in the case of MSP managed organization, a service provider would call them clients. Basically, a tenant is a management scope that represents an organization.
Tenant manager scope is defined for tenant administrators. For a multi-tenant Cluster Server system, each tenant has an administrator. For a single-tenant Cluster Server system, the default cluster administrator is also the tenant administrator.
Tenant Manager is completely web-based.
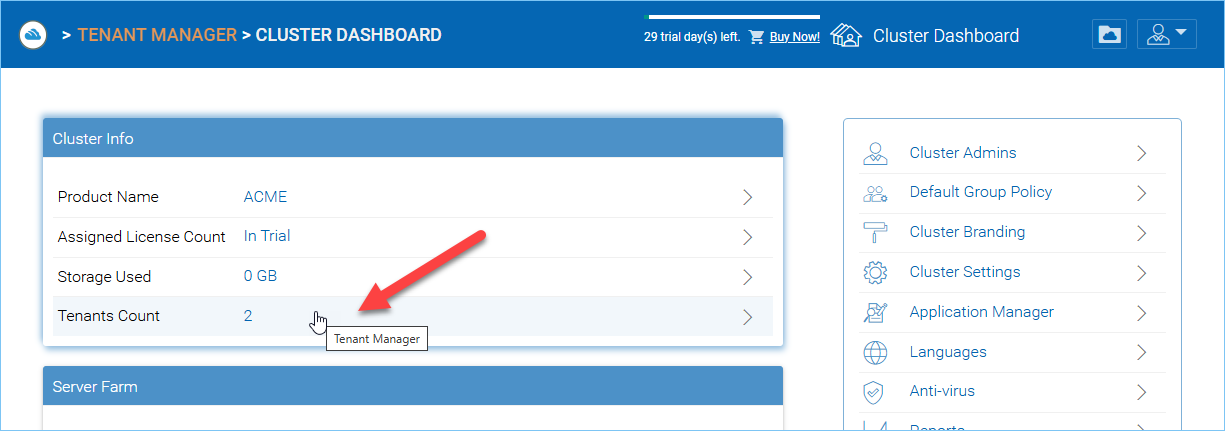
From the Cluster Manager Dashboard, you can access the Tenant Manager by clicking “Tenants Count”.
You can also log in directly to the web portal as the tenant administrator instead of the default cluster administrator to get to the tenant administrator management web interface.
Note
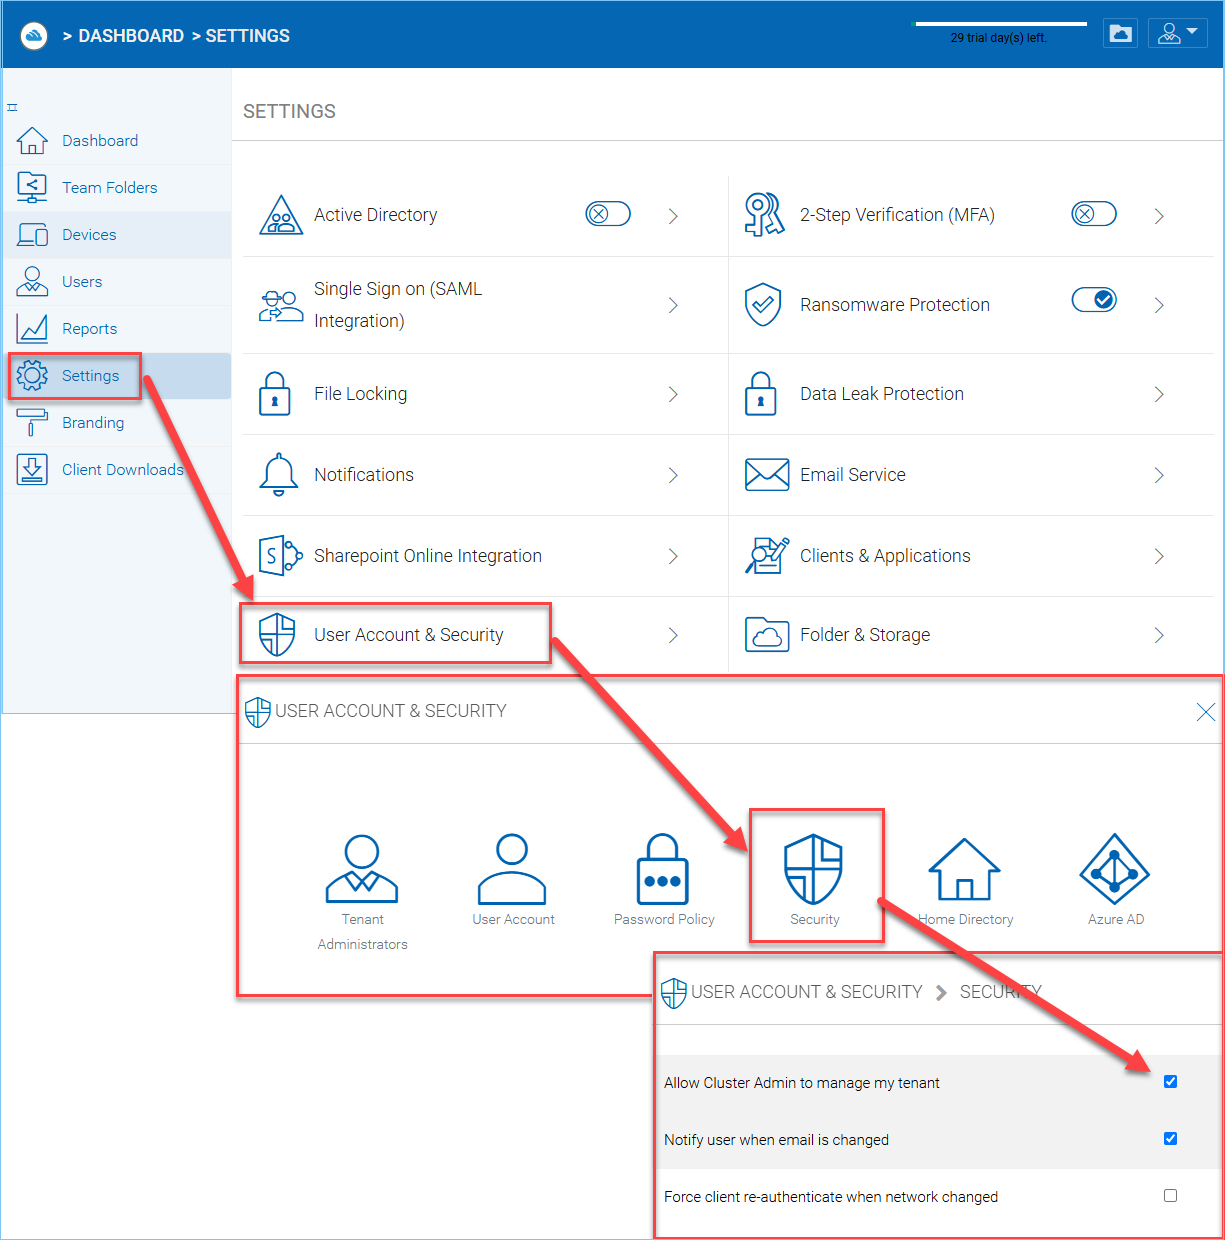
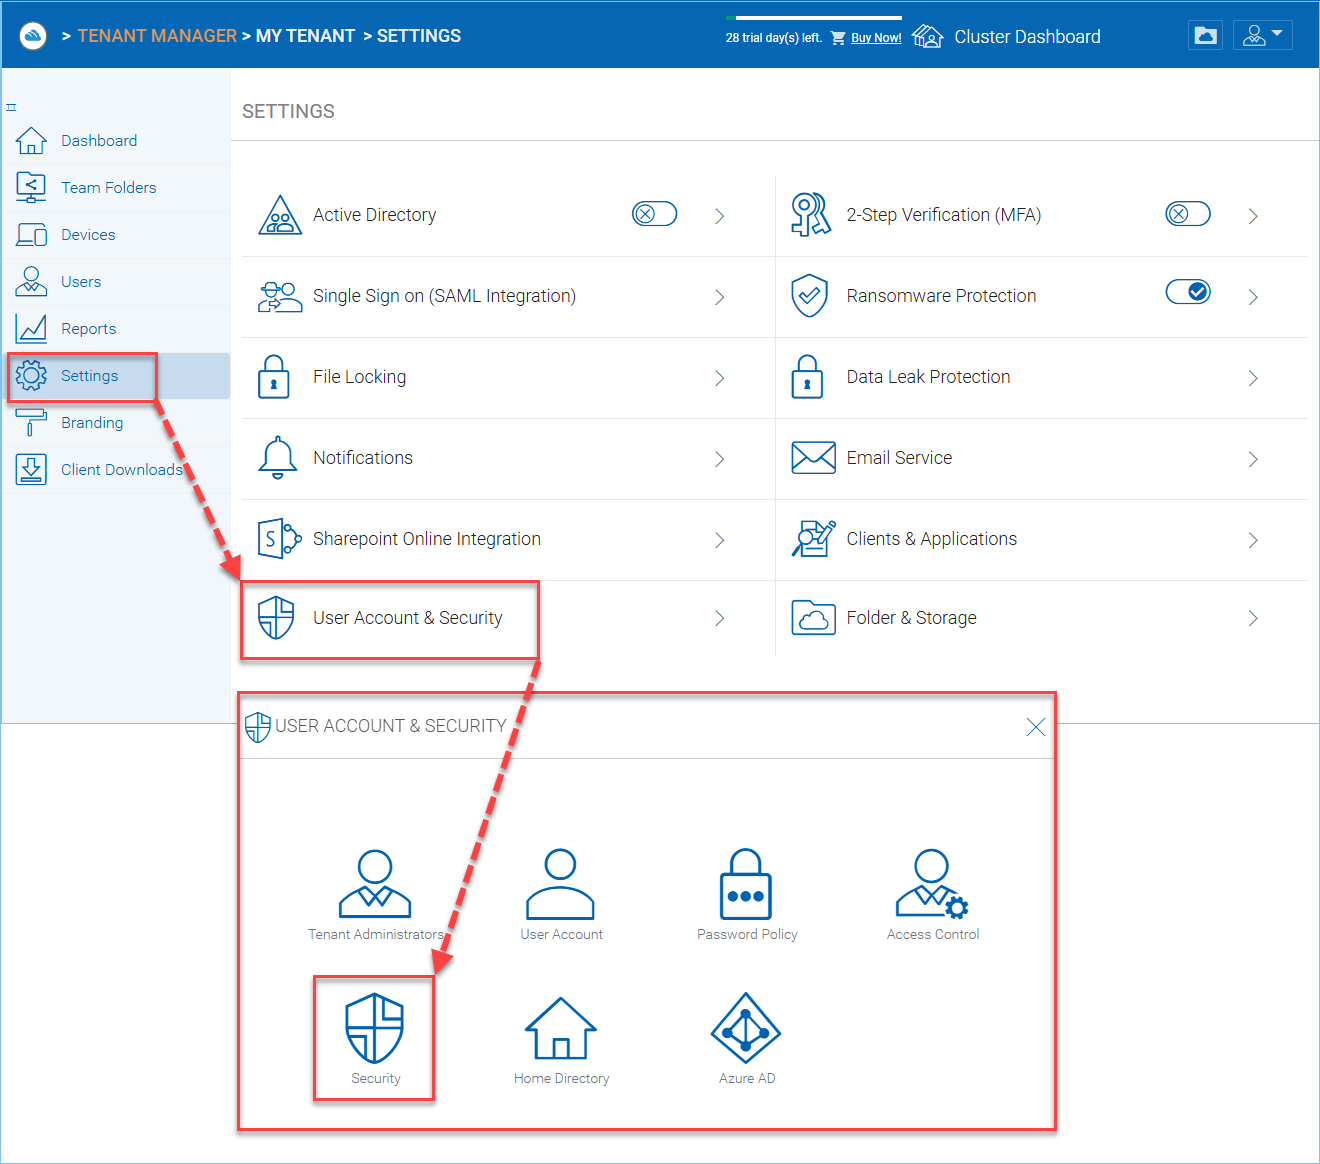
At a high level, the Cluster Administrator and Tenant Manager have almost identical controls for the Tenants within their scope; however, the Tenant Manager settings will always take precedence and override Cluster Administrator settings. Tenant Managers can give permission for Cluster Administrator to manage their tenants by enabling this option in Settings > UserAccount&Security > Security. “Allow Cluster Admin to manage my tenant” is by default checked.
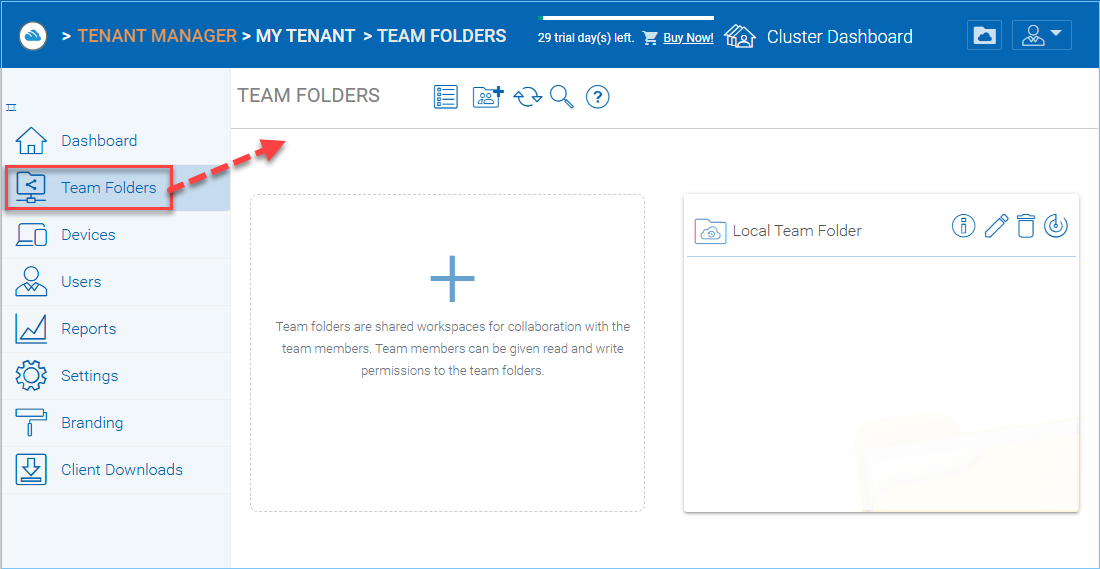
The team folder concept is like a network share, meaning you can define a folder and then add users and groups to the folder and thus turn it into a team shared folder. The team folder will show up in the user’s folder list when the user is added to the team folder.
When the server agent is in use, the team folder can be mapped directly to a network share from the server where the server agent is installed.
When a directly connected network share is used, a team folder can be mapped to an SMB/CIFS network share directly.
You can also turn any existing folder into a team folder.
A Team folder has a tenant administrator scope so the team folder related sharing is limited to the users inside the tenant.
Note
By default, the files and folders that the administrator can see is hidden away from the regular team user until those folders are published to the team users.
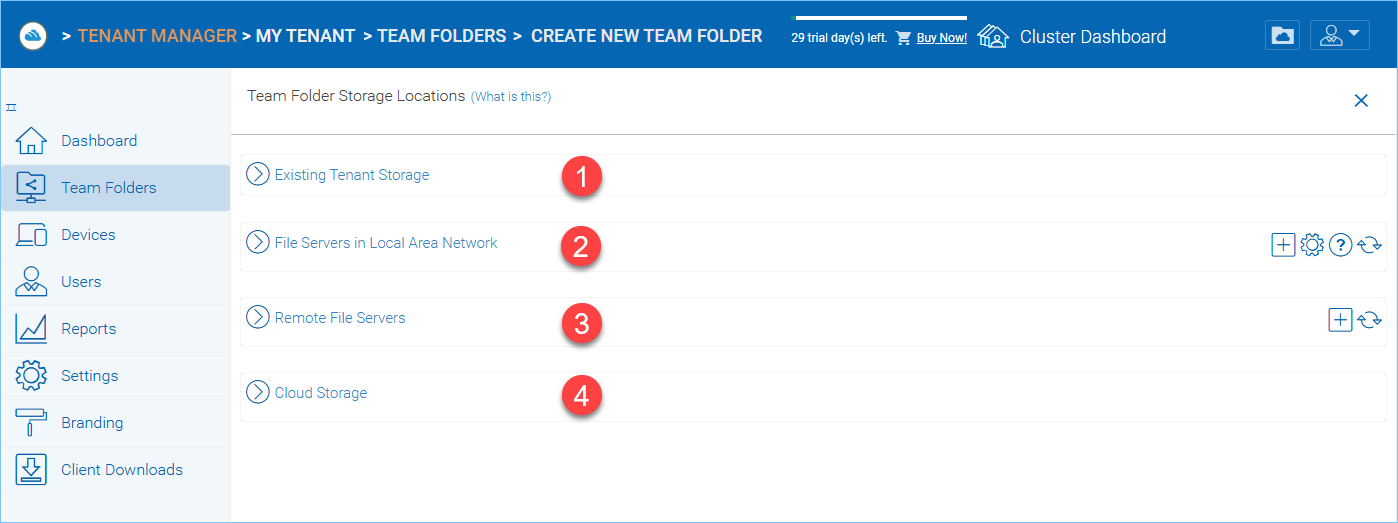
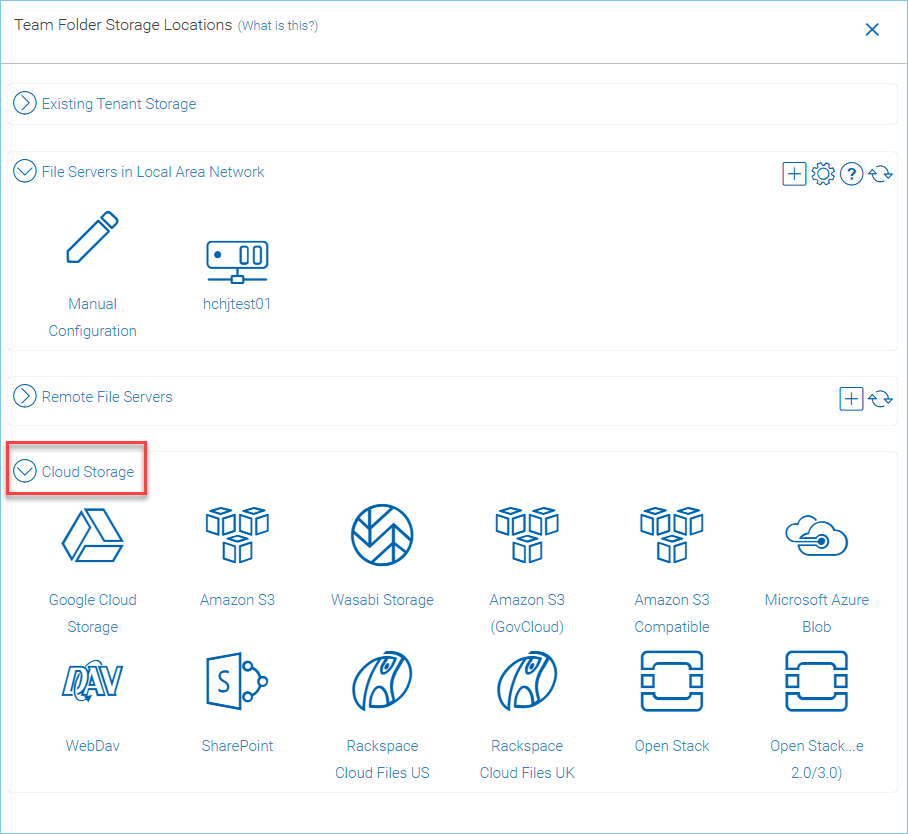
Team Folders (Shared Work Space) are used for team-share collaborations. Generally, Team Folders are converted from File Server Network shares. Other Team Folder sources can be Google Storage, Amazon S3 (or S3 Compatible), Amazon Cloud, Windows Azure Blob, WebDav, SharePoint, Rackspace (US or UK) and OpenStack or you can create new folders under the Tenant’s root storage.
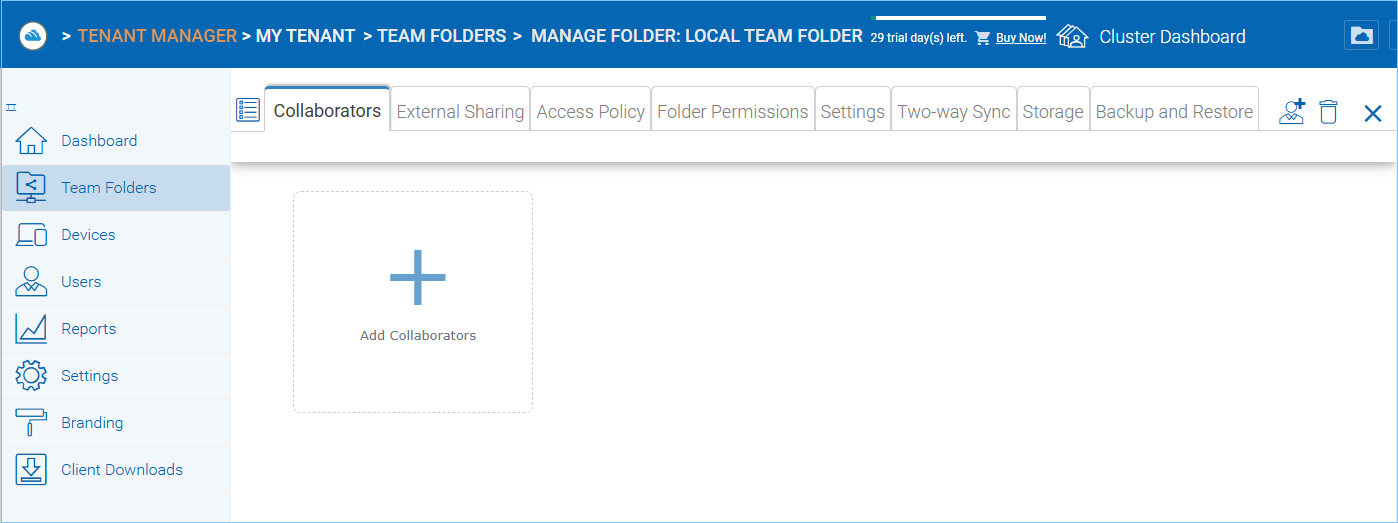
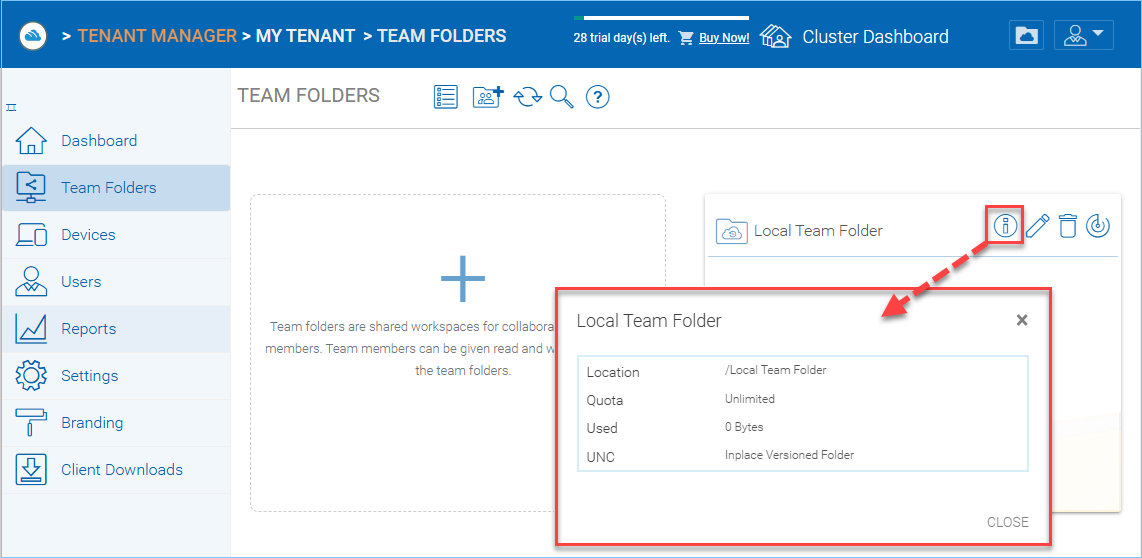
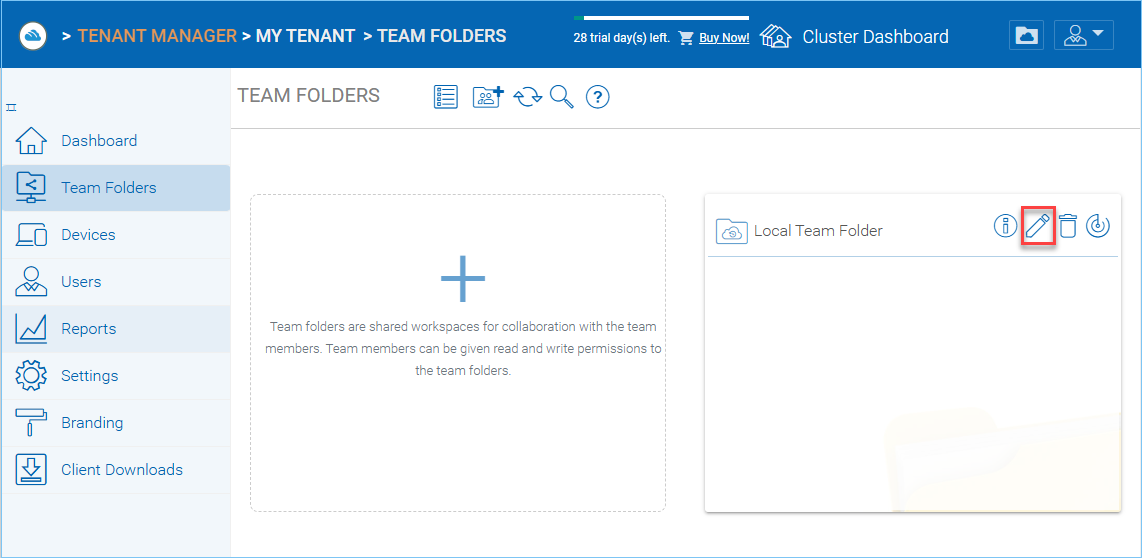
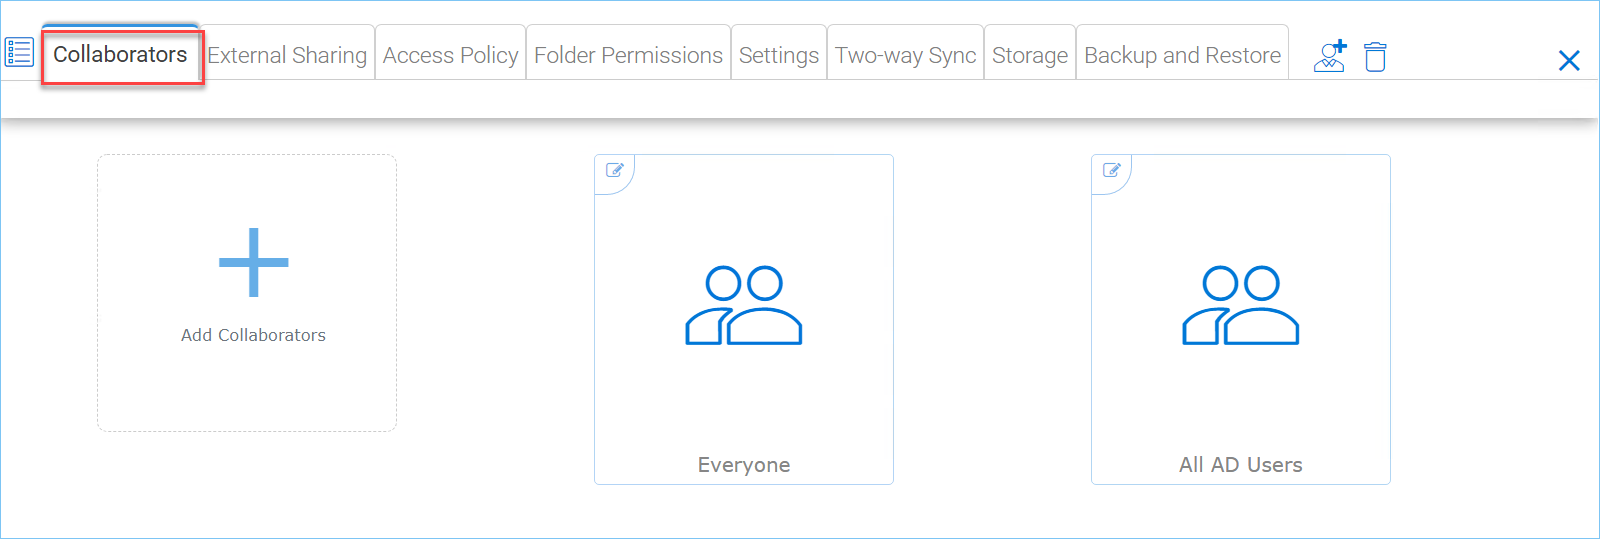
In the “Team Folders” page, you can click “Edit” icon to manage team shares, folder permissions and the underlying storage configuration.
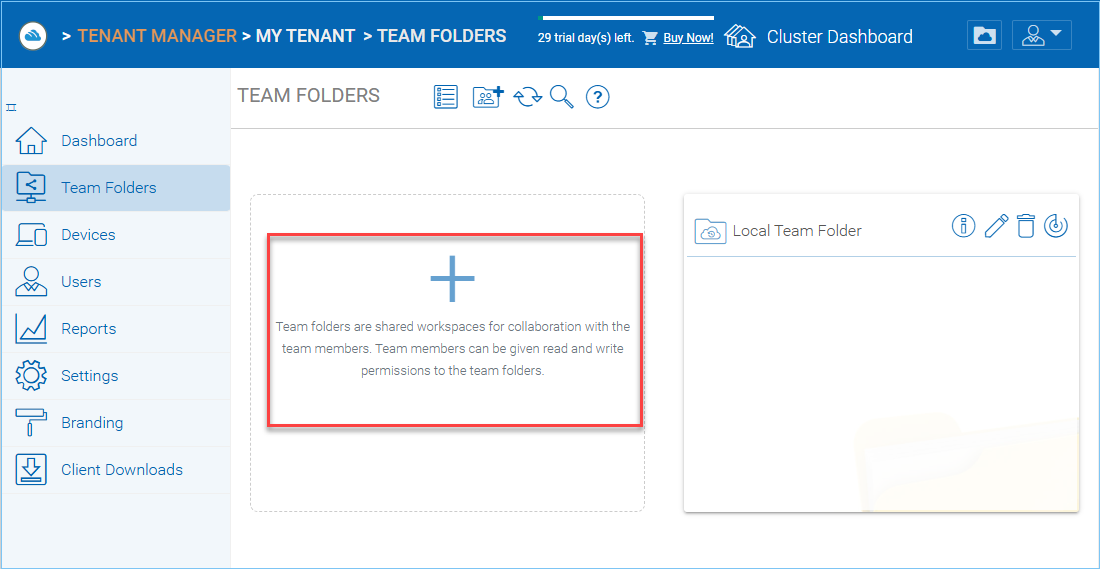
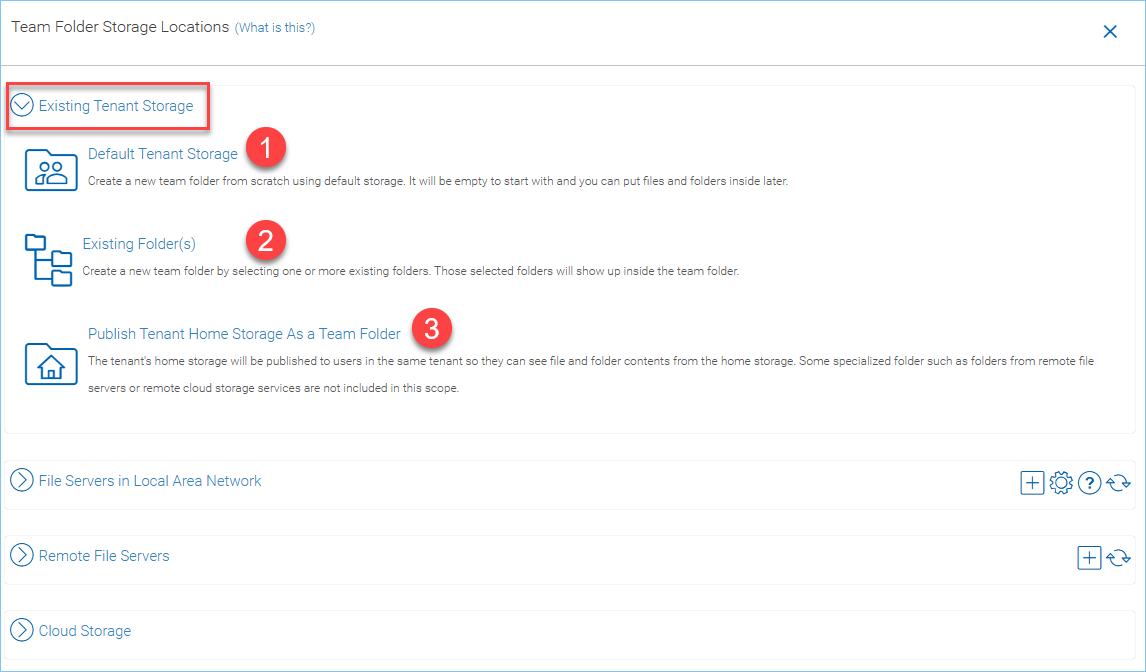
Default Tenant Storage (1): The team folder will be created from the default storage from scratch with an empty team folder. Usually when you want to have a team folder that is brand new and empty, you can pick this option.
Existing Folder(s) (2): You can pick several existing folders, which physically may not be in the same folder, but you can logically arrange them into the same team folder. For example, you may want to have a short term project that put “Building A”, “Blue Print A”, “Budget A”, three different folders from three different places into one logical
Publish Tenant Home Storage As a Team Folder (3): By default, the tenant’s root storage folder is not published to any team user. To use an analogy, it is like a C: drive on a Windows File Server, by default it is not published as a network share to users. However, if you want to make it available to users, you can pick this option.
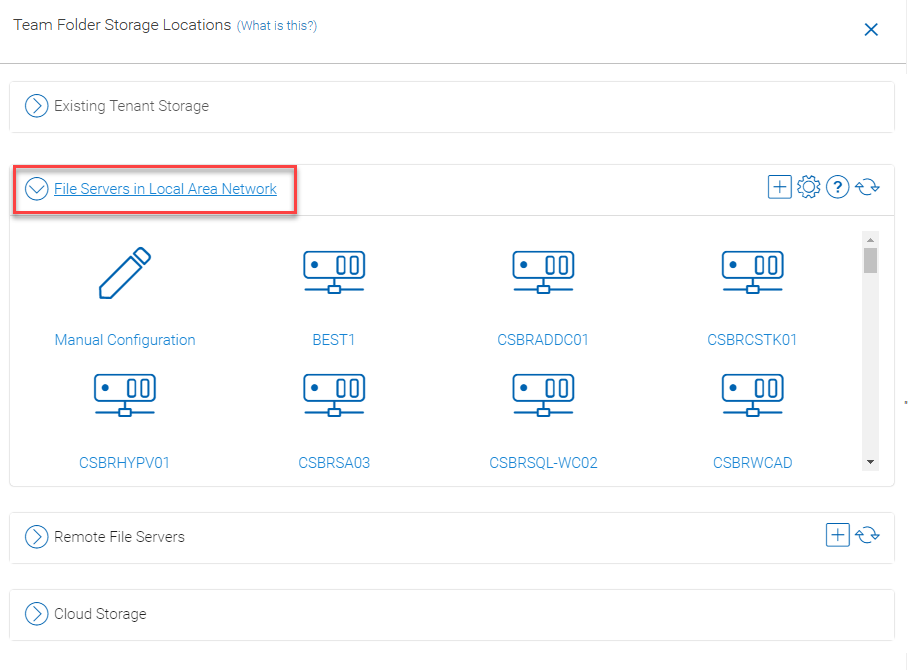
File Servers in Local Area Network
When you have files and folders from the local area network (LAN), you can convert the network share directly into a team folder in the Cluster Server. It is a one-to-one relationship between a team folder and a network share. When you pick this option, most of the time, the Active Directory server for this tenant is also in the same Local Area Network.
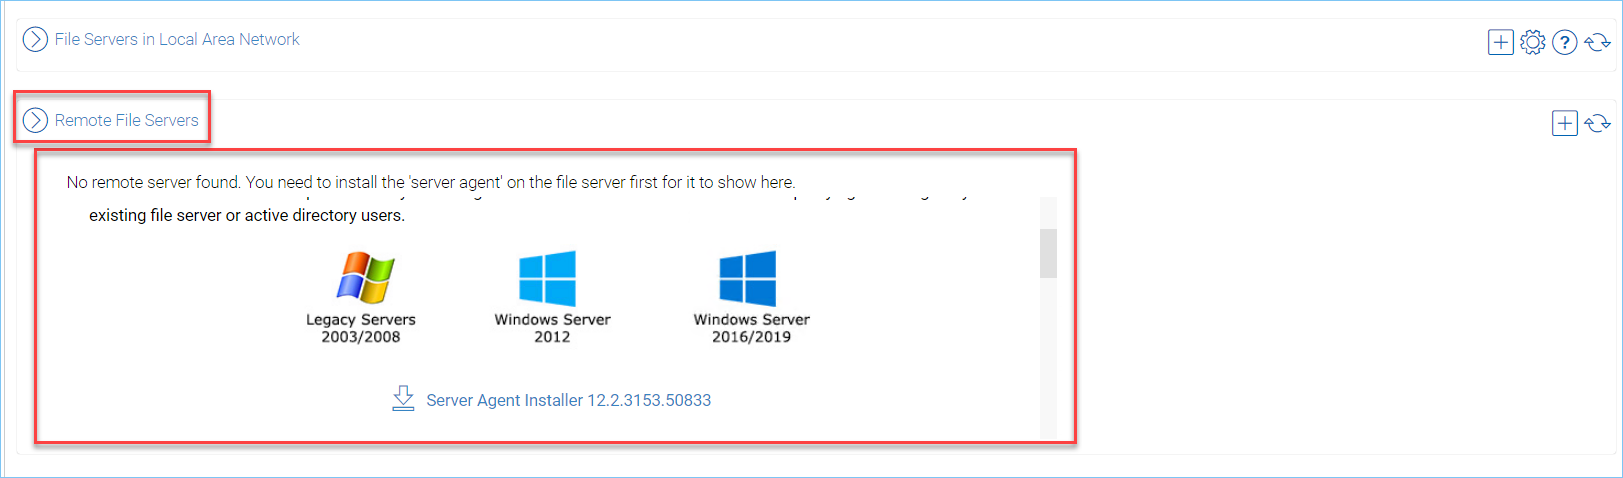
When you have server agents installed on remote file servers, those file servers will be visible and the network shares from remote file servers will be imported to the Cluster Server.
You can also pick Cloud Storage as this team folder’s underlying storage. As shown in the following picture, you can pick Amazon S3, Windows Azure Blob, OpenStack Swift, and other cloud storage services.
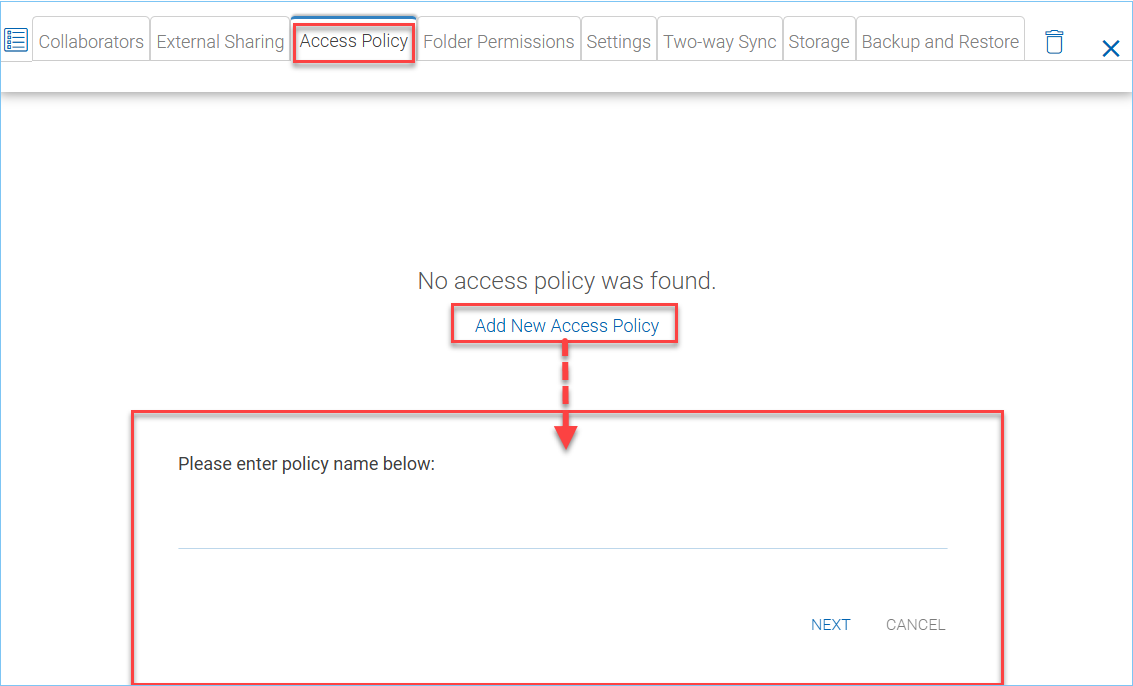
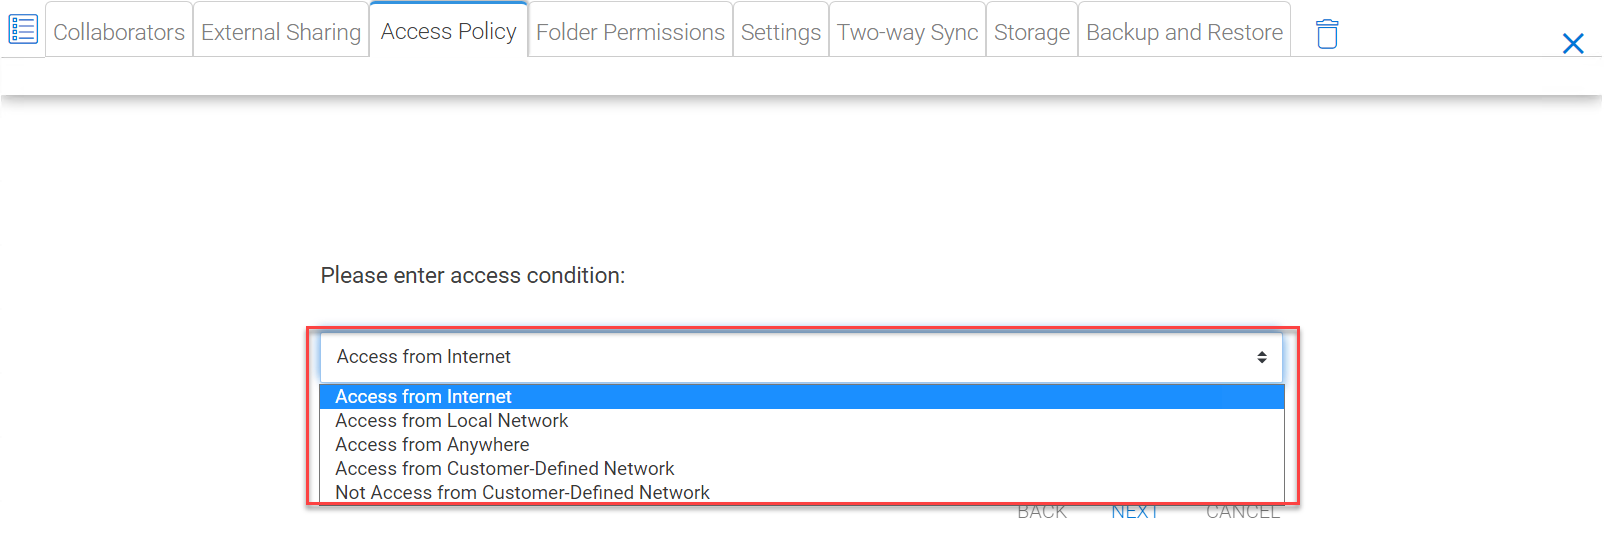
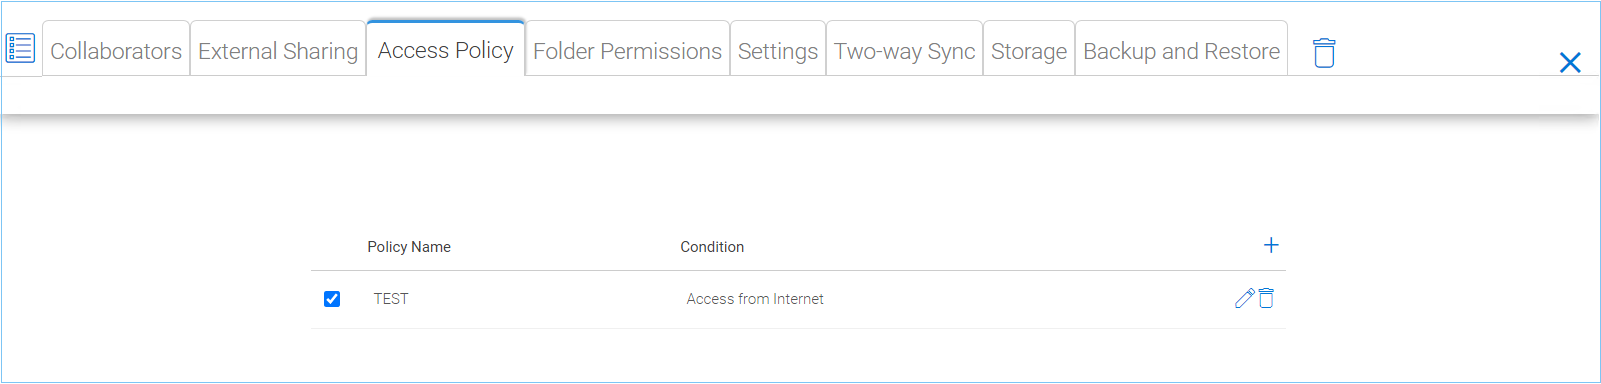
Define customized access policies to restrict and allow access based on the device location. For example, a company can enable access from the internet to only Windows clients and web clients. IT can configure allow or deny client access policies from the following locations:
Access from the internet
Access from local network
Access from Anywhere
Access from customer-defined networks
Deny access from customer defined networks
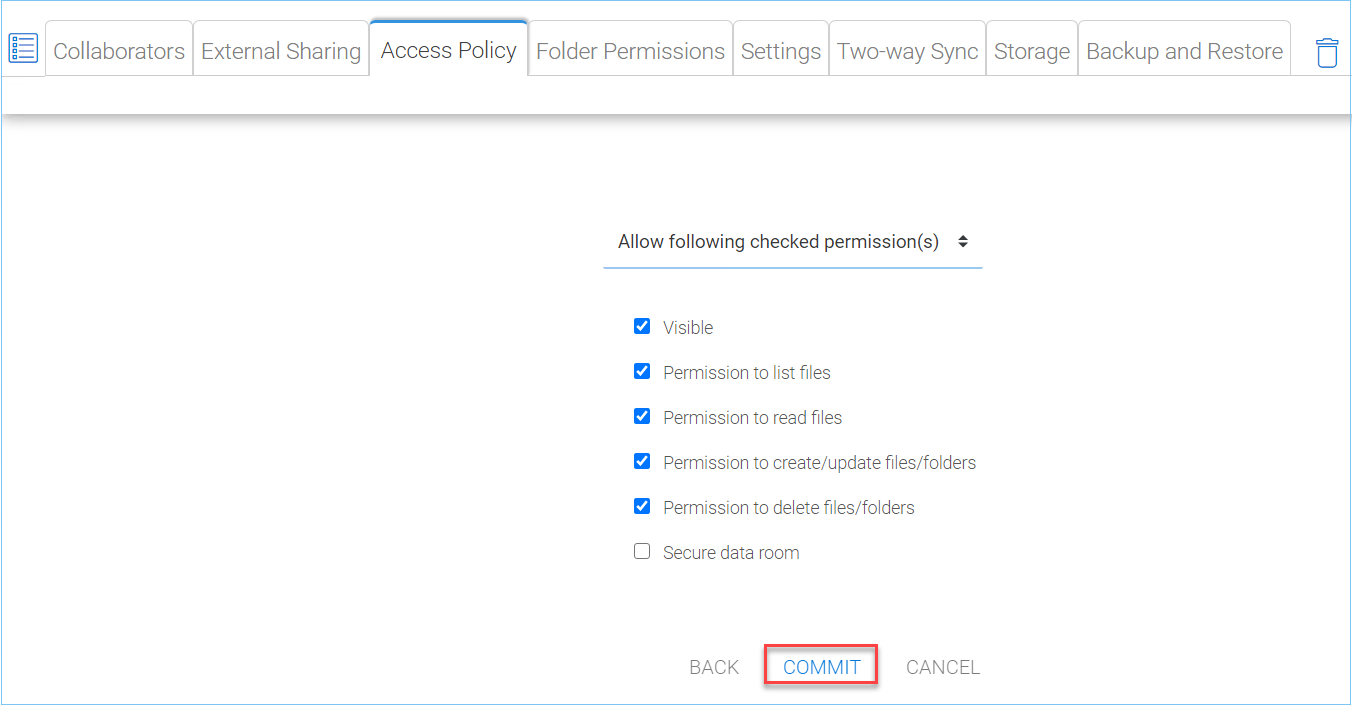
The above allow and deny client access policies can be configured for the following clients:
Web client
Web management
Windows client
Mac client
Mobile client
IT can also prevent data loss and data leakage of important company confidential shares by configuring ‘Share Access Policies’ for external users who are not company employees. Again, IT can configure allow or deny shares access policies from the following locations:
Access from the internet
Access from local network
Access from Anywhere
Access from customer-defined networks
Deny access from customer defined networks
The above allow and deny share access policies can be configured with the following conditions:
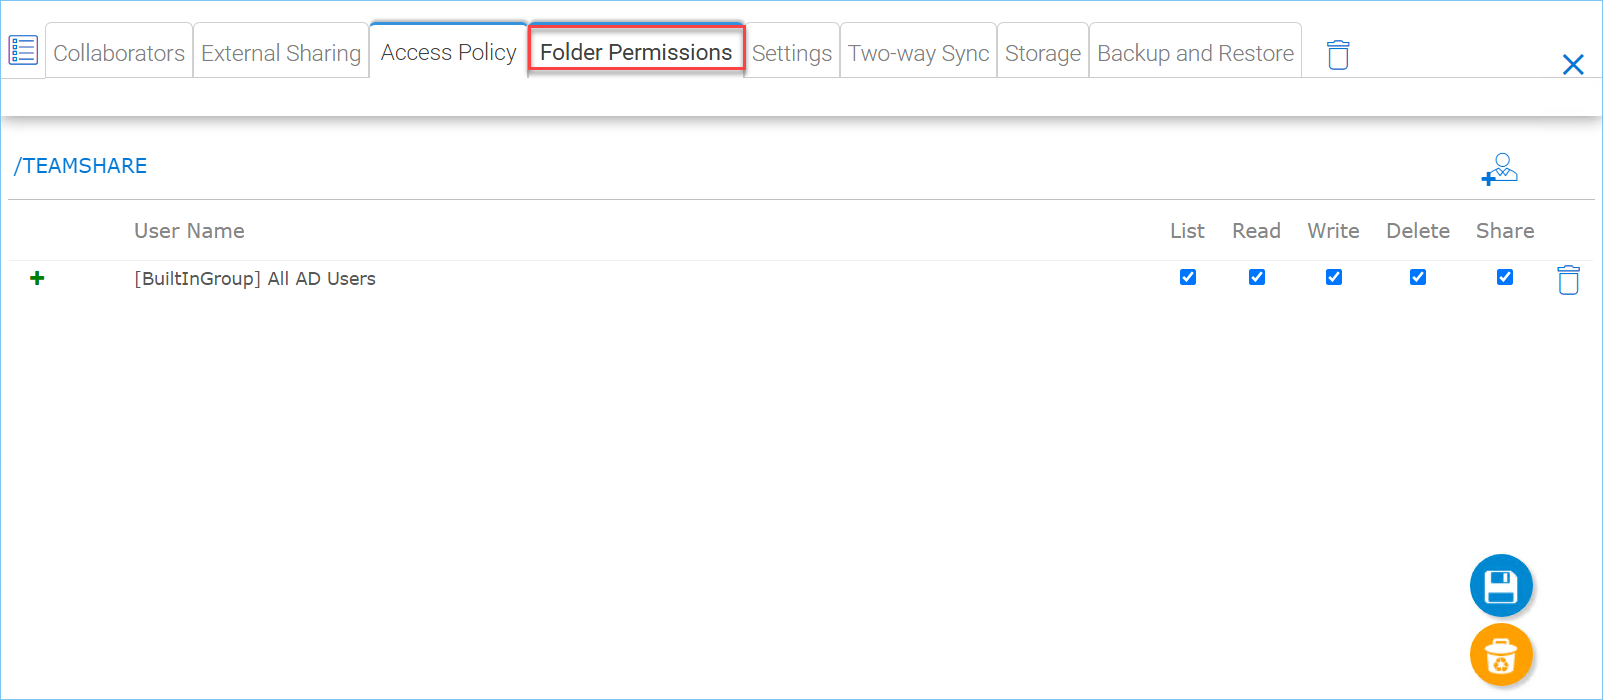
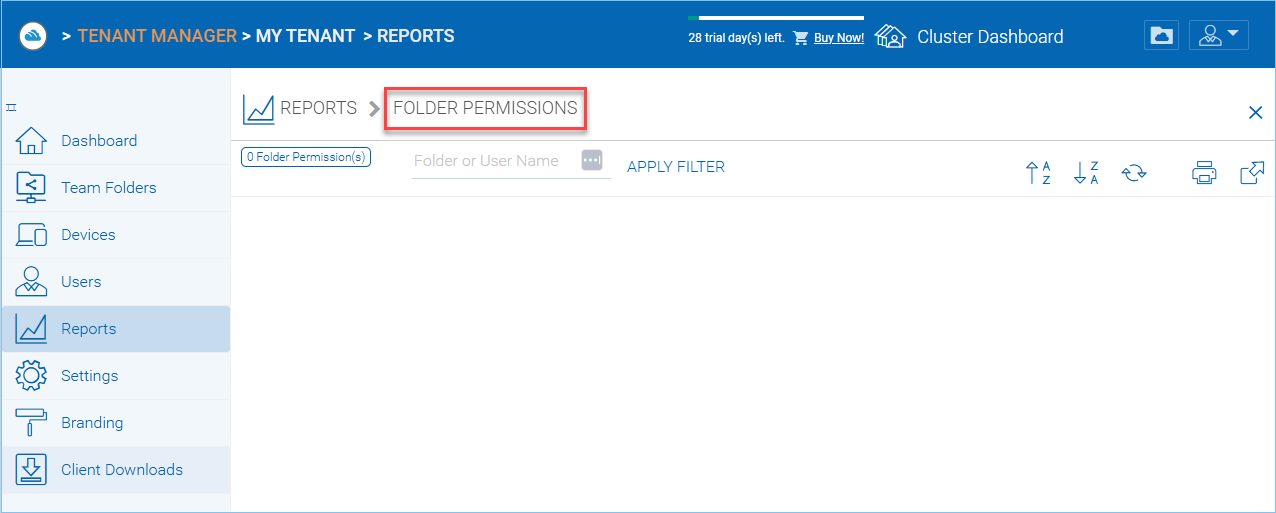
You can browse to different sub-folders and define the folder permission. The folder permissions defined here represent the Cluster Server side of the permission.
If you are leveraging native Active Directory/NTFS permission from a file server, you don’t need to define any permissions here.
Note
You can think of the permissions as two different gates controlling the access to files and folders. The first gate is defined here as the ClusterServerFolderPermission. After this permission check, there is still a check at the file server level (which is the NTFS permission).
In practice, usually it is done one way or the other. If you have decided to use NTFS natively, you can leave the permission settings here empty and not defined.
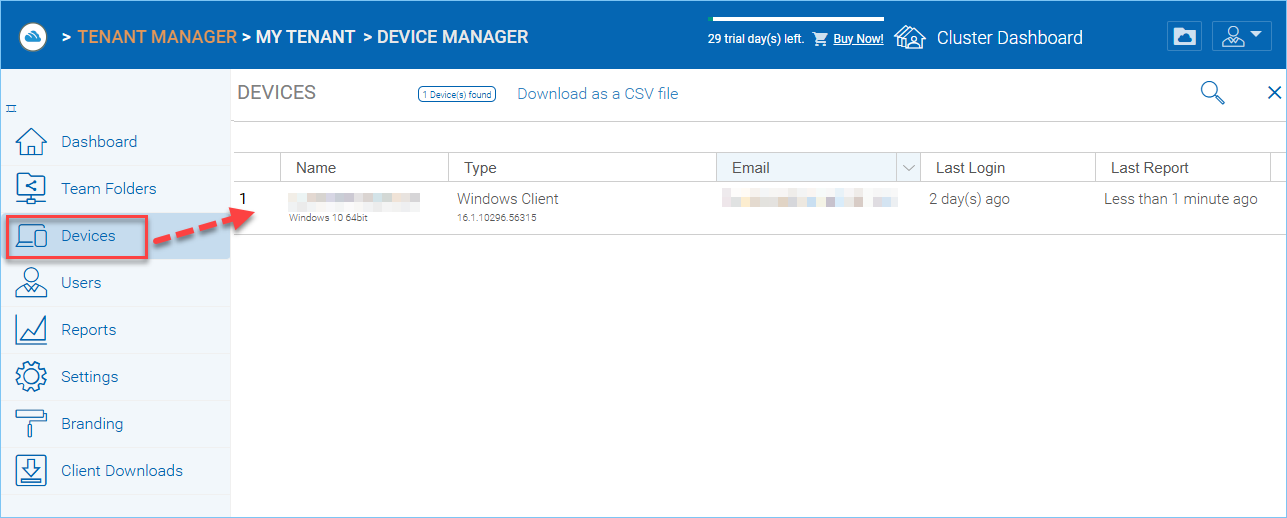
The cluster administrator can look at the devices that have the client agent software installed and connected in the specific tenant.
This feature is used to control BYOD (Bring your own device). For some organization, they want to control who can bring what device into the system. This is the tool to control that and allow/disallow on a device by device basis.
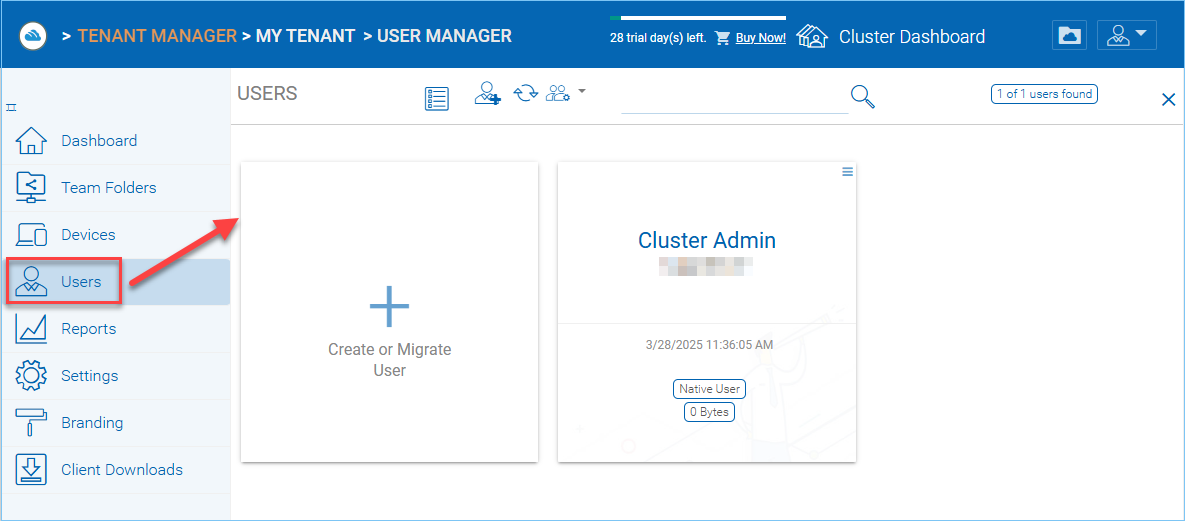
If you have Active Directory, normally these are the users in the Active Directory.
Native User
These are the users that are created manually with an email.
AD User
These are the users that are imported from Active Directory via LDAP.
Proxied AD User
These are the users that are imported from Server Agent, where the file server agent is remote and away from the Cluster Server in the customer’s site. The customer’s Active Directory domain is also remote, and the file server itself (where server agent is installed) is in the
remote Active Directory.
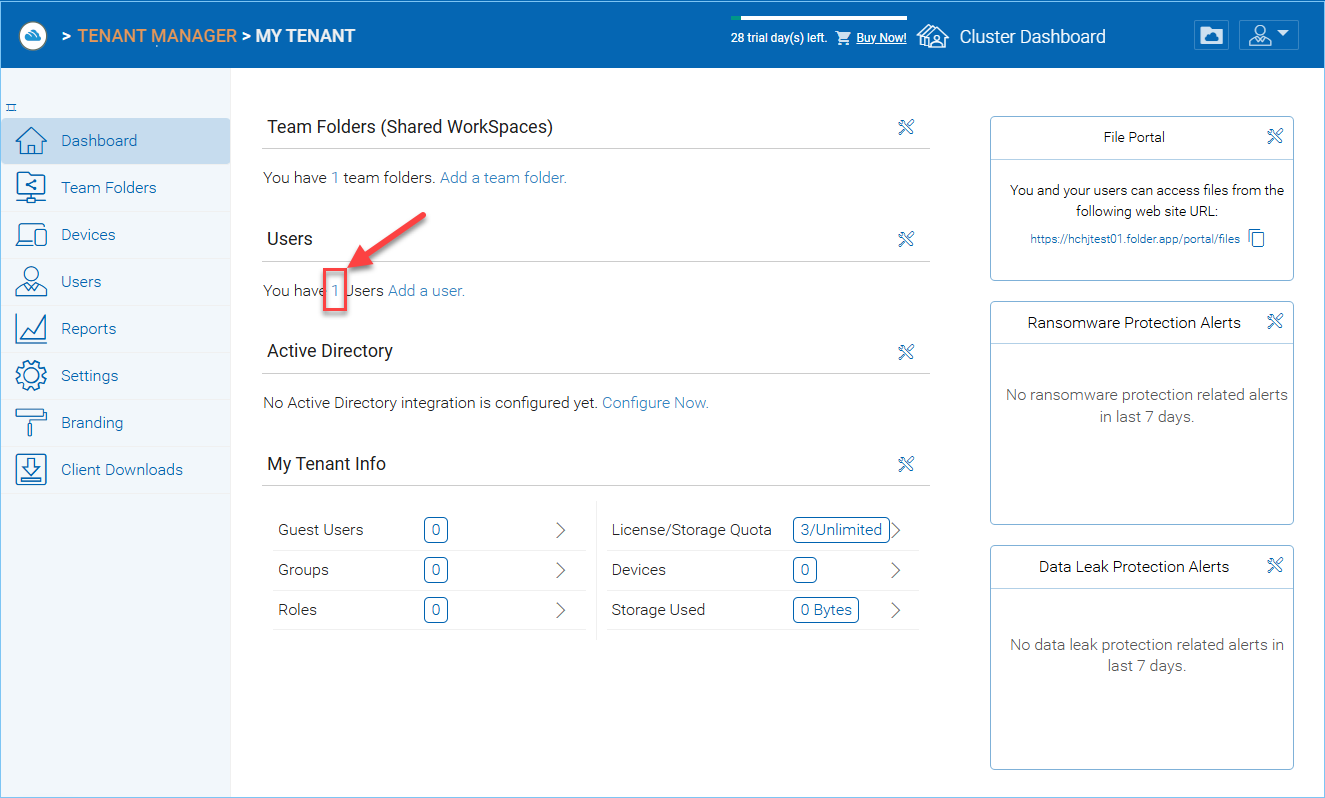
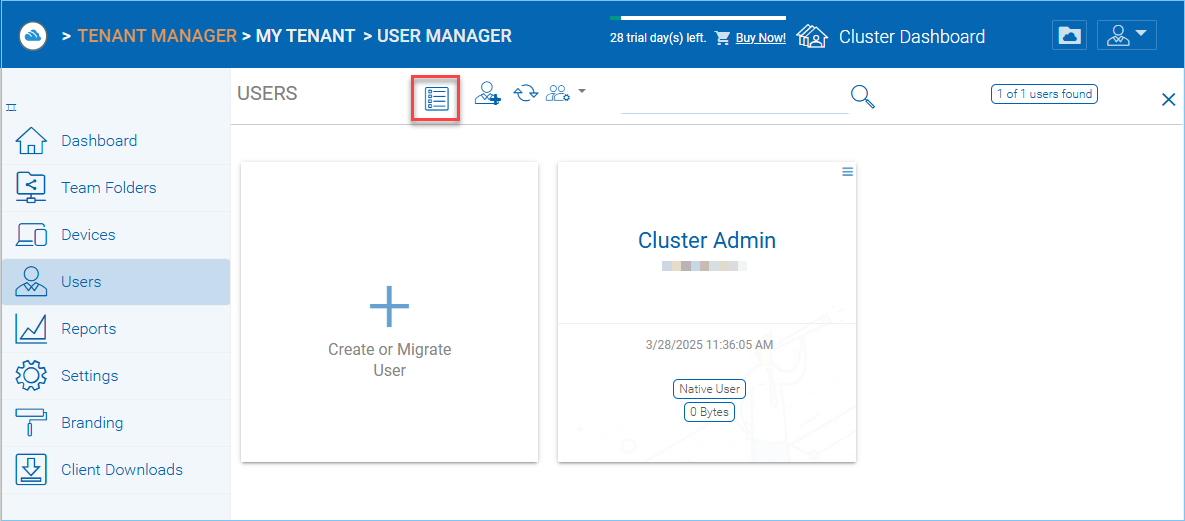
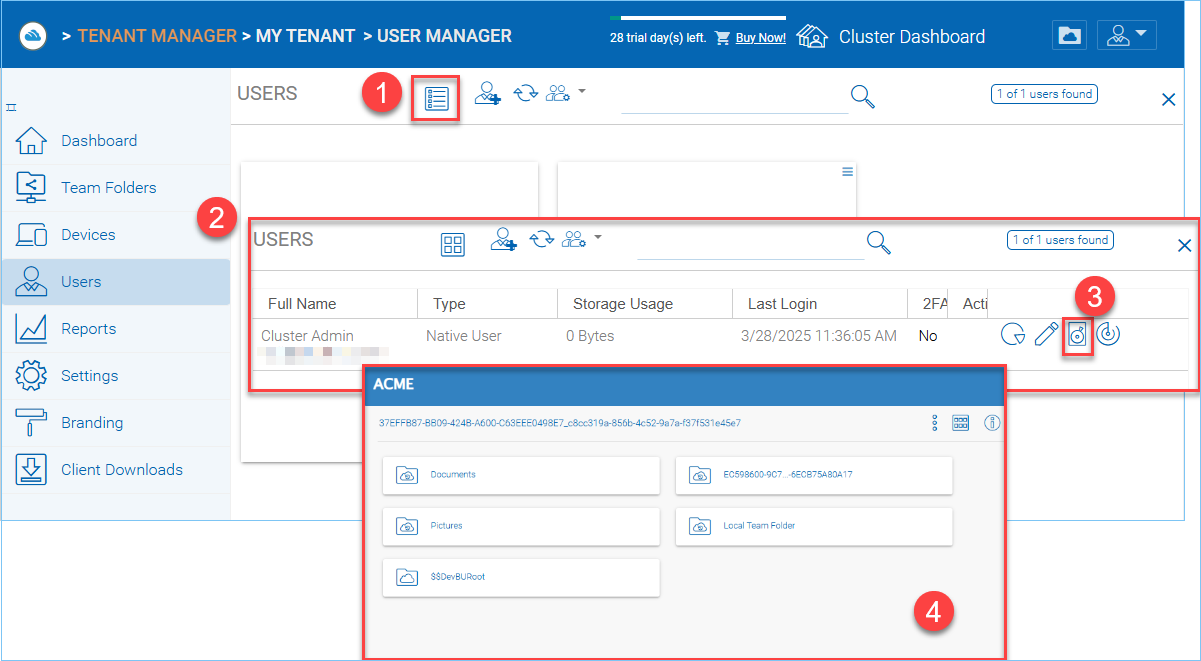
An admin can view a user’s file and folder list using the drive icon (3) for the user in Management ConsoleUser Manager.
First switch the icon view (1) to detail view (2) and click the drive icon (3) next to the user you are examining. This will open a new window (4) where you can view the files.
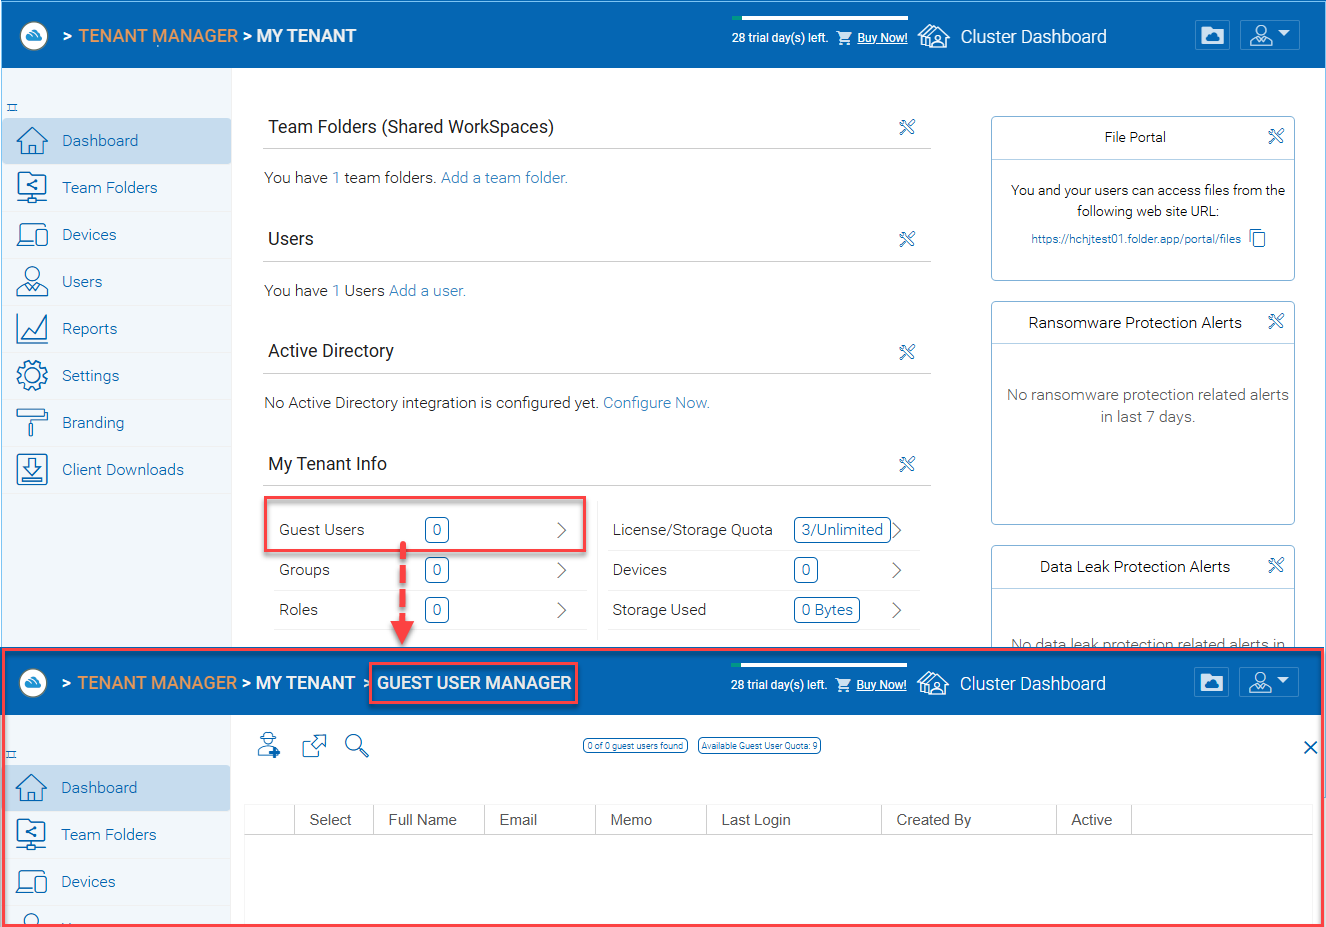
Guest users are users that don’t have a home directory. The only folder they have is “Files Shared with Me”. So they rely on other “Regular User” sharing files and folders with them before they can do anything. If nobody is sharing anything with a guest user, the guest user doesn’t have any read/write permission to any folder.
The primary reason for guest user to exist is to have a secure way for external user to collaborate and edit documents.
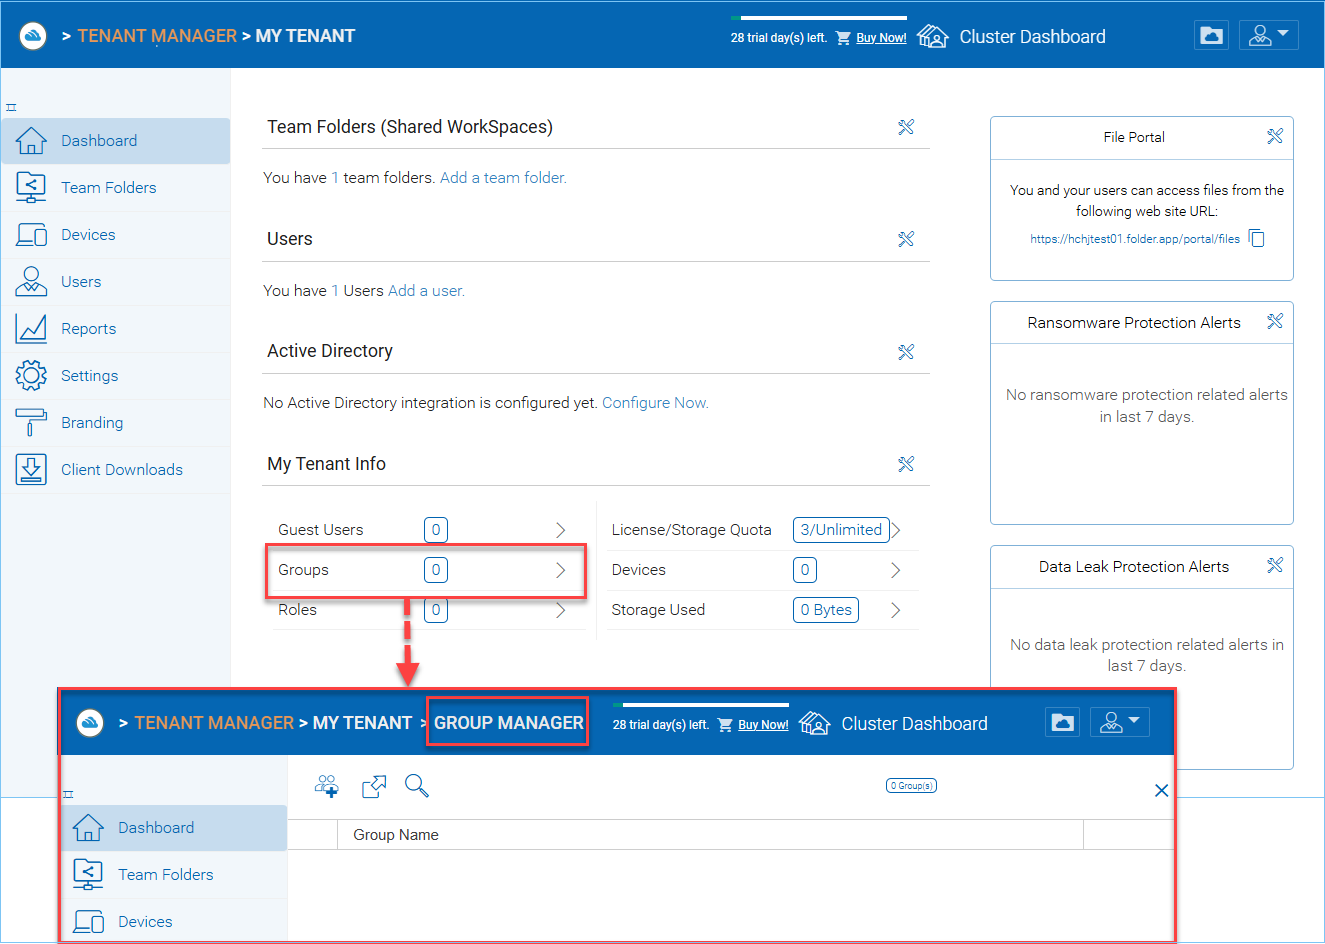
When you have Active Directory integration, you will leverage the Active Directory group instead of using Group Manager here. This group manager is to create a group of users in a simple way. It is not as complicated as Active Directory (such as supporting nested groups) but make it easy for non-Active Directory users. This is native Cluster group. In the product, you may also see AD group from the user selection user interface and Proxied AD group from the user related interface. The AD group and the proxied AD group are not the same as the group mentioned here.
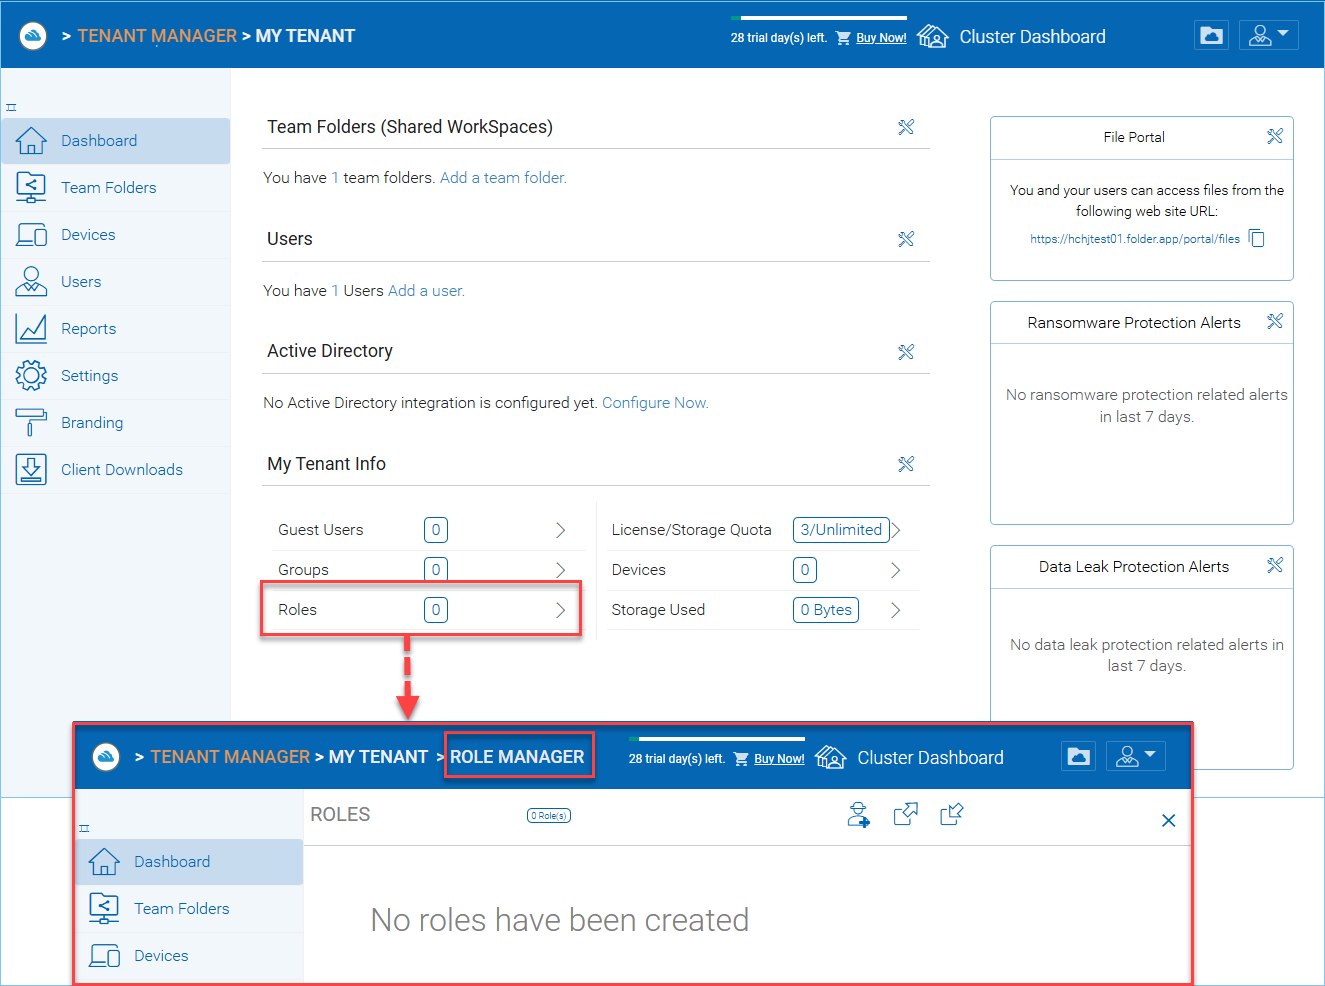
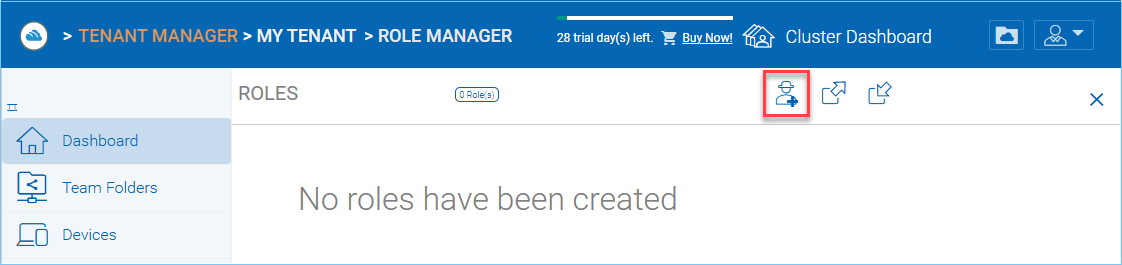
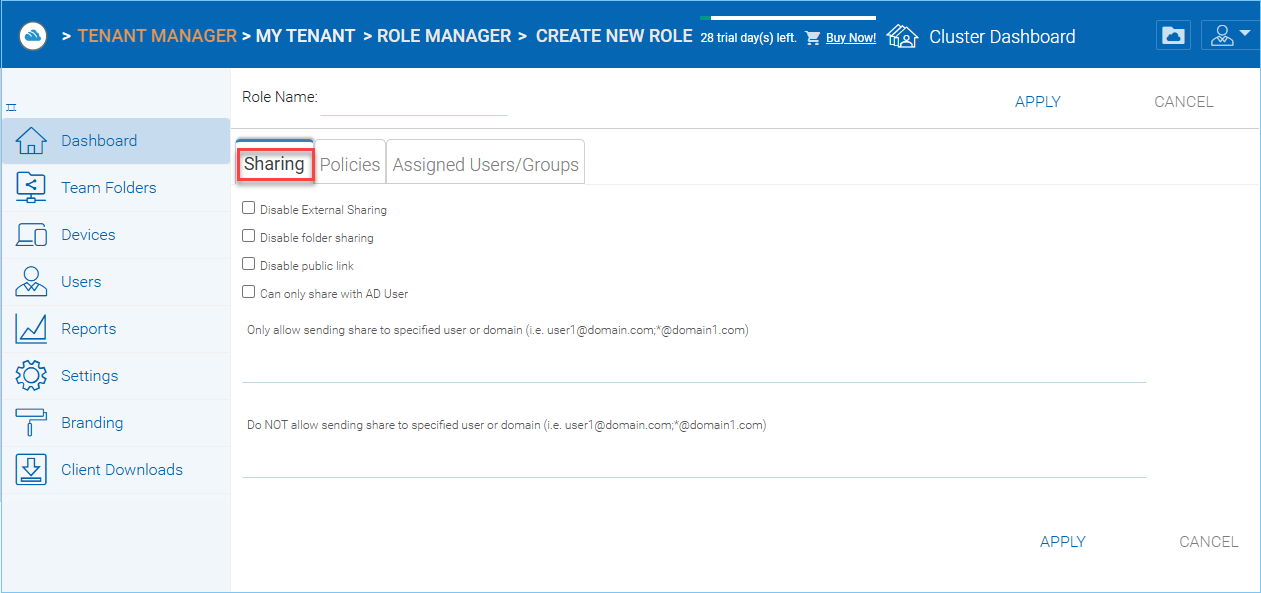
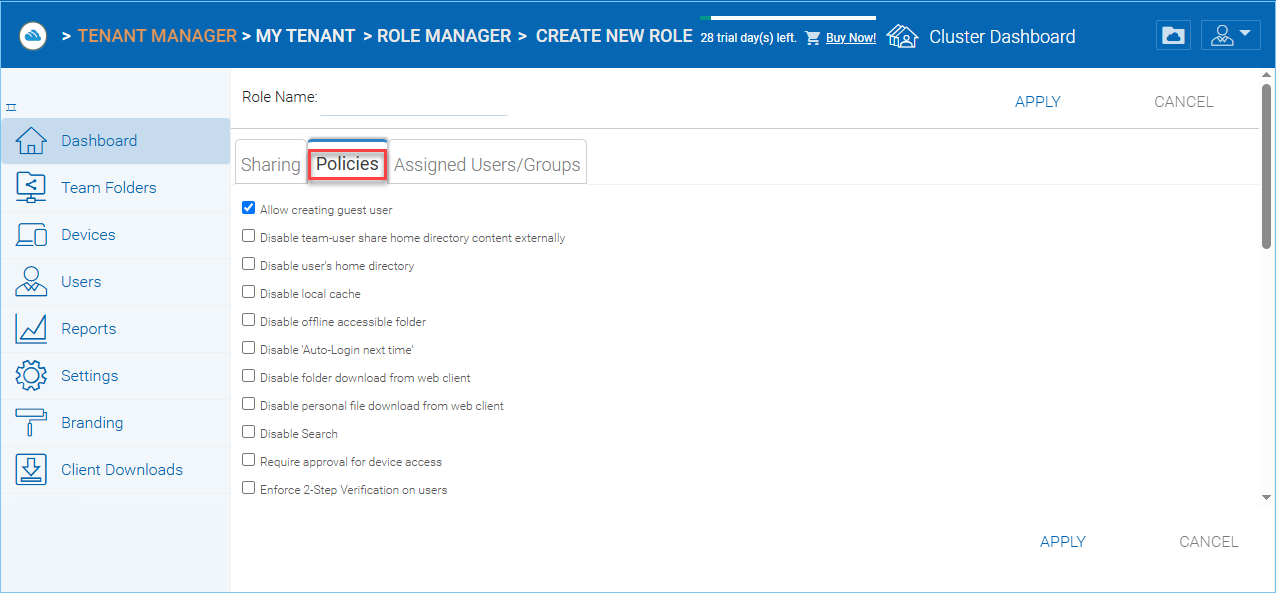
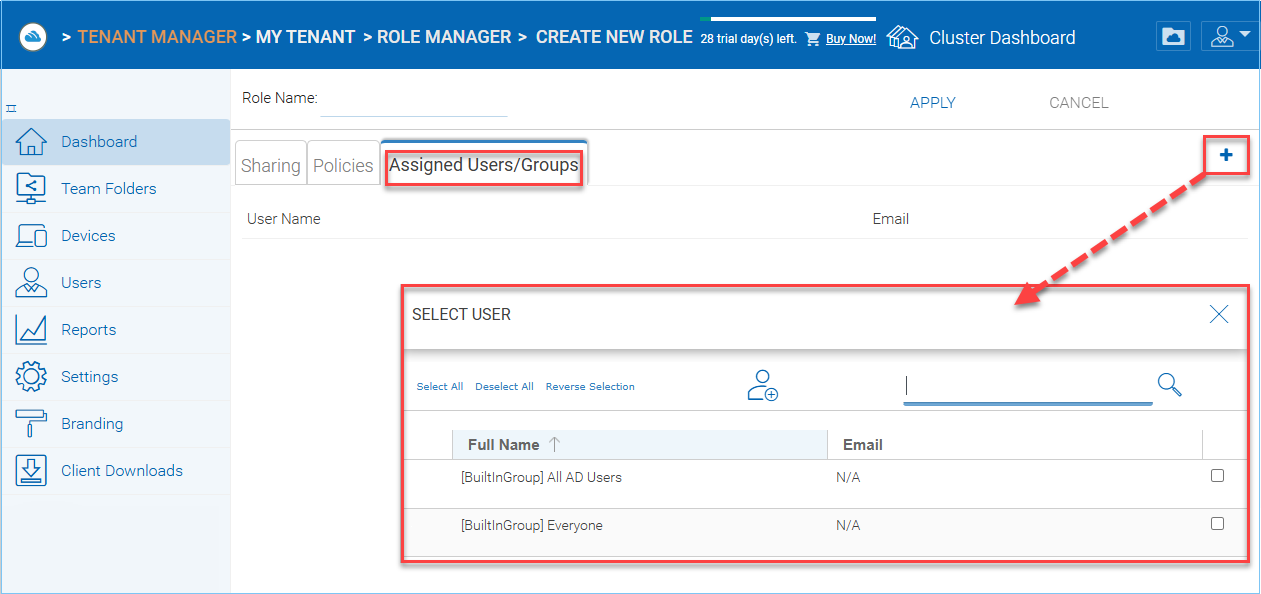
The Role Manager is to provide role based administration. For example, you may want to provide read-only permissions to some users. You can also assign some group policies to some groups of users. More and more policy items are added to the role manager so in addition to only use role manager for administration, it can be also used to define policy items for users.
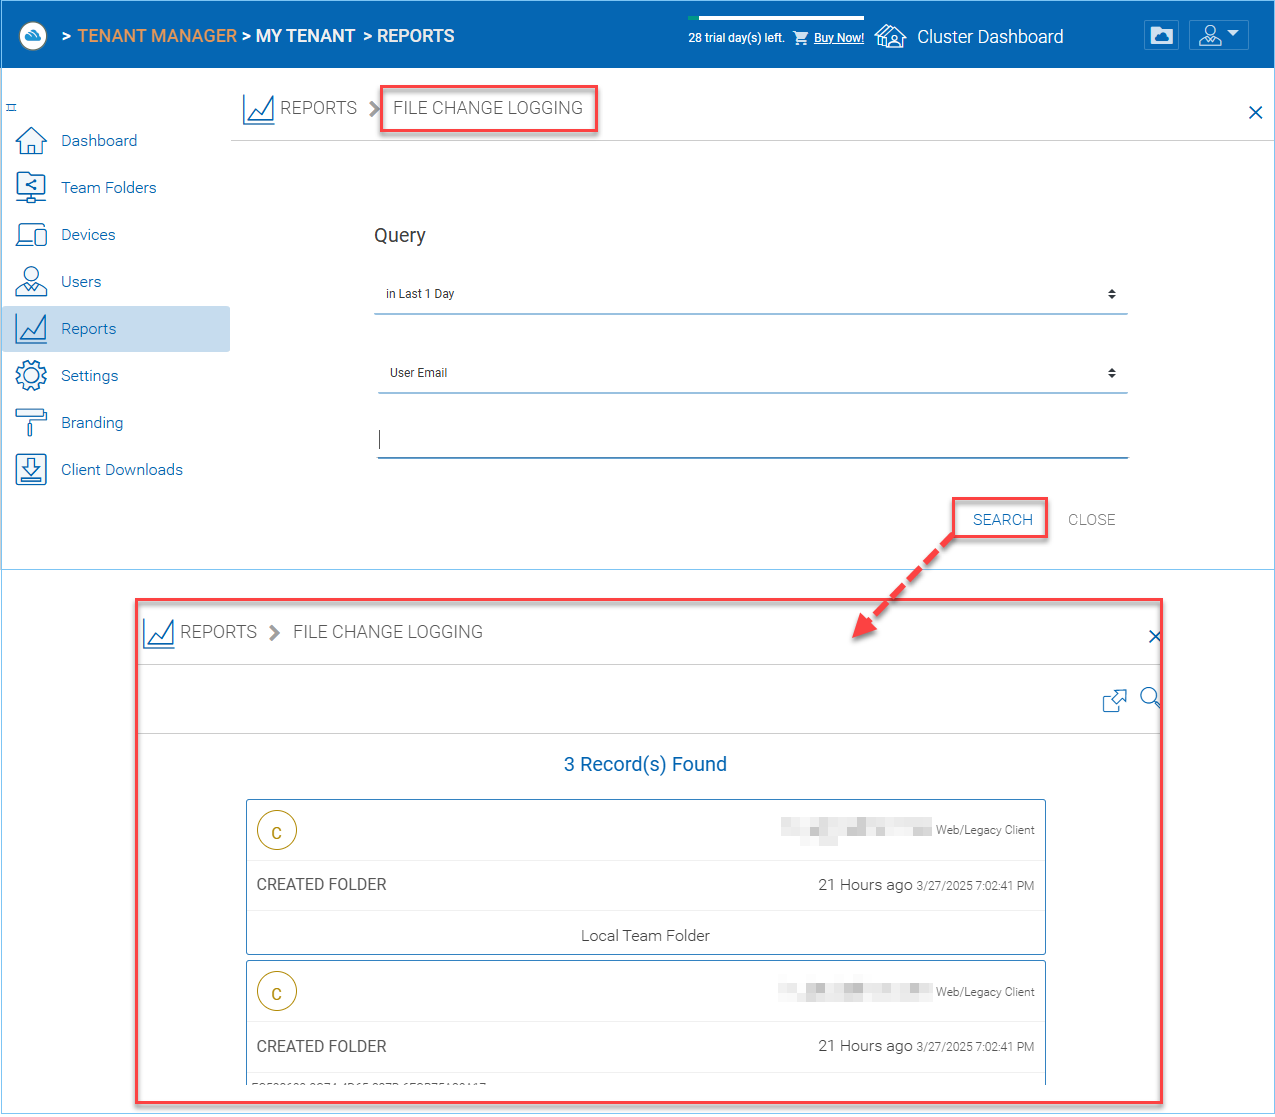
File change log is capable of search for user’s file change history. It is most useful when helping user
troubleshoot issues. For example, you can point to the file change log and say, you deleted this file on this
day.
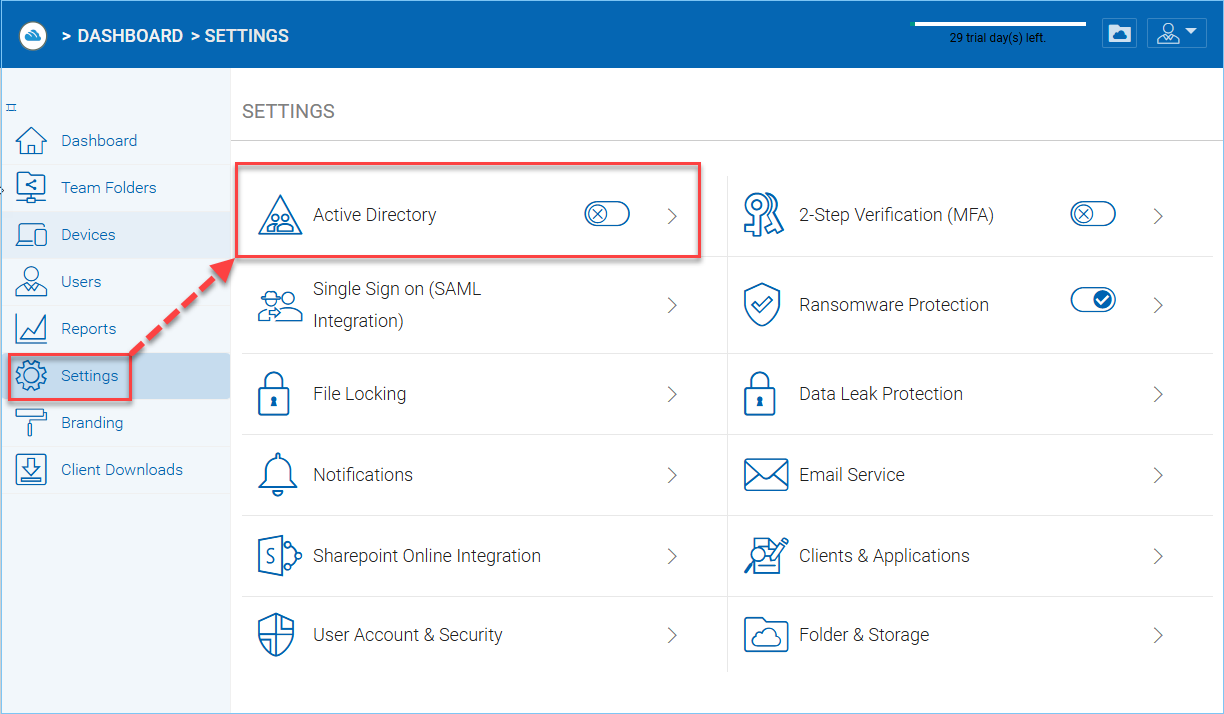
If the tenant’s infrastructure is in the same local area network as the Cluster Server, the Active Directory can be directly accessed and integrated from the “Local Active Directory” page. The integration is done over LDAP protocol.
However, if the tenant’s infrastructure is away from the Cluster Server, it is recommended using “Server Agent” to connect both the tenant’s file server and Active Directory to the Cluster Server.
Tip
If your Active Directory is away from the Cluster Server over the Internet, skip the “Local Active Directory” section but use the “Remote Active Directory” instead.
Use LDAP AD Setting only if the AD is in the same Local Area Network.
Note
The difference between using LDAP to connect Active Directory and using “Server Agent” to connect Active Directory:
By using LDAP to connect Active Directory, the assumption is that the LDAP is local in the local area network so the speed is very fast and also very reliable. So a lot of the calls and queries are directly passing through to Active Directory.
By Using Server Agent to connect Active Directory, the assumption is that the Active Directory is in a remote location and over the Internet so the access speed may not be fast and the Internet may not be 100 percent up and reliable. So the server agent replicates Active Directory related information over to the Cluster Server.
The connection to local active directory is via LDAP over Local Area Network. If the active directory infrastructure is in the same network as the Cluster Server, this is a convenient way to connect to the active directory.
You will check this when you want to integration with Active
Directory.
Note
There are two different ways to integrate with Active Directory. One way is here, using the Lightweight Directory Access Protocol (LDAP) connection. The other way is to leverage the server agent software. The server agent software is capable of connecting a remote Active Directory.
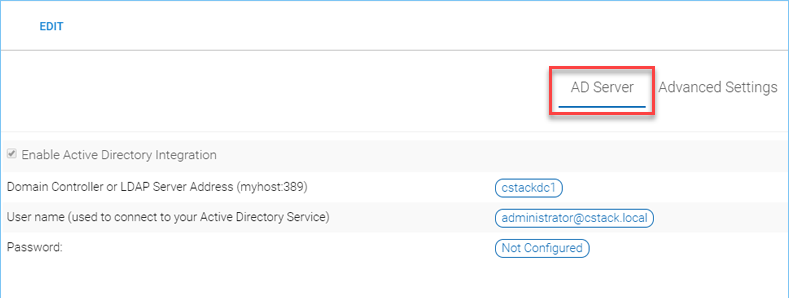
Domain Controller Address
The domain controller’s address, typically in the form of DNS name.
User Name
This is recommended to be a service account (password never expire, account never disable” so the user will be able to query LDAP for users and authenticate users on the login user’s behave.
Password
This is the password for the service account for the “User Name” field.
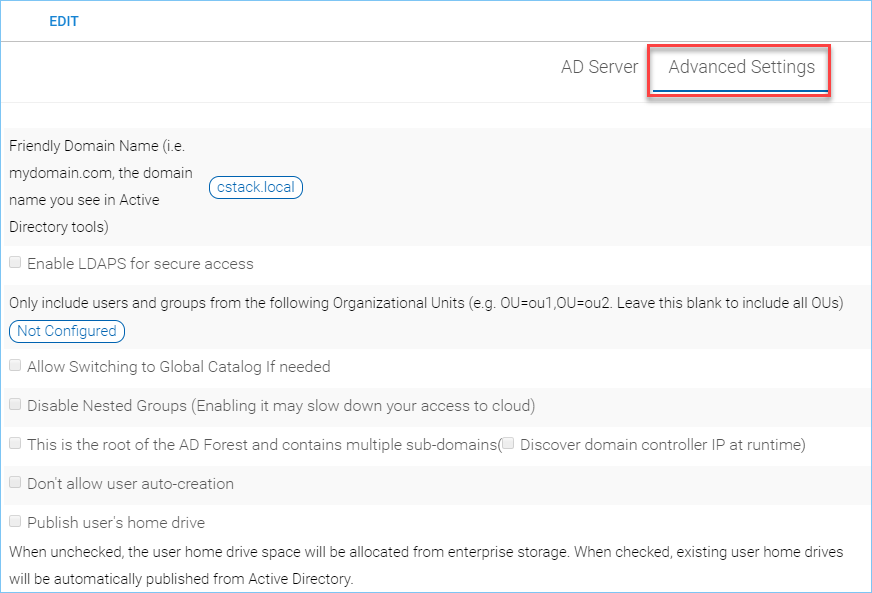
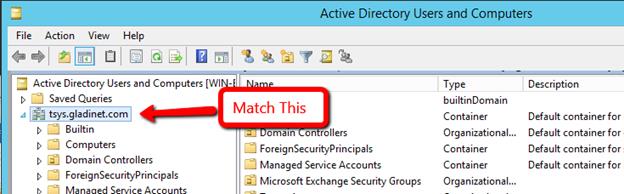
(i.e. mydomain.com, the domain name you see in Active Directory tools) This is typically the domain name you see in the Microsoft Domain and User tool. It needs to be exact match of the domain name. Otherwise, you will see error message about “referral is required” , which translates to the domain controller didn’t match the domain name and need to refer you to somewhere else for another domain name.
Disabled by default. Enable this if you are using SSL security on the domain.
Only include users and groups from the following Organizational Units
(e.g. OU=ou1,OU=ou2. Leave this blank to include all OUs) When you type in the organization unit, you don’t need to type the domain part any more. It just need the Organization Unit part of the string. This is allowed for only single Organization Unit specified in its distinguishedName format without the domain suffix.
Allow Switching to Global Catalog If needed
Disabled by default. For some organization that has multiple domain, sometimes there is a Global Catalog that stores everything inside. This may be required if you have such situation.
Disable Nested Groups
Not checked by default. (Activating this checkbox may slow down your access to cloud) Normally you will activate this option if you have many groups.
This is the root of the AD Forest and contains multiple sub-domains
The Cluster Server supports multiple domains in the same AD forest. You will need to point to the root of the AD and it is capable of finding all the sub-domains if you enable the Discover domain controller IP at runtime sub-opion.
Don’t allow user auto-creation
By default, the Enterprise package is capable of creating users upon first login into the web portal. However, for big enterprise, they may want to control the pace of adding users to the system so they will disable this feature.
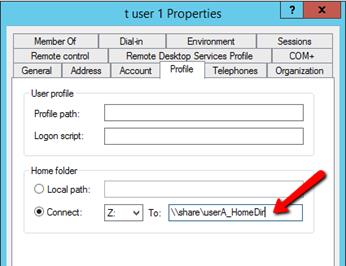
Publish user’s home drive
When unchecked (default), the user home drive space will be allocated from enterprise storage. When checked, existing user home drives will be automatically published from Active Directory.
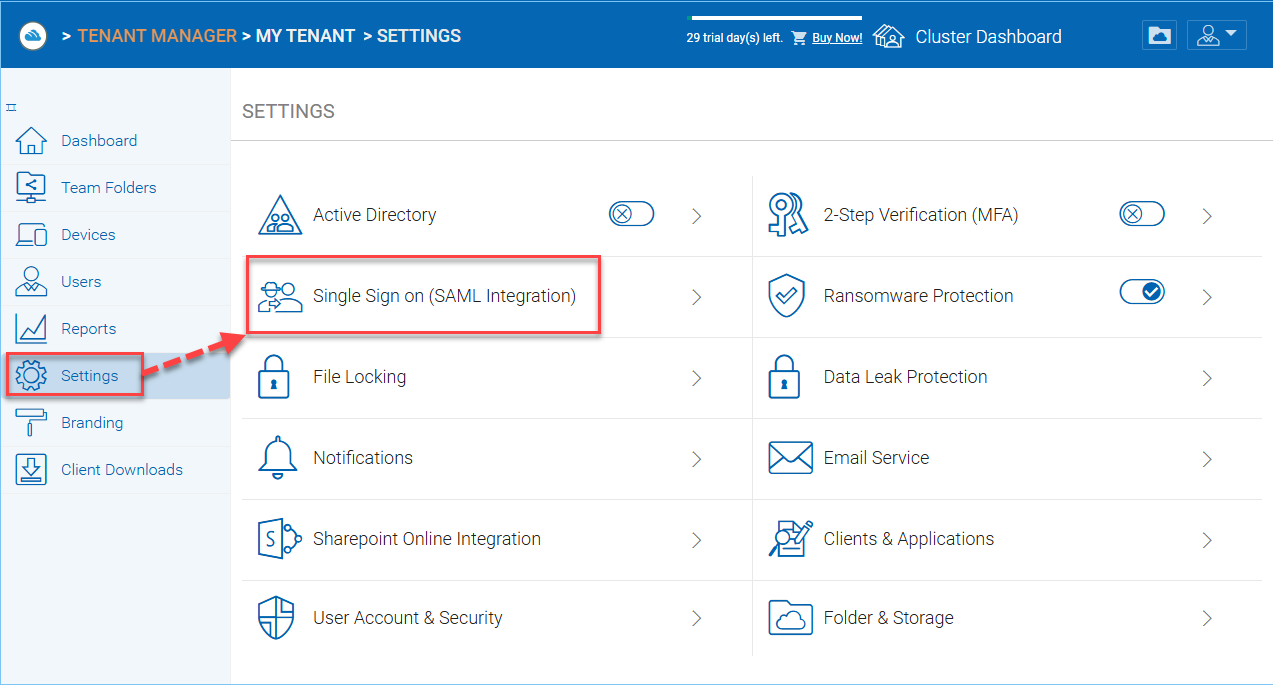
Single Sign-On is available using SAML authentication.
When it comes to Single Sign-On support via SAML, there are always two parties.
One is the IdP (the identity provider)
and the other is SP (service provider)
A user will be registered with the identity provider and use the service from service provider.
The setup here is to allow service provider (the Cluster Server) to use an identity provider.
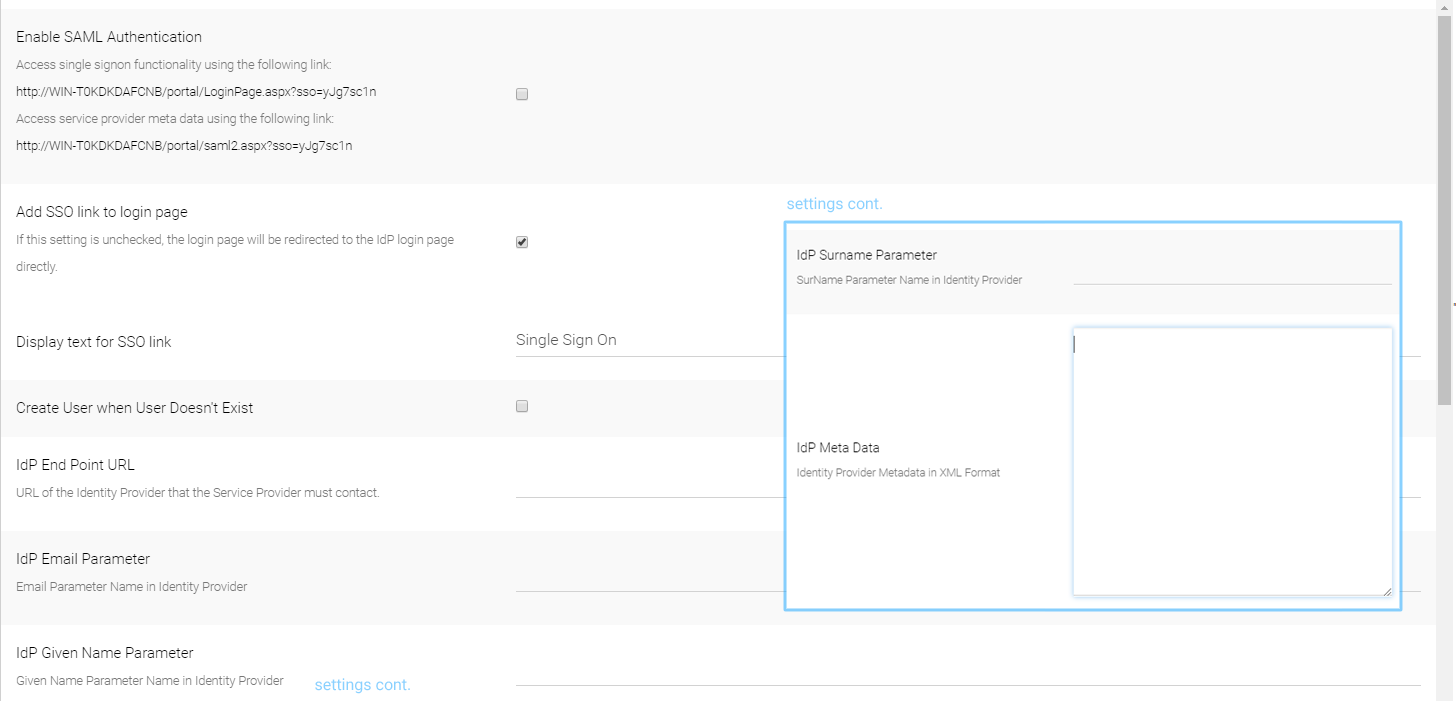
The SAML single sign on setup is mostly about matching parameters from the identity provider to the identity consumer (service provider).
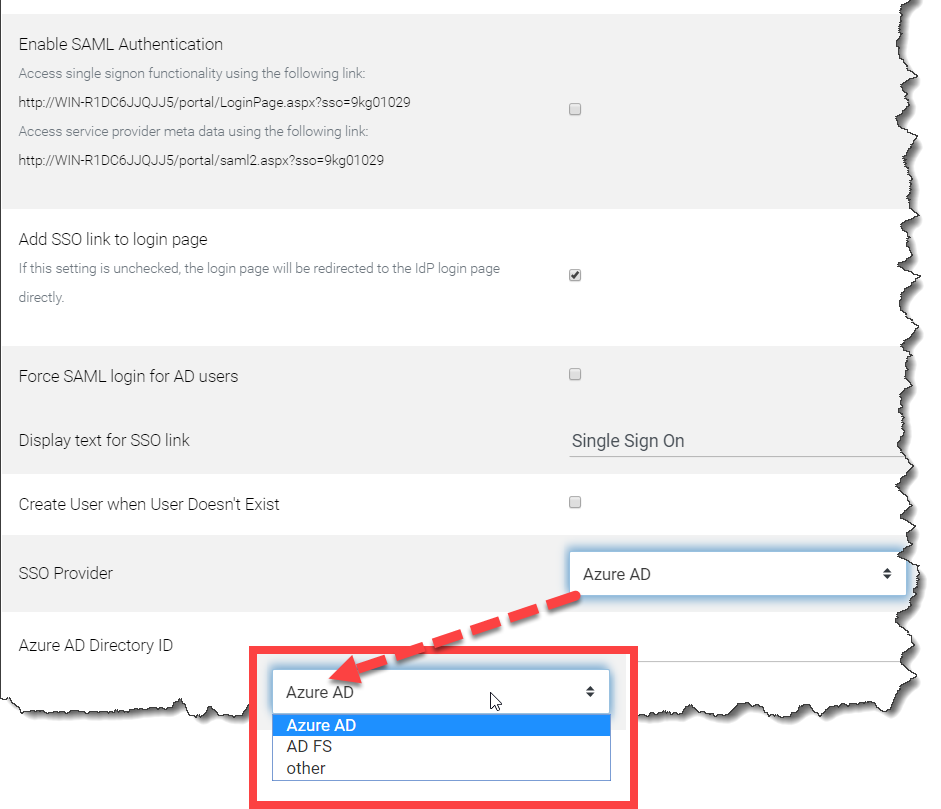
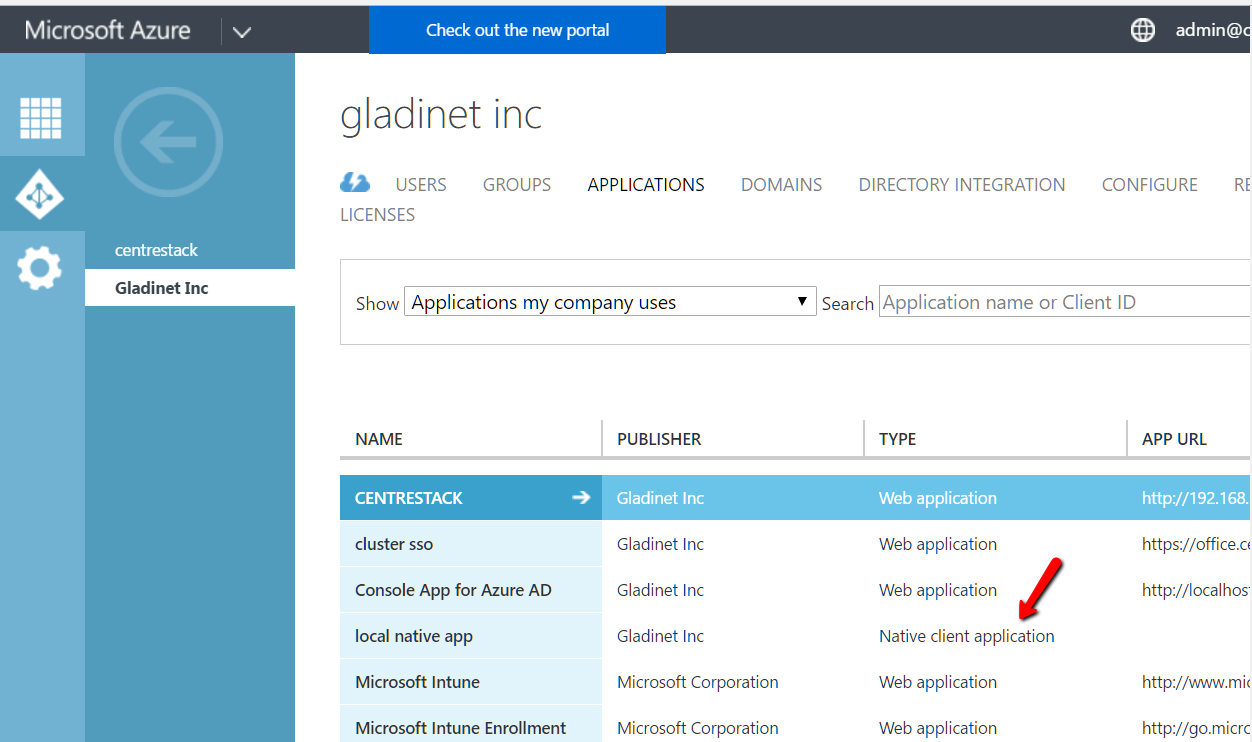
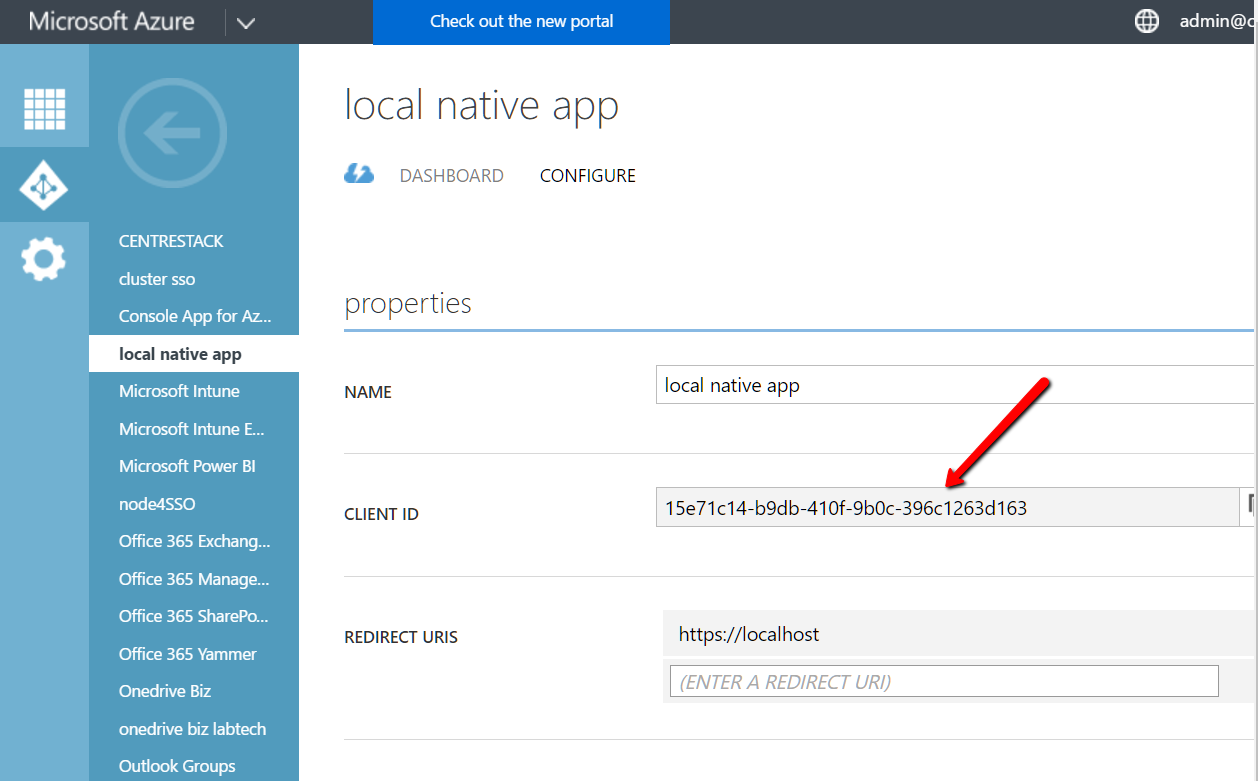
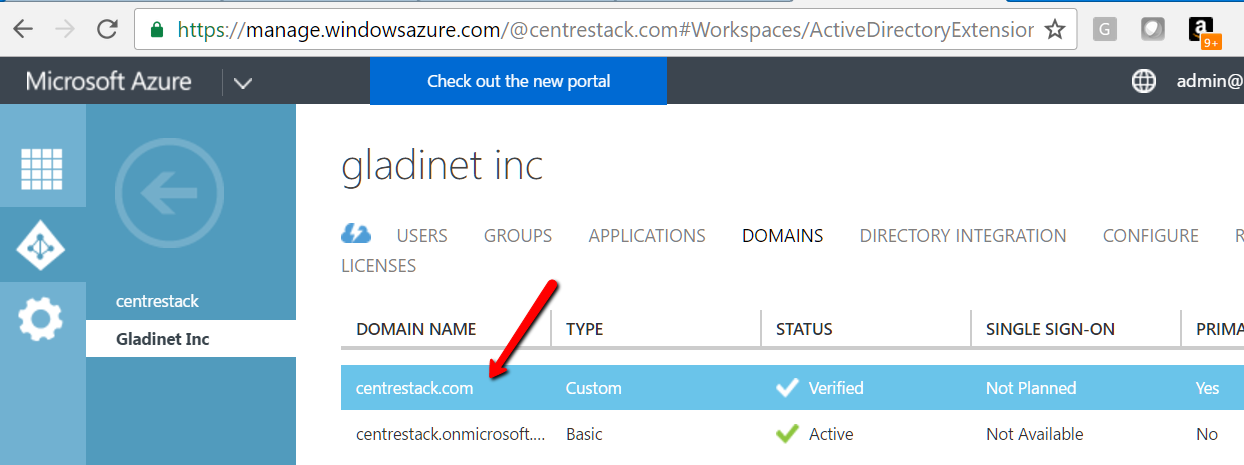
As shown in the screen capture, There are three types of identity provider, “Azure AD” , “AD FS” , and “others (generic)” that
pretty much covers the most used ones and the most generic ones.
Others (Generic SAML)
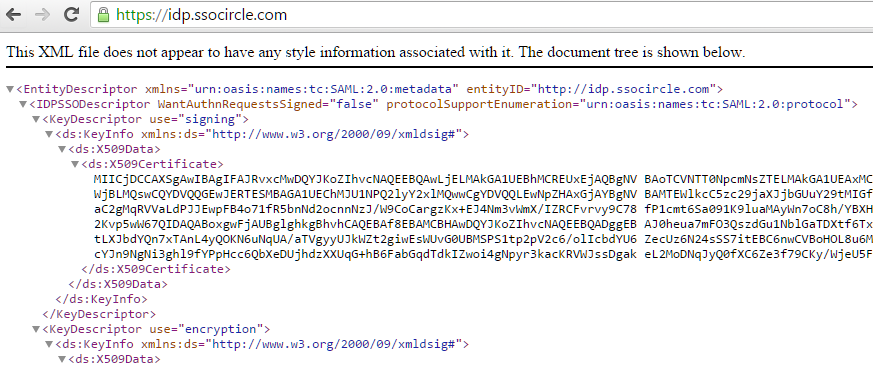
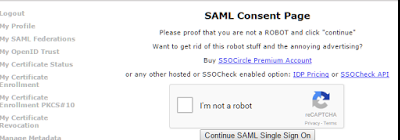
Here, The IdP will be a public IdP such as SSOCircle and the SP will be the Cluster Server. The SSOCircle is used as an example to set up the IdP;
it can work with other IdP as well.
In a multi-tenant Cluster Server deployment each tenant may want to have its own SSO service. Therefore, the Single Sign On is a per-tenant setting.
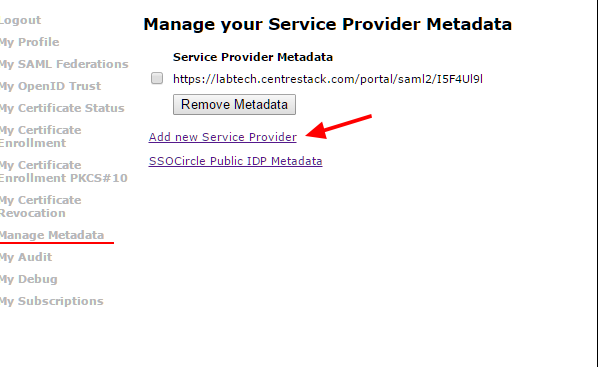
Step 1: Register the Cluster Server at IdP
IdP will need to register the Cluster Server as a service provider (SP) by importing the SP’s meta data. You will find the Cluster’s metadata at the following location (per-tenant setting).
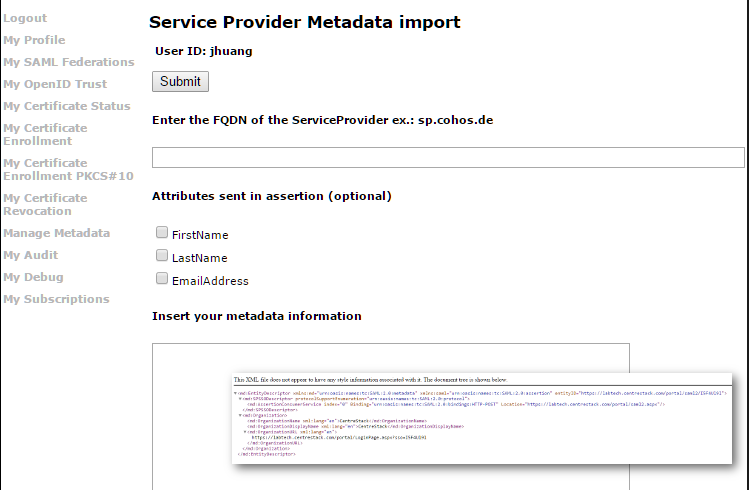
In the next screen we can paste in the xml from the Cluster side, set the FQDN to the URL contained within the XML, and check the 3 parameters,
the FirstName, LastName and Email.
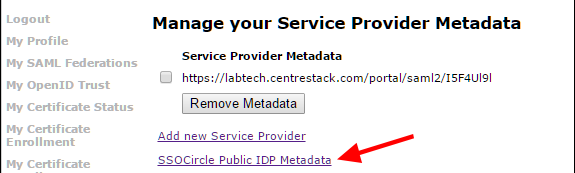
Inside the meta data from SSOCircle, you will see there is a HTTP-Redirect URL, that will be the URL we use to register the IdP.
And also register the 3 parameters (FirstName, LastName, EmailAddress) from the IdP.
As the summary, the IdP and SP register each other’s meta data, register each other’s URL and parameters.
After that, it will be single signon at the IdP side. The login will be at the IdP side, and after login,
it will redirect back to the SP side.
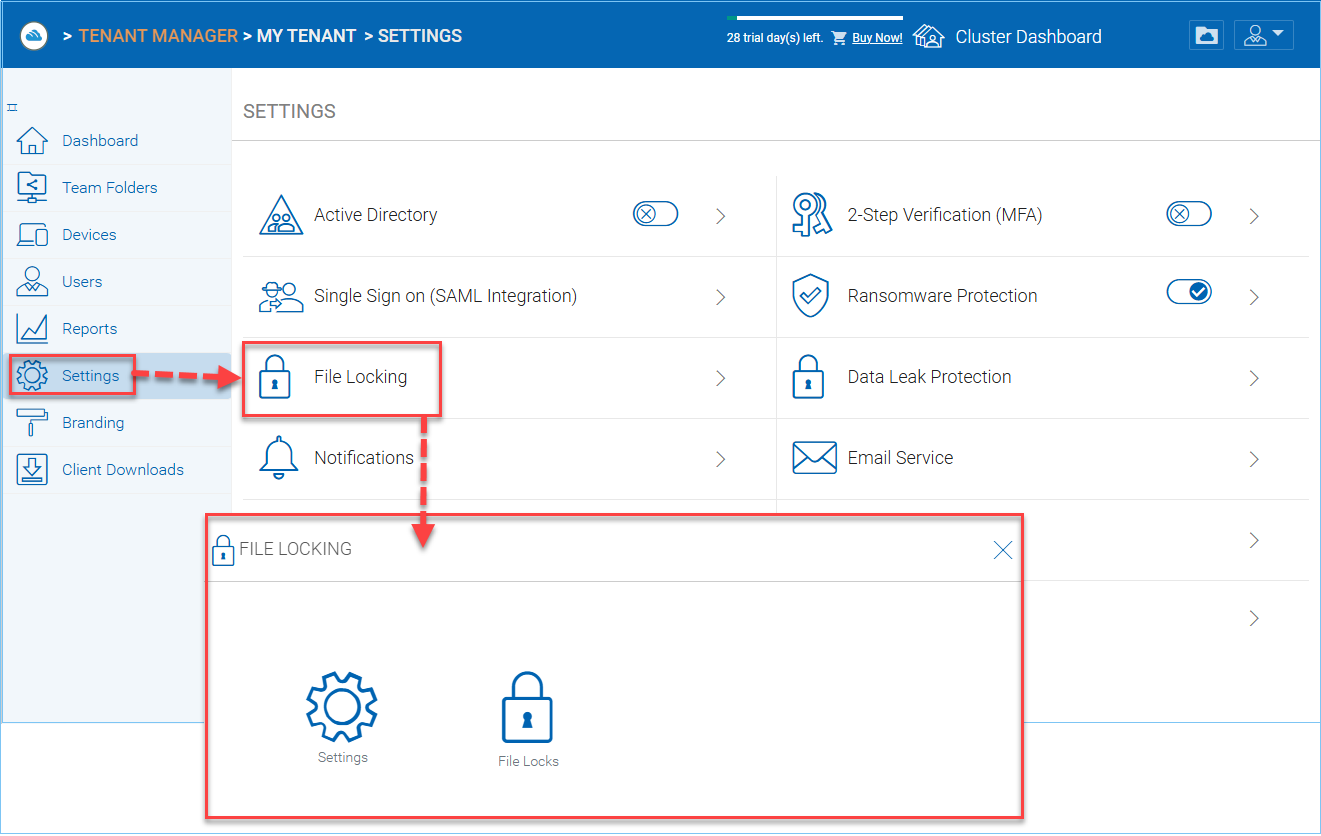
Settings under file locking applies to all clients which include desktop clients as well as server agent clients.
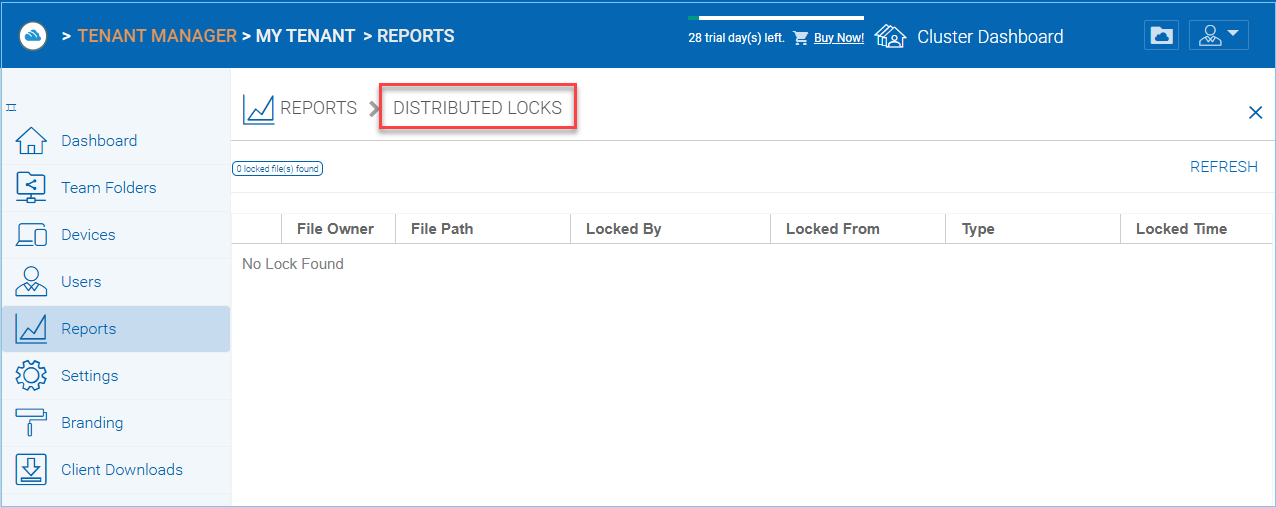
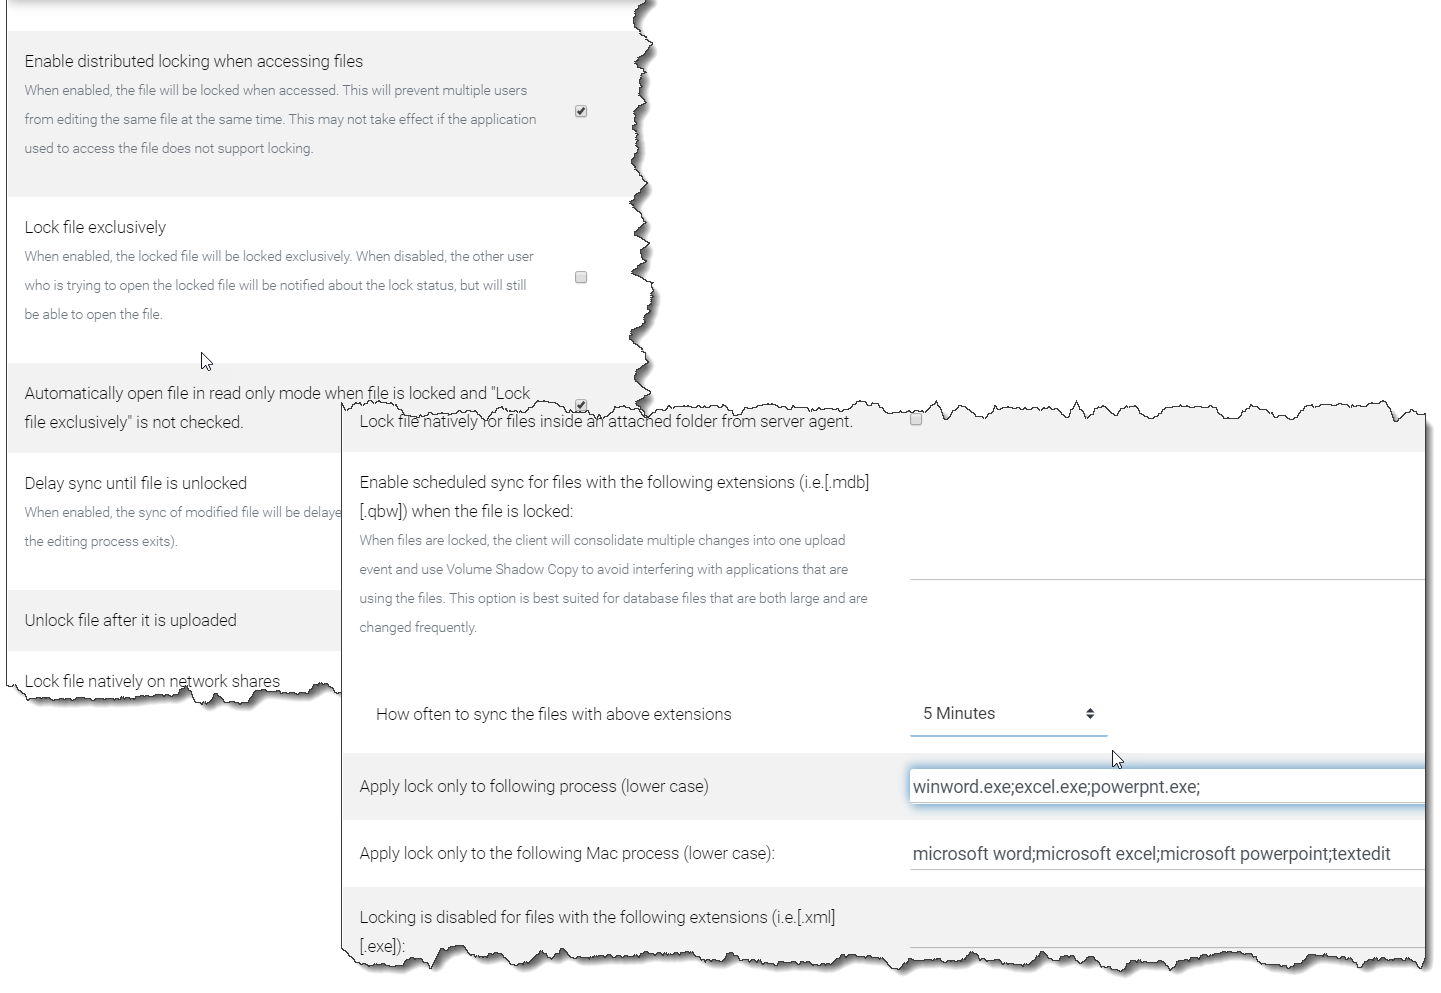
Enable Distributed locking when accessing files
In the Cluster Server, there are two ways to lock files, one is manually by right-clicking on a file and select “Check out”. The other way is automatic based on certain binary executables. For example, you can see Microsoft Office executable files like winword.exe and so on.
Lock file exclusively
When enabled, the locked file will be locked exclusively. When disabled, the other user who is trying to open the locked file will be notified about the lock status, but will still be able to open the file.
Automatically open file in read only mode when file is locked and “Lock file exclusively” is not checked.
When this setting is enabled (default), a second attempt to open a locked file will result in the file opening in read-only mode. If “Lock file exclusively” is checked, then second user will not be able to open a locked file.
Delay sync until file is unlocked
It is recommended to check this setting. Most users have the habit to save files in the middle of editing. You don’t want these edits to go every time to the cloud for these intermediate saves. You want to do a save to the cloud at the end like a grand finale. So you can delay sync until the file is
unlocked.
Unlock file after file is uploaded
After the file is uploaded, unlock the file.
Lock file natively on network shares
When a file is locked in the CentreStack, if the file is from an attached network share, the CentreStack lock will be converted into a native file system lock on the network share. This provides locking interoperability between the CentreStack and the underlying file system network share.
Enable scheduled sync for files with following extensions (i.e.[.mdb][.qbw]) when the file is locked”
When files are locked, the client will consolidate multiple changes into one upload event and use Volume Shadow Copy to avoid interfering with applications that are using the files. Typically this applies to database files that are constantly in use and constantly actively writing (commit) to the database file.
How often to sync the files with above extensions
This setting allows you to control the interval of synchronization that takes place on the above file extensions.
Apply lock only to the following processes (Lower case)
You can specify the processes here for which locking should be applied. By default, locking is enabled for Microsoft Word, Excel, and PowerPoint.
Apply lock only to the following MAC processes”(Lower case)
You can specify the processes here for which locking should be applied. By default, locking
is enabled for Microsoft Word, Excel, PowerPoint and MAC text editor.
Locking is disabled for files with the following extensions (i.e.[.xml][.exe])
You can use this setting to specify which file types will be ignored with regard to the file-locking feature.
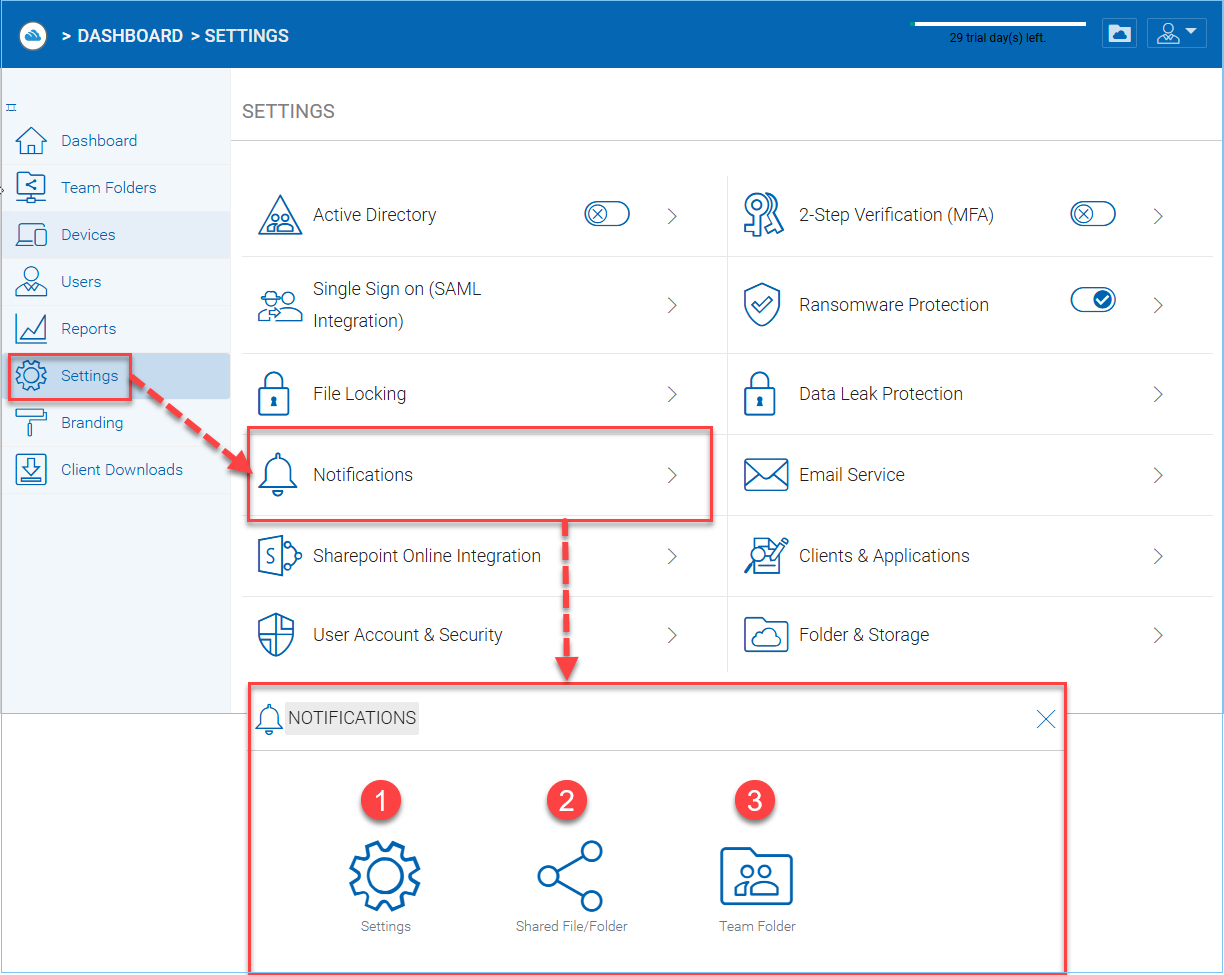
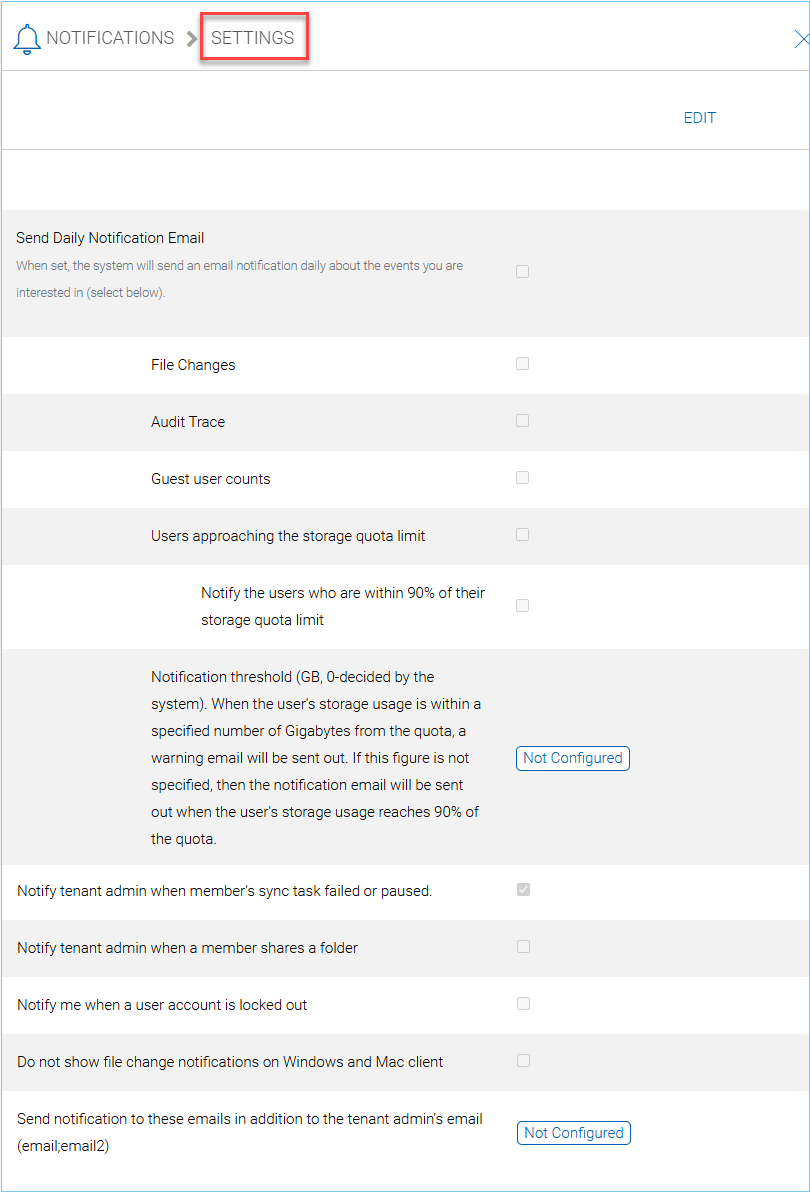
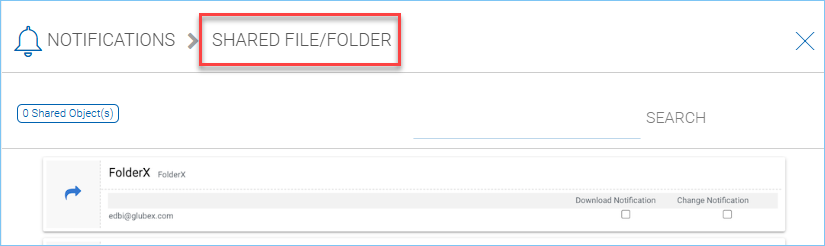
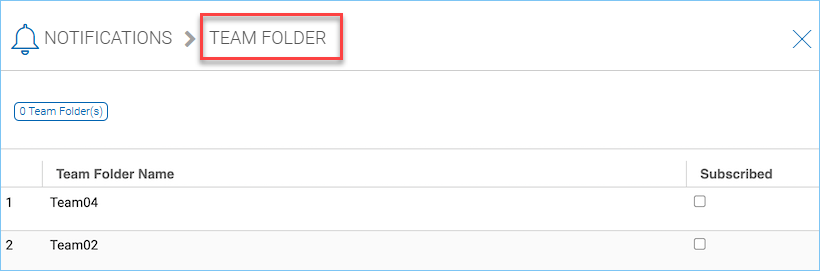
The cluster administrator can use the notification manager to help the tenant setup notification events. The tenant administrator will receive email notifications
for the events subscribed.
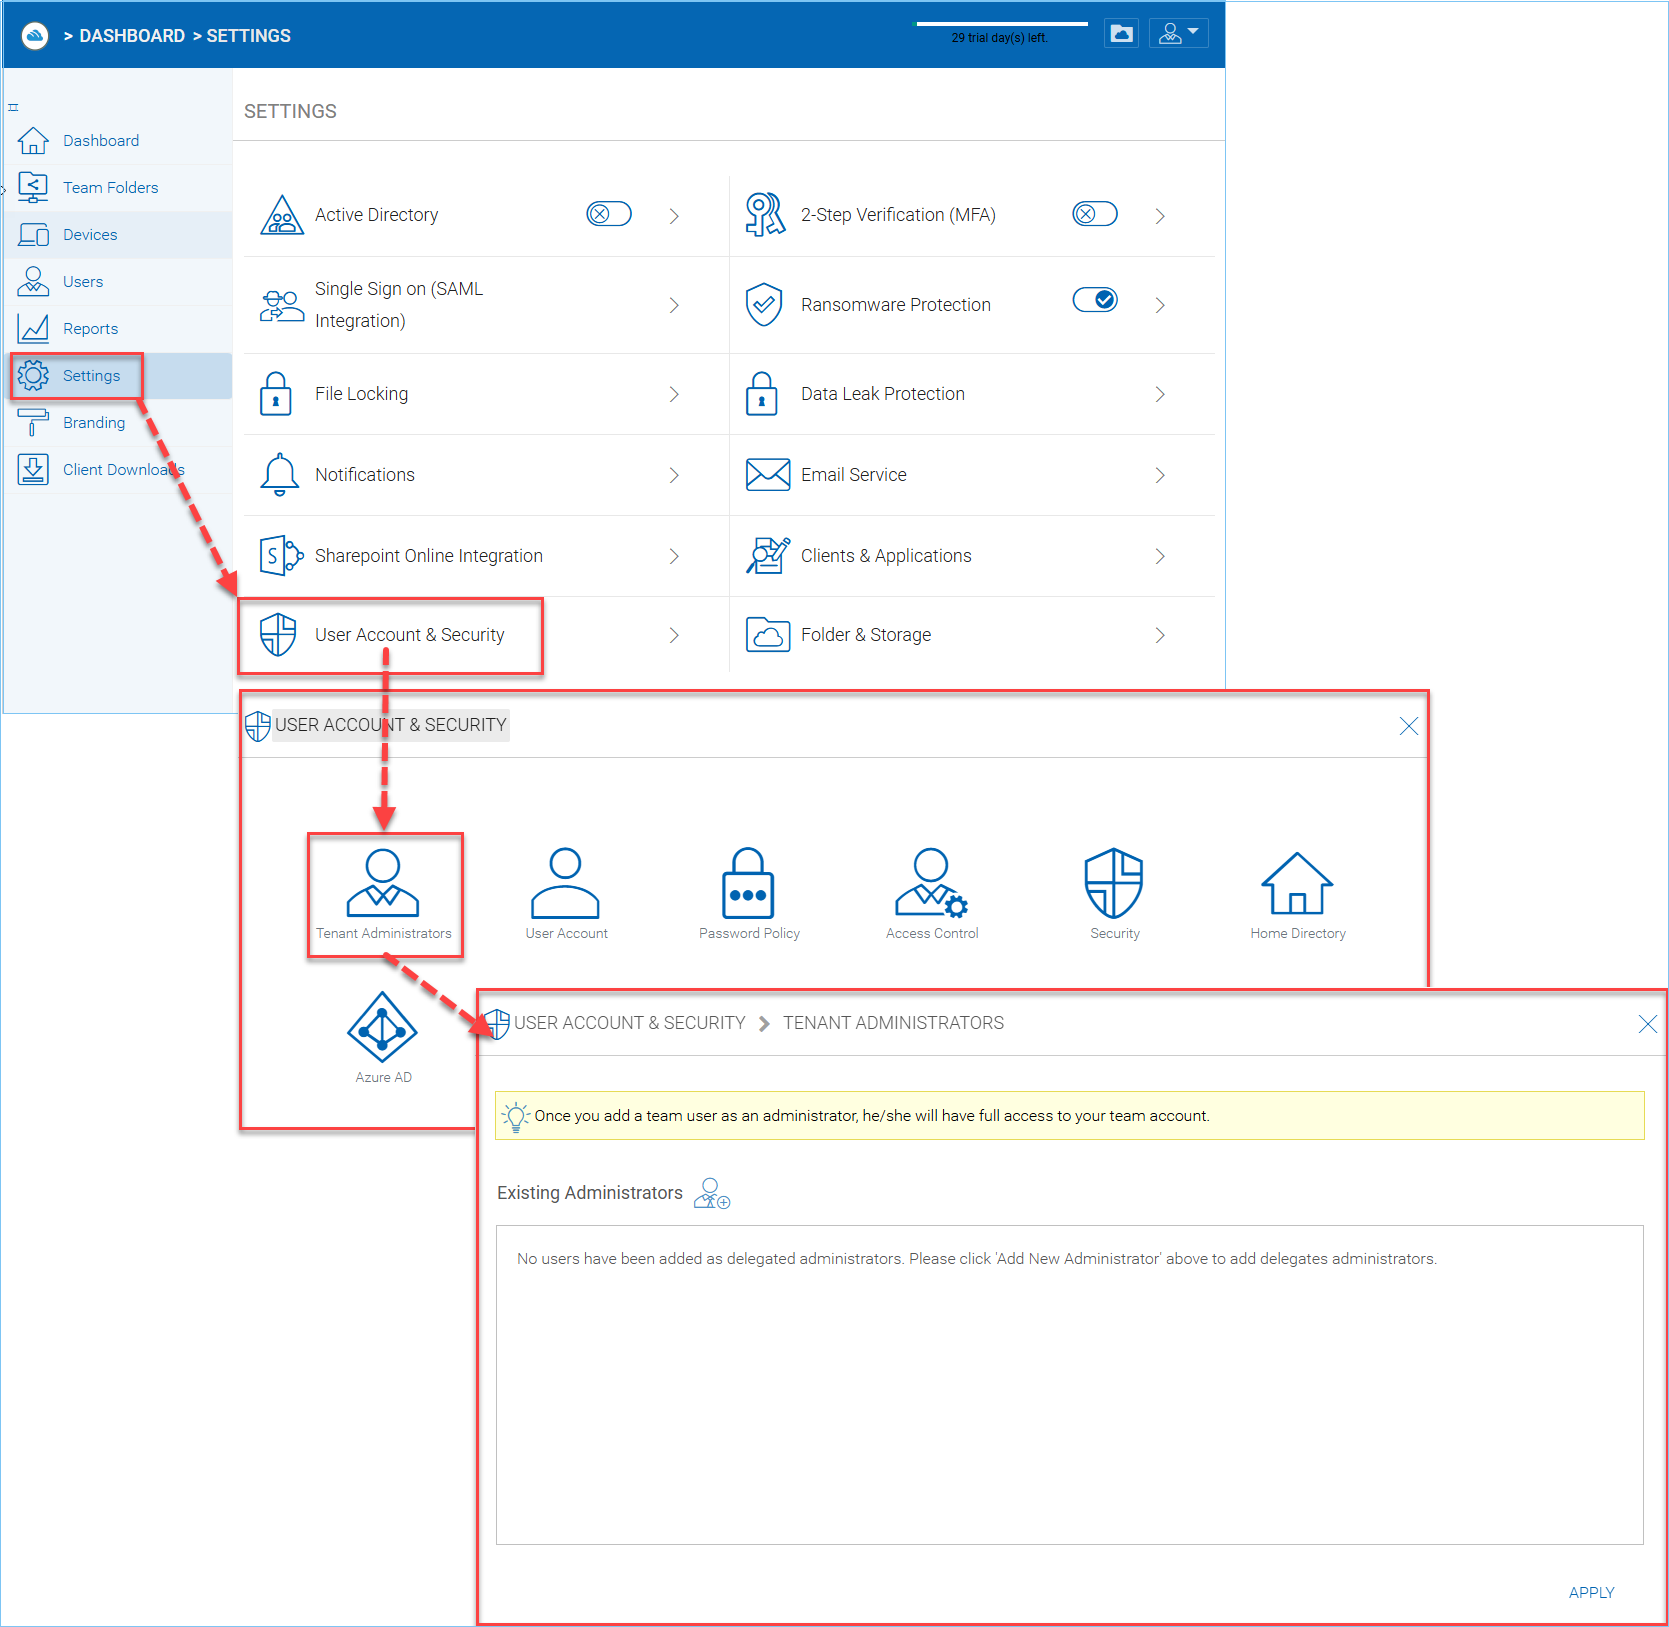
In the administrator information page, the cluster administrator can help the tenant manager change their email and user name if they need to, and to also setup delegated administrators.
The delegated administrators that are setup at the cluster level are users who are already in the Cluster Server and will be helping out the management of this specific tenant. Access these settings by clicking “User Account & Security” from “Settings” section, and choose the “Tenant Administrators” icon. You can define a group of users here to delegate the administration of tenants to other users.
Delegated administrators have two different roles. First of all, they are not the
default administrator in the tenant so normally they are just normal team users
in the tenant.
However, they can elevate themselves into the admin role by clicking the elevation icon that
is available to delegated administrators.
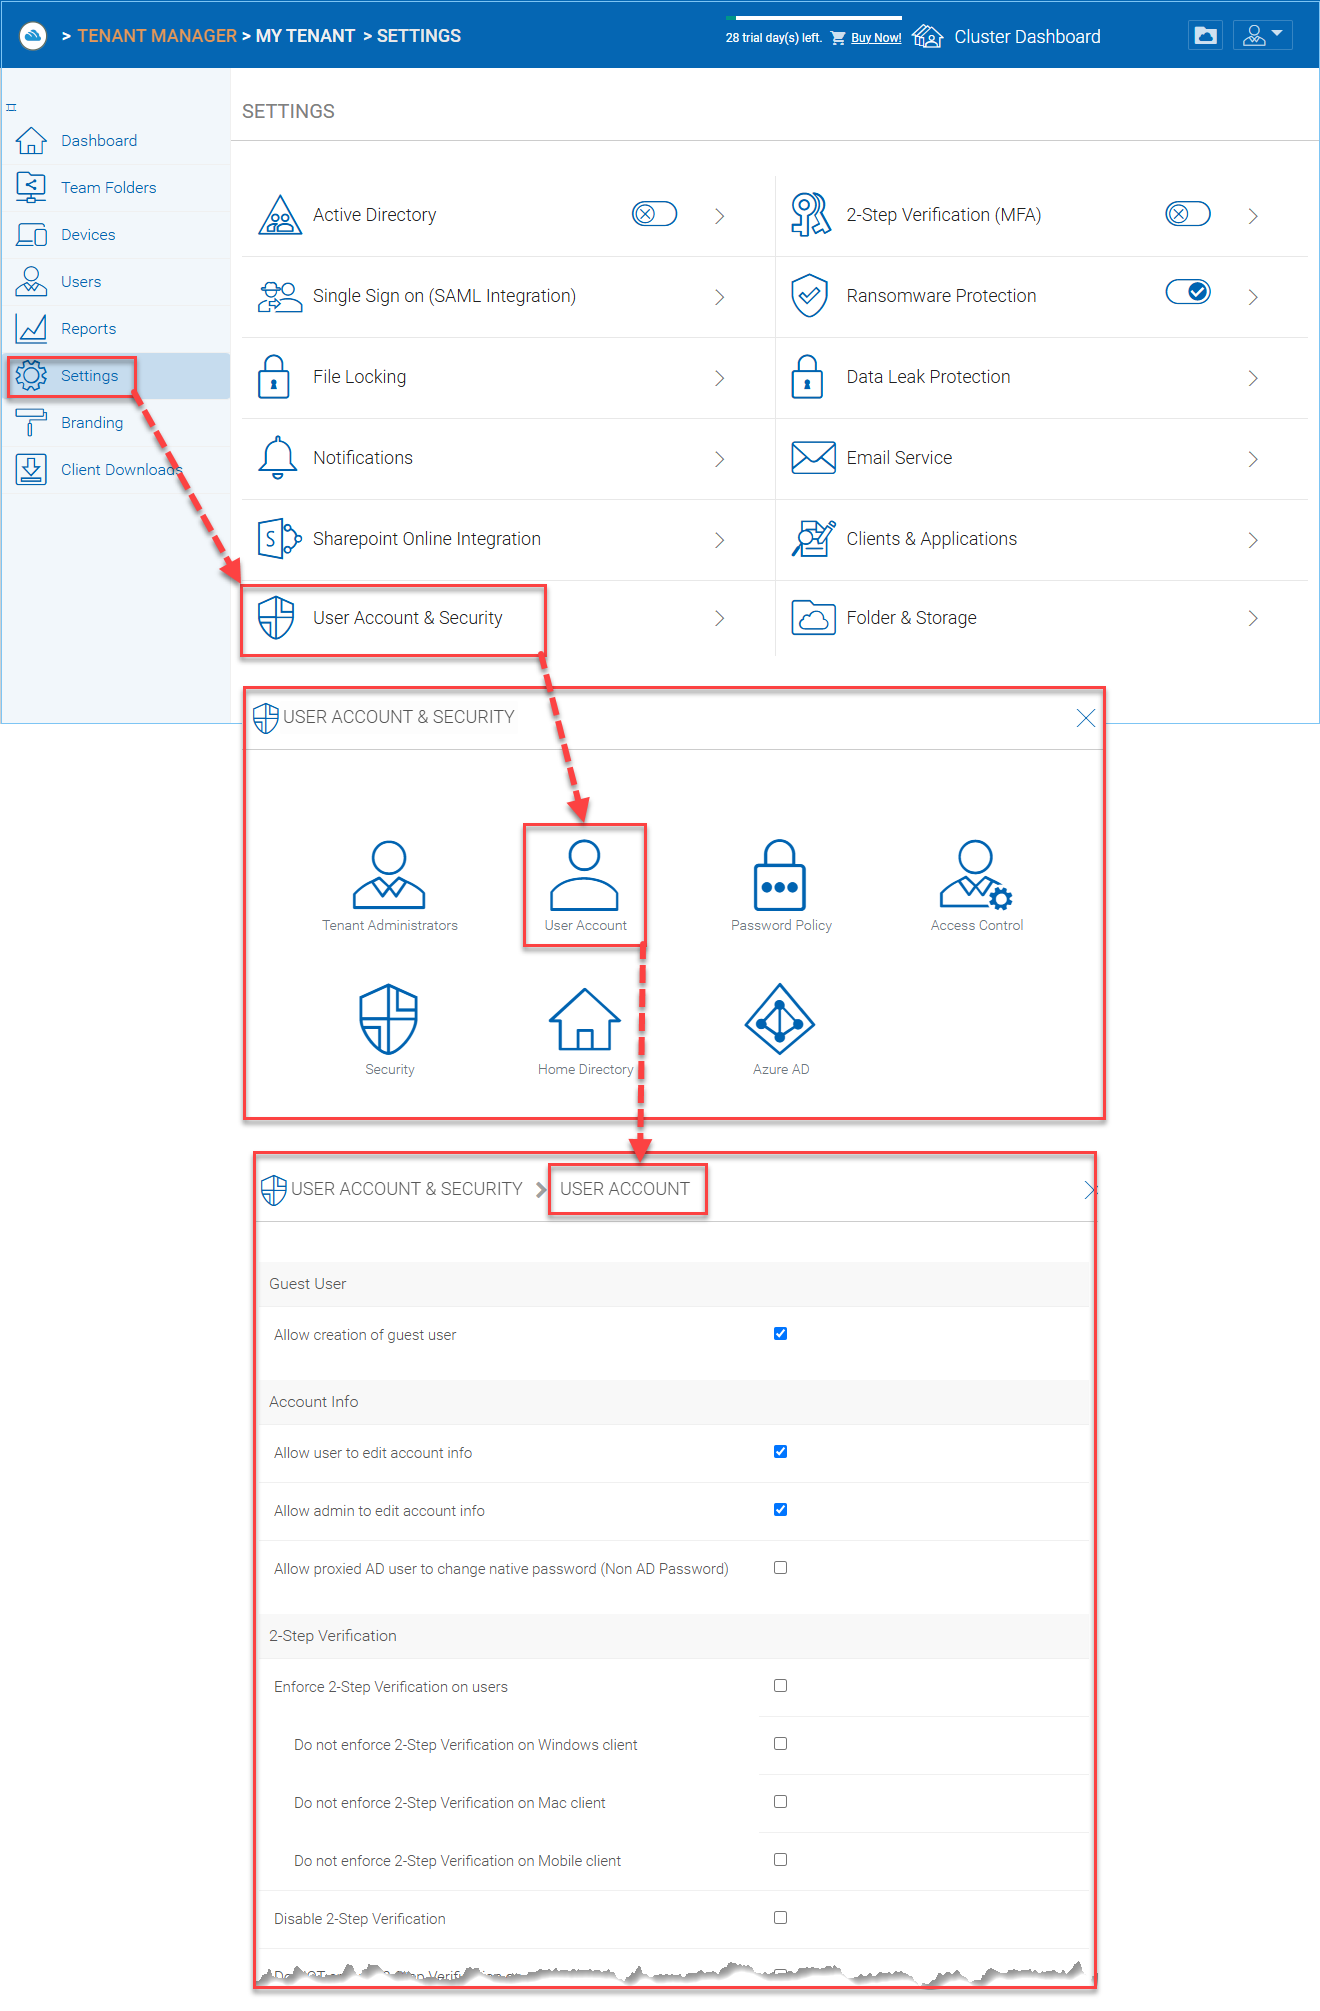
When enabled (default), you will allow creating of guest user when team user share files or folders with external users. When disabled, the file/folder sharing is limited to regular users only or anonymous users only.
When enabled (default), this setting allows users to edit their account information.
Allow proxied AD user to change native password (Non AD Password)
Proxied AD user refers to Active Directory users from remote server agent machine. Normally the initial password and changed password are
synchronized from the server agent side periodically so the end user is always using the same Active Directory credentials to log in.
However, there may be cases when you want the user to break away from the old Active Directory and setup credential natively on
CentreStack.
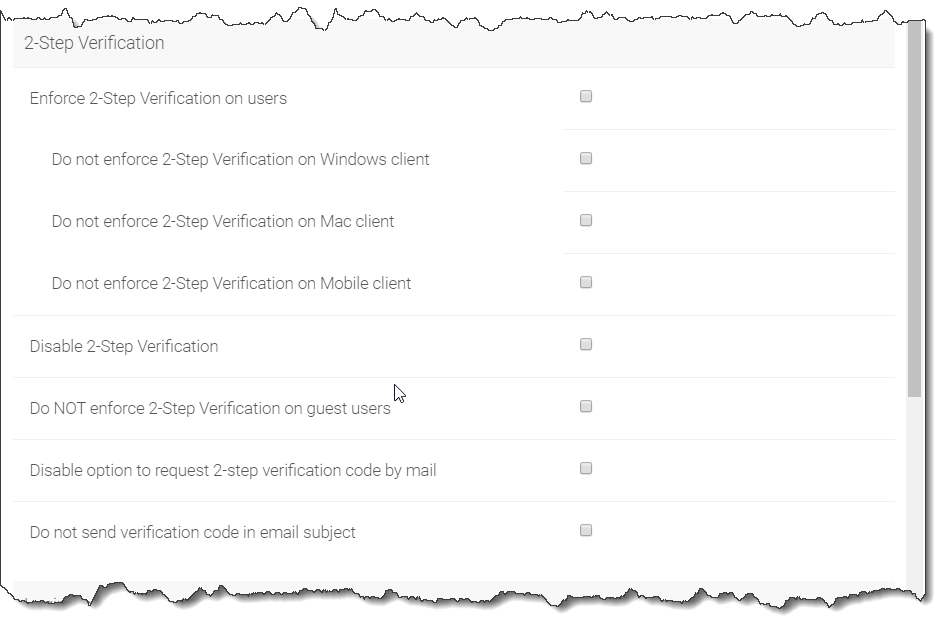
Enforce 2-step verification will force the users to setup 2-step verification via Google Authenticator, Microsoft Authenticator, Amazon MFA or any app that supports the same 2-step verification algorithm.
Do not enforce 2-Step Verification on Windows client
Tuning on windows client whether to enforce 2-step verification
Do not enforce 2-Step Verification on Mac client
Tuning on mac client whether to enforce 2-step verification
Do not enforce 2-Step Verification on Mobile client
Tuning on windows client whether to enforce 2-step verification
Disable 2-Step Verification
Disable 2-step verification. One possible use case is when 2-step verification is no longer needed or 2-step verification needs
to be disabled temporarily.
Do NOT enforce 2-Step Verification on guest users
Guest users may have a set of credentials to login to receive shared files and folders. This policy define whether to enforce 2-step
verification for them.
Disable option to request 2-step verification code by email
If user doesn’t have the 2-step verification app on the mobile device, the alternative is to send the code to user’s email.
Do not send verification code in email subject
If the code has to be sent over email, don’t send the code in the subject line.
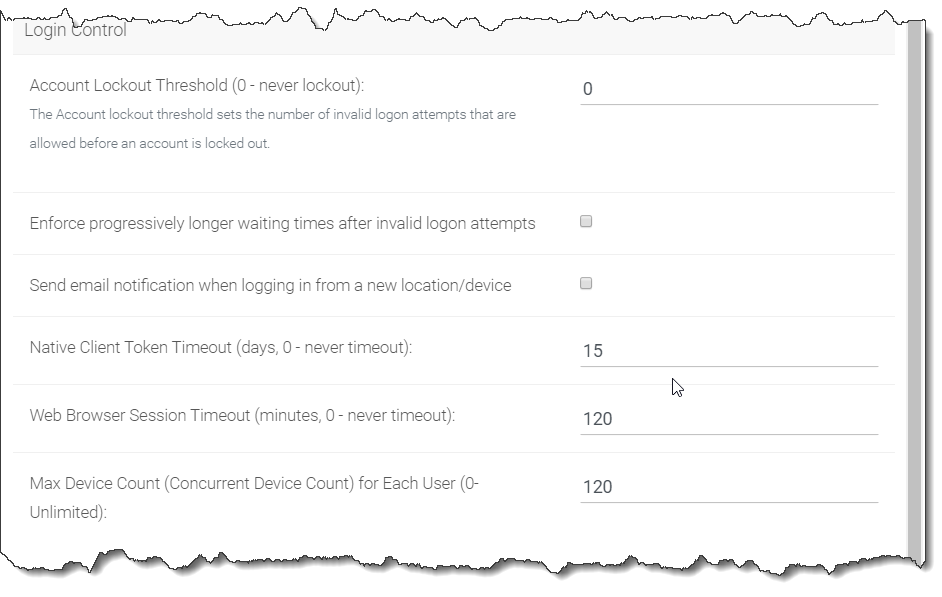
You can specify the Account lockout threshold limit here. The limit specified will be the number of invalid logon attempts that will be allowed before an account is locked out. Default is 0 (never lockout).
Enforce progressively longer waiting times after invalid logon attempts
Disabled by default. Under login control, you can also enforce progressively longer waiting times after invalid logon attempts.
Send email notification when logging in from a new location/device
Disabled by default. Another setting under login control is the ‘Send email notification when login from new location/device’. This setting will send an email to users whenever a different device or location is used to login.
Native Client Token Timeout (days, 0 - never timeout)
Determines if and when the Native Client Token will timeout, in days. Default is 15 days.
Web Browser Session Timeout (minutes, 0 - never timeout)
Determines if and when the Web Browser Session timeout, in minutes, will occur. Default is 120 minutes.
In the Admin Access Control, the cluster administrator can decide the division of work between cluster administrators and the specific tenant administrator. A lot of times, the cluster administrator will help with setting things up. In this case, the cluster administrator can take away some of the administrative work from the tenant administrator.
Note
For example, if the cluster administrator is a Managed Service Provider (MSP), the tenant admin can be an admin user from a specific client (customer).
Or, if the cluster administrator is an enterprise IT directory, the tenant admin can be a specific division of the enterprise.
If checked, in the tenant administrator’s management console, the “Storage Manager” will show and allow tenant administrator to mount (attach) external storage.
If the cluster administrator is setting it up for the tenant, the cluster administrator can take away this privilege.
Allow tenant to edit branding settings
The Cluster administrator can decide whether to allow tenant administrator to have its own branding.
Do not show GDPR consent form
The EU General Data Protection Regulation (GDPR) is the most important change in data privacy regulation in 20 years. There are regulations about collecting user information and software needs to provide consent form.
If you have customers in the EU, it is recommended to show the consent form.
Allow tenant to increase user plan automatically
The Cluster administrator can decide whether to allow the tenant to grow the user count automatically.
Multi AD Domain Support
Support multiple Active Directories in a single tenant (current tenant).
Multiple Active Directory forests support. This is not a common option because most of the time, the tenant has one forest (which can have multiple sub domains). In the case when the tenant has several Active Directory domains that are not related, multiple LDAP connection can be set up this way.
Tip
If you have single AD forest but contains multiple sub-domain AD domain controller, you don’t need to turn on Multi-AD support. Instead, you just point the LDAP to the root forest domain controller and the root forest domain controller will find and identify the sub-domains.
View and edit group policy
The Cluster administrator can decide whether to show the group policy section to this tenant.
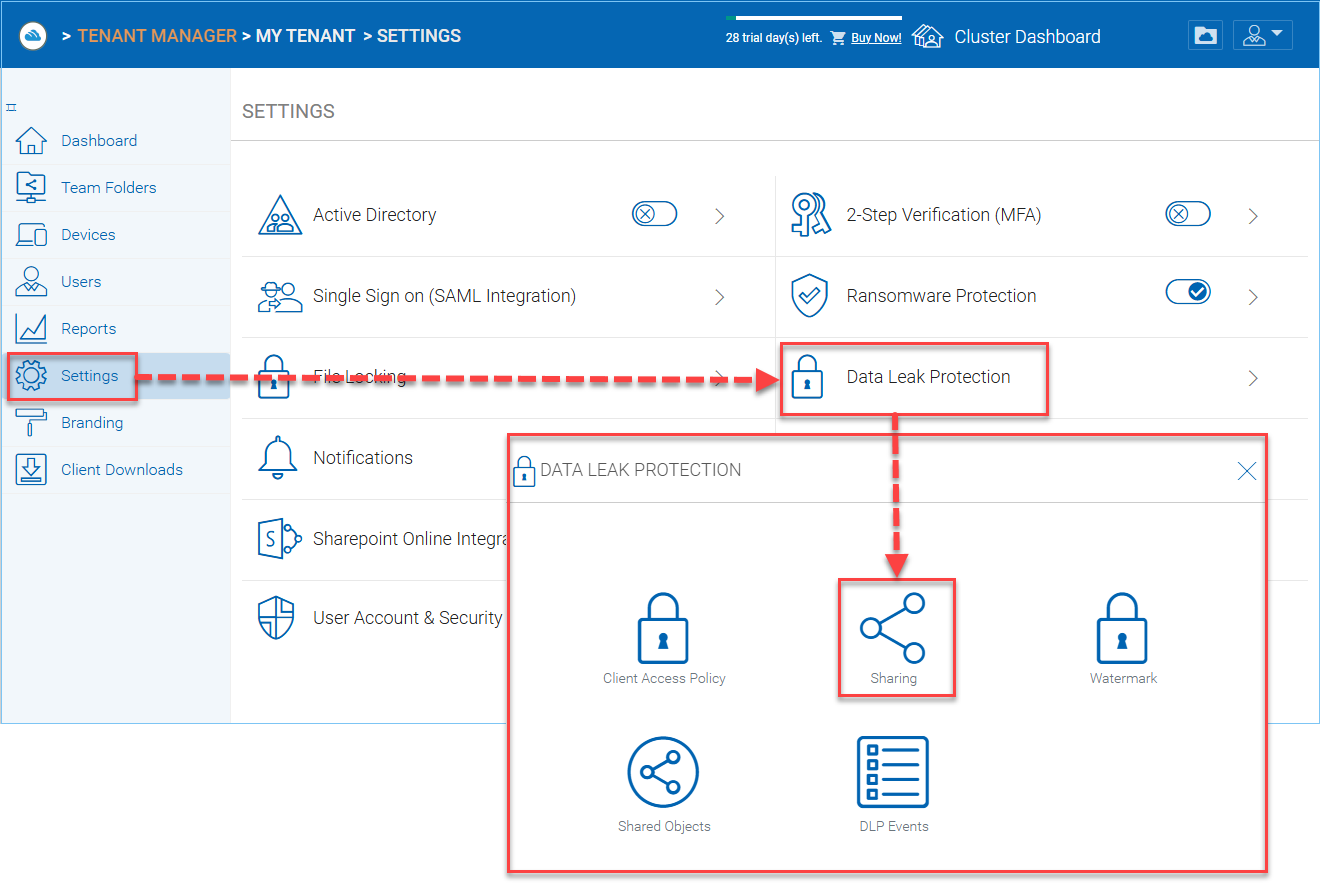
Disable file/folder sharing
Disable file and folder sharing from tenant level.
Hide migration option
Migration option refers to migrating remote file server(s) from remote customer location(s) to the Cluster Server. Not all clients (customers) have remote file servers, so this tenant level option may not apply all the time.
Show Data-At-Rest Encryption (DARE) configuration page (Requires empty storage container)
If the tenant has the required encryption of the data
in the cloud (Cluster Server side), a DARE configuration
page can be shown upon the first usage to set it up.
Allow tenant to edit LDAP setting
In the case the tenant’s infrastructure is in the same LAN (Local Area Network) as the Cluster Manager, the tenant’s Active Directory can be directly connected via LDAP to the Cluster Server.
If the cluster administrator is setting it up for the tenant, cluster administrator can take away this privilege.
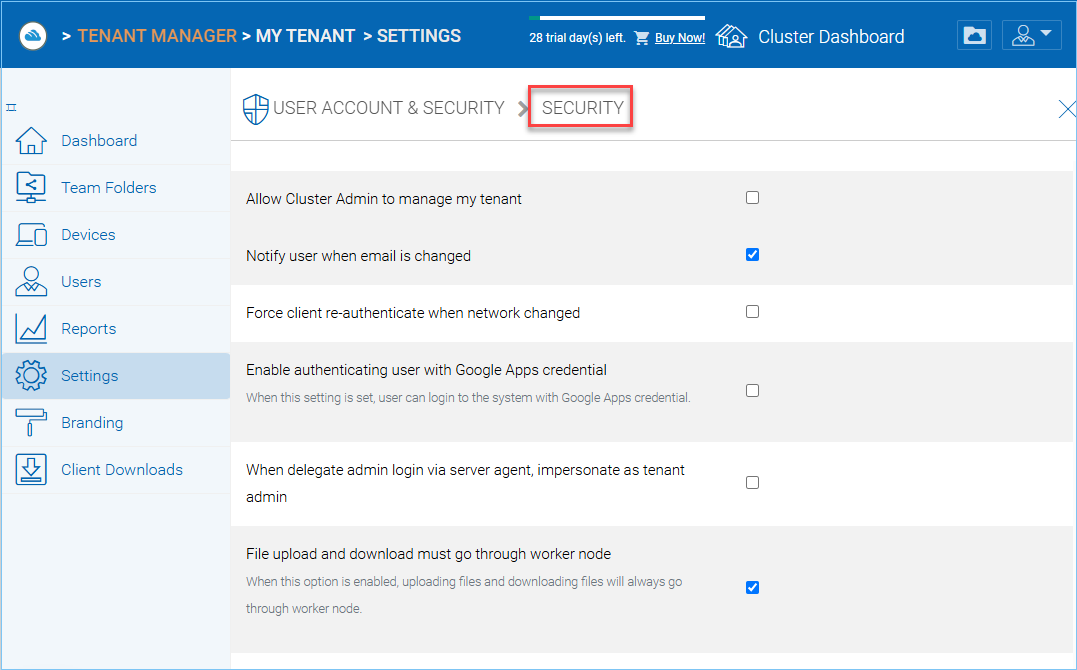
When enabled, the cluster-admin will be able to use the “Manage Tenant” link to manage the tenant in the tenant manager. This is very convenient for cluster administrators (typically system administrators from service providers) to provide management work to the tenant.
Enable Authenticating User with Google Apps Credentials
When enabled, users can login using Google Apps credentials.
When delegate admin login via server agent, impersonate as tenant admin
Server agents typically need to sync to the default tenant administrator. It is recommended when a delegate administrator setup a server agent, it needs to impersonate the default tenant administrator.
File upload and download must go through worker node
(This setting may only be available from cluster administrator side)
For Amazon S3 type of cloud storage/object storage, it is recommended NOT to force file upload and download going through worker nodes, because Amazon S3 is good for offload the upload/download between the access clients and the backend Amazon S3 storage. However, for OpenStack Swift storage, depending on how it is set up, you may want to turn this on to force File Upload/Download going through worker node for security reasons.
This setting may be checked by default. However, based on your configuration, it may not need to be checked.
For example, if you are using file server network share as the storage location, the upload and download has to go through worker node anyway, so there is no need to check this checkbox.
There may be some situations that this setting must be checked. For example, you may be using native object storage such as Amazon S3 for storage. However, your company policy may disable direct access to Amazon S3. So in this case, you will have to route traffic through the worker node.
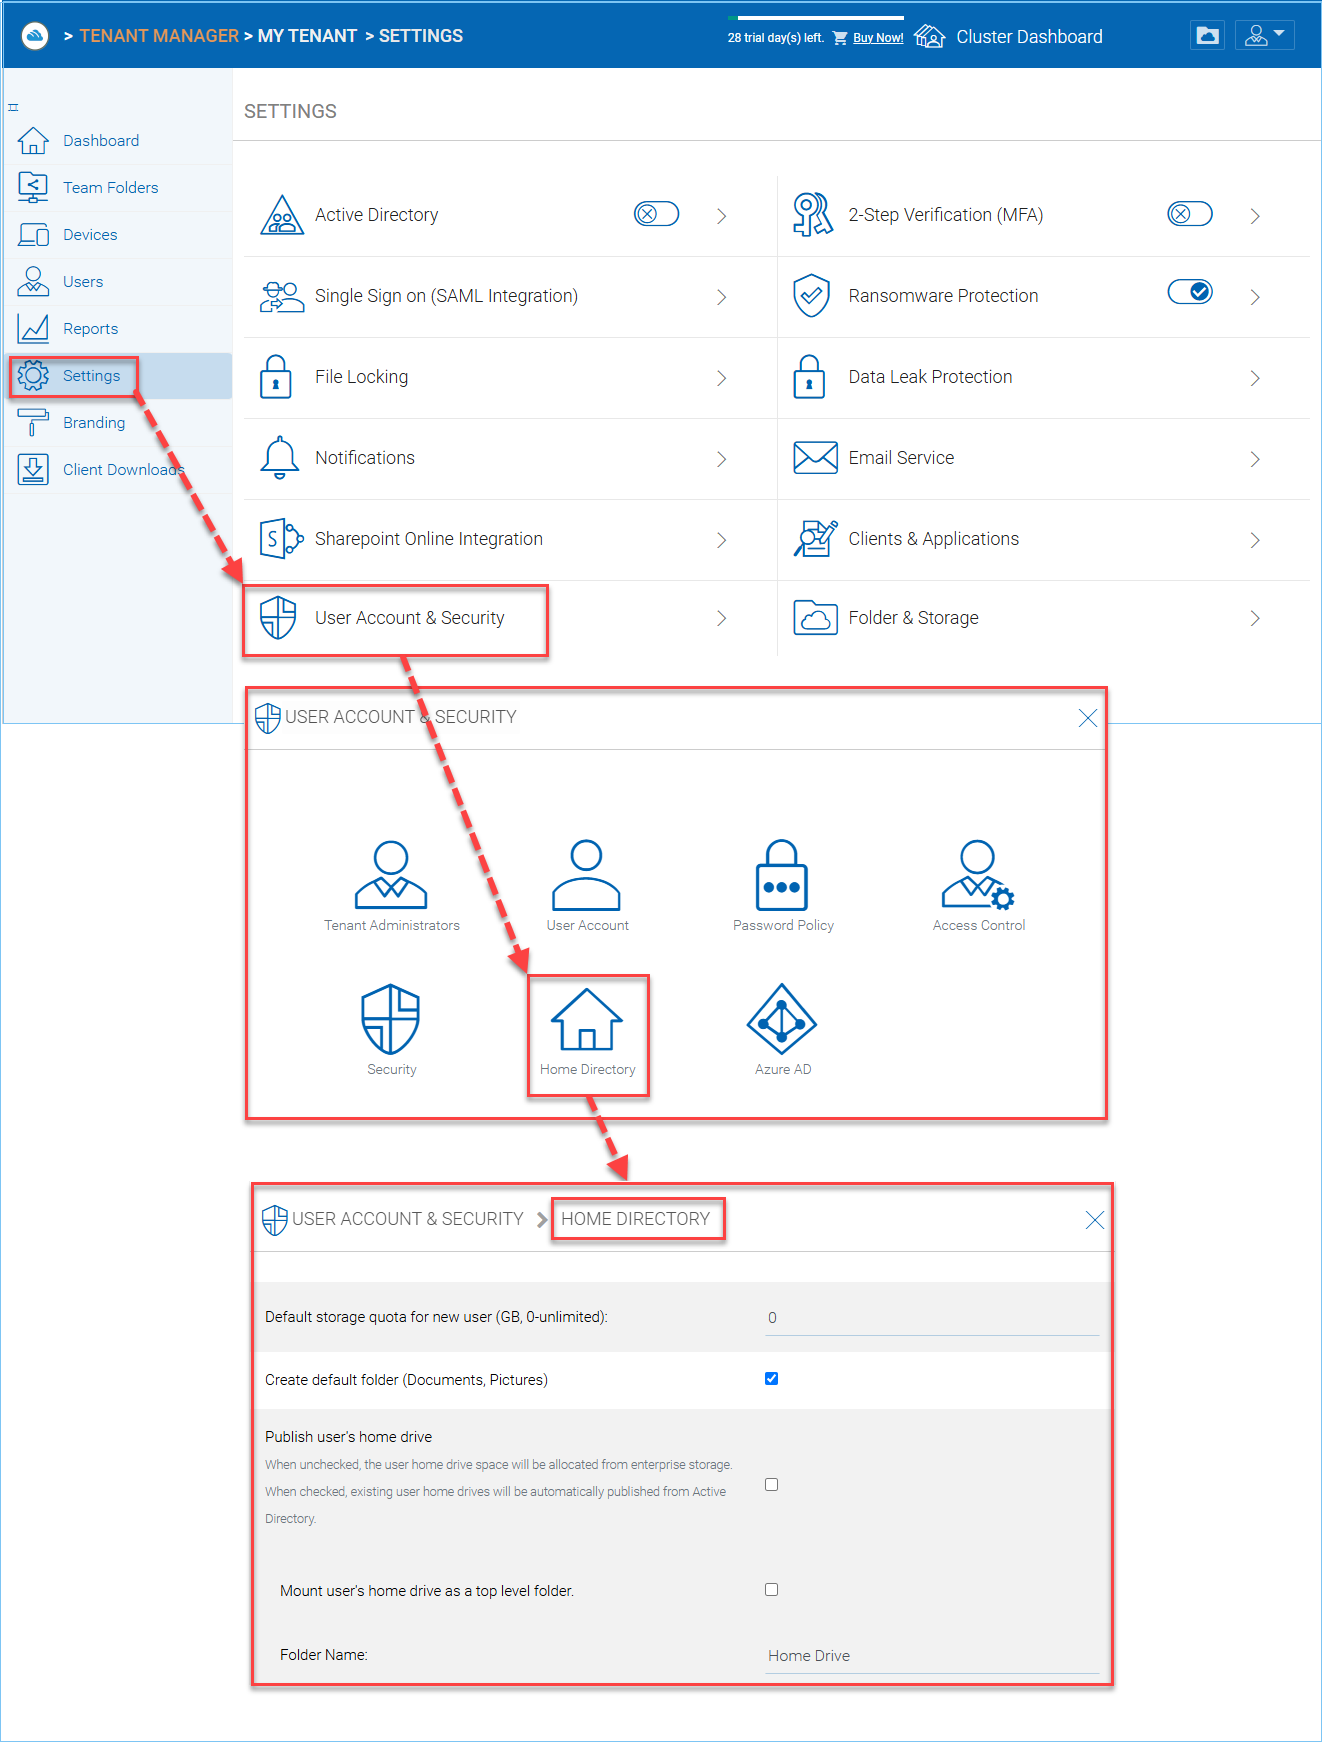
This policy will not affect existing user and their quota. It can affect a newly created user for the default storage quota.
Create default folders
When the new user account is provisioned, the default root folder is empty.
“Create default folder (Documents, Pictures)” will make the root folder look less empty and more user-friendly. This hints at how to organize files and folders in the cloud.
Publish user’s home drive
When unchecked, the user home drive space will be allocated from enterprise storage. When checked, existing user home drives will be automatically published from Active Directory.
Mount user’s home drive as a top level folder
Without this option, the user’s home drive from active directory mapping will become the root folder in CentreStack. However, if the user also have network shares mapped into CentreStack, those network shares
will appear as top level folders. So in this use case, mapping user’s home folder as a top folder
is more in parallel to the other network shares.
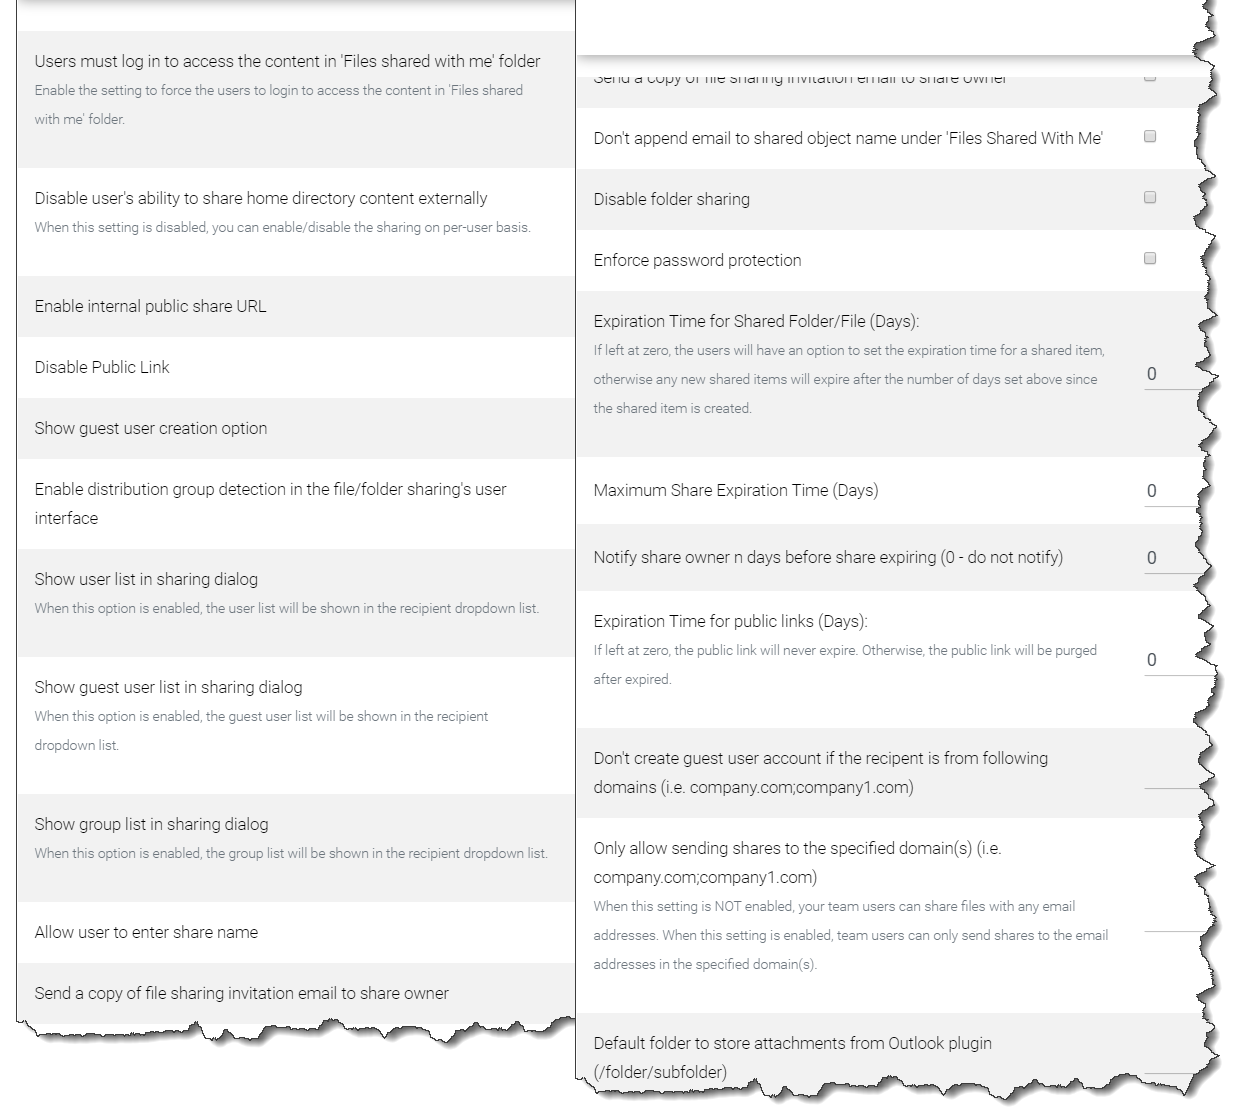
Users must log in to access the content in ‘Files shared with me’ folder
When sharing files and folders with users, you can force the sharing to create guest accounts for users that are not already in the system. It is more secure when asking the receiver of the share to sign in to receive shared items. This disables anonymous sharing.
If this setting is not enabled, users can share files and folders to an outside email address without requiring outside users to create a guest user account.
Disable user’s ability to share home directory content externally
This feature disables the ability for a regular user to share home directory contents for security reasons.
Enable Internal Public Share URL
If you have an internal public share you can use this setting to enable it.
When this is enabled, it will use the Internal URL property to generate a web link for shared file/folder.
Disable Public Link
This will disable the public web link feature in the sharing dialog.
Show guest user creation option
When enabled this shows the guest user creation option which you will see when ‘Sharing’ a file or folder by email. This is how you can provide full edit capability to a guest user, as they must be logged in to modify a file or folder in the CentreStack.
Enable distribution group detection in file/folder sharing’s user interface
With active directory integration, sometimes you want to share files and folders with a distribution group. This feature allows detection of distribution group and expands the group so the sharing will be done with the users in the group, instead of using the group as a single user.
Show user list in sharing dialog
When enabled, the user list will be displayed in the recipient’s dropdown list.
Show guest user list in sharing dialog
When this option is enabled, the guest user list will be shown in the recipient dropdown list.
Show group list in sharing dialog
When this option is enabled, the group list will be shown in the recipient dropdown list.
Allow user enter share name
By default the file name or folder name is used for the share name. However, if user has many same name folders or files. Sharing them out sometimes many not know which is which. This setting allows user to change share name. For example, when sharing out a “Documents” folder, it can be named “Documents in top level folder”.
Send a copy of file sharing invitation email to share owner
When sending the file-sharing email, sending a copy (CC) to the owner of the share (usually the sender of the email)
Don’t append email to shared object name under ‘Files Shared With Me’
When enabled, emails won’t show next to object names in ‘Files Shared With Me’ view.
Disable folder sharing
When enabled users will not be able to share folders.
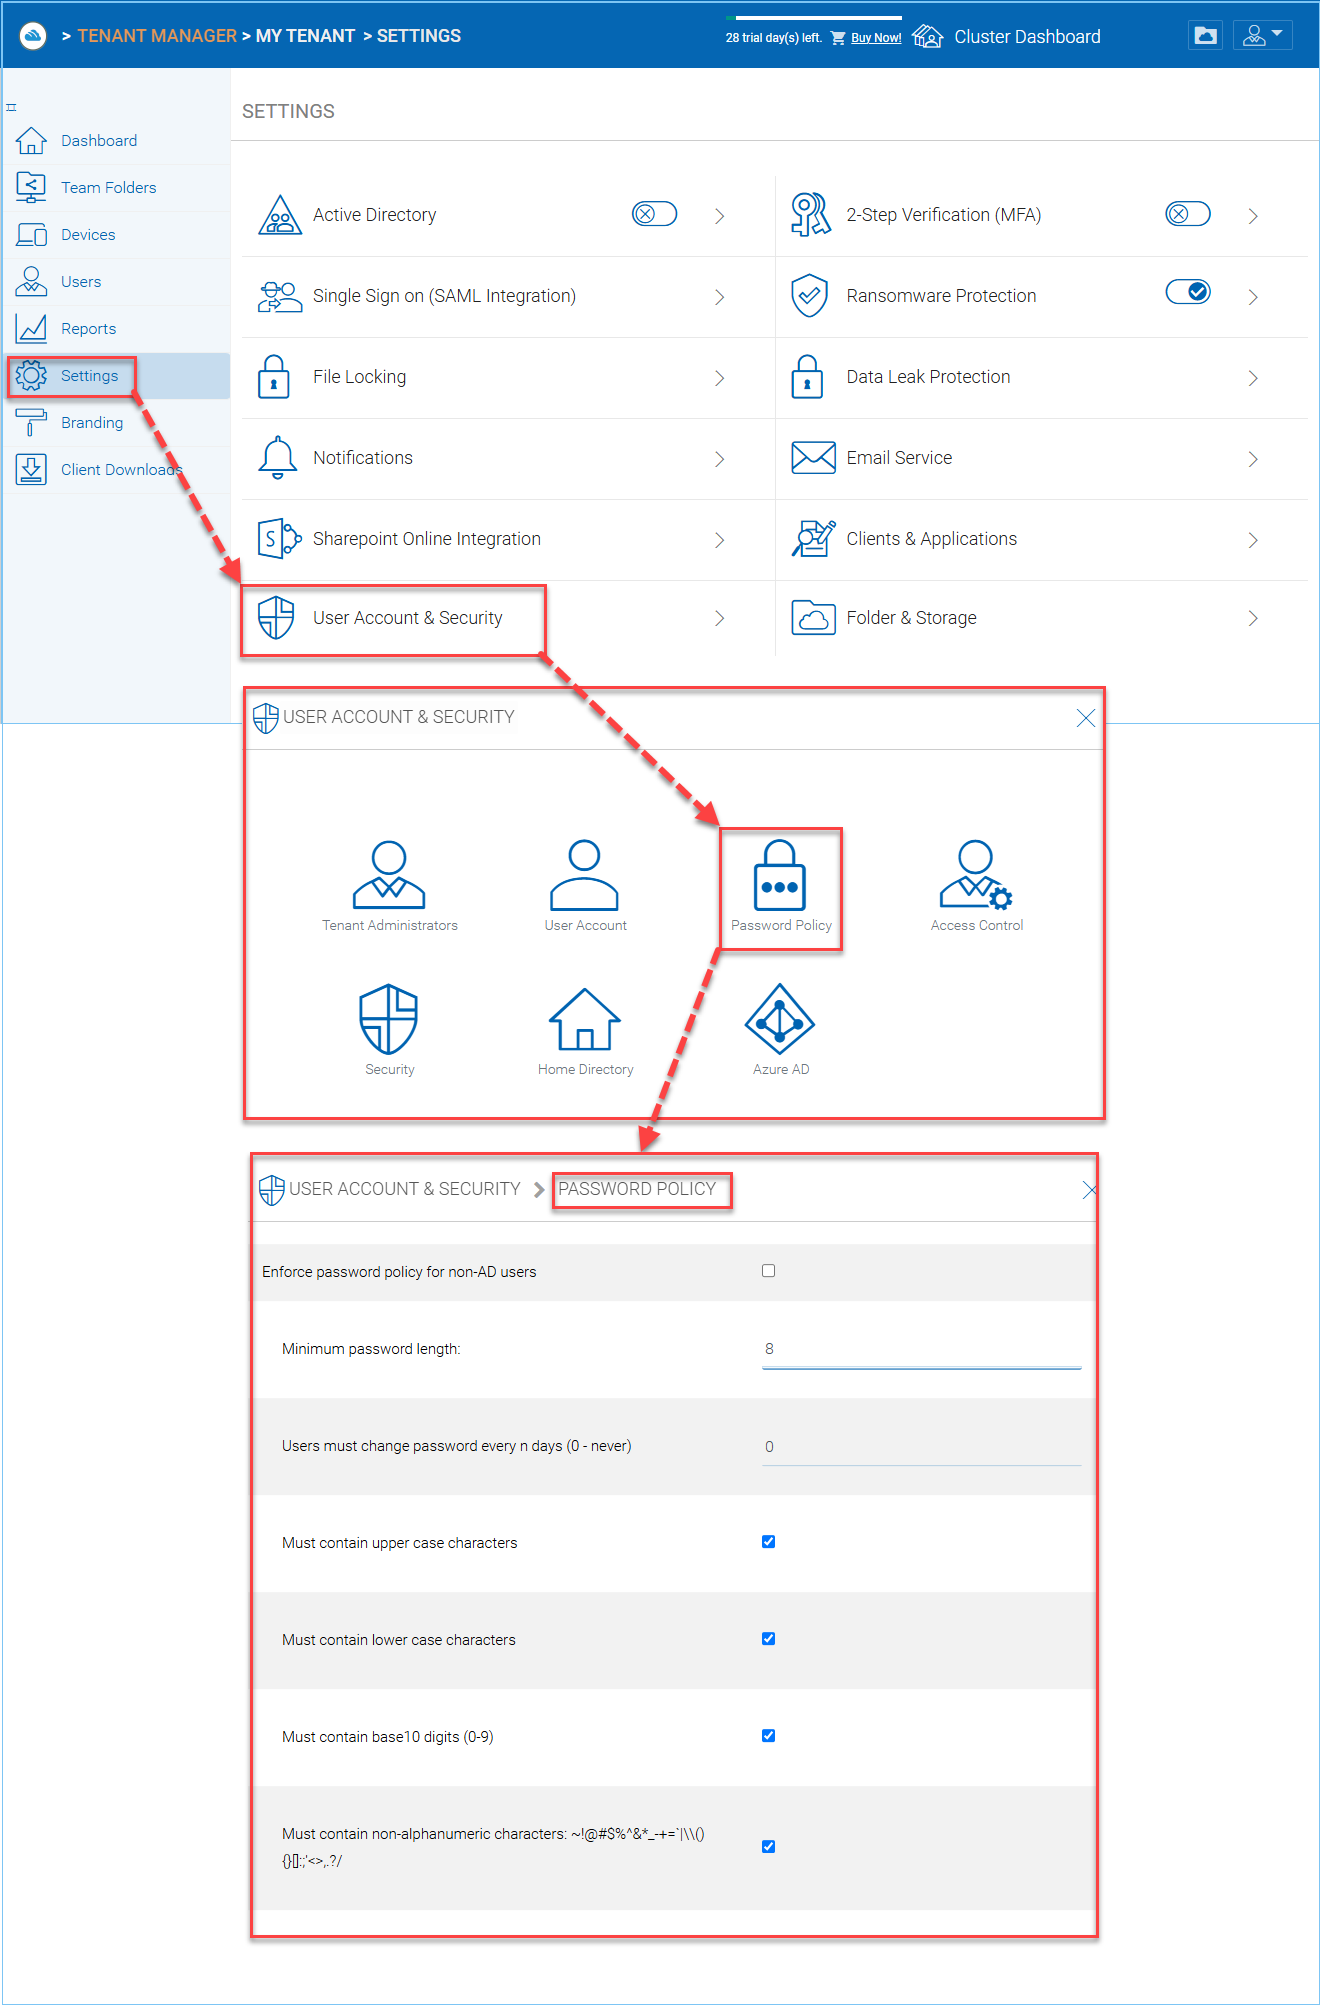
Enforce password protection
When enabled all users (including guest users) will be required to use complex password protection.
Expiration Time for Shared Folder/File (Days):
When set, during the file/folder sharing wizard, the expiration time dropdown selection will not be shown, it will be pre-set to expiration set in here.
Maximum Share Expiration Time (Days):
When set, this creates an upper limit to the time a share will be available, which forces all shares to expire when this limit is reached.
Notify share owner n days before share expiring (0 - do not notify)
Notify the sender (owner) of the share before share expiration.
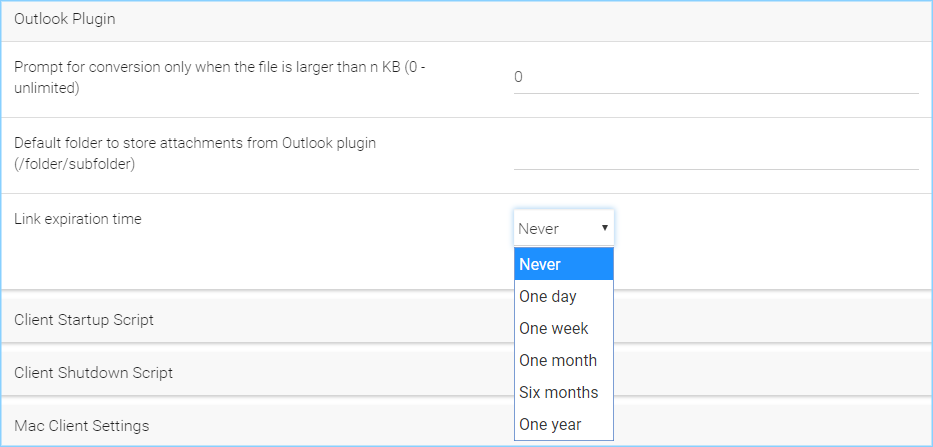
Expiration Time for public links (Days):
If left as zero, public link will never expires, otherwise the public link will be purged after expired.
Don’t create a guest user account if the recipient is from the following domains (i.e. company.com;company1.com)
Blacklist guest emails from the domains listed here. Do not allow sharing to these domains.
Only allow sending shares to the specified domain
You can further limit the sharing to some domain instead of random email. For example, if your primary collaboration target is with ACME corporation and you can limit the sharing to your domain and also ACME domain.
Only allow sending shares to the specified domain(s) (i.e. company.com;company1.com)
When it is set, the external sharing can only be shared to the white-list of email domains (which represent external partners, clients and etc)
Default folder to store attachments from Outlook plugin (/folder/subfolder)
Allows you to designate where Outlook attachments are saved.
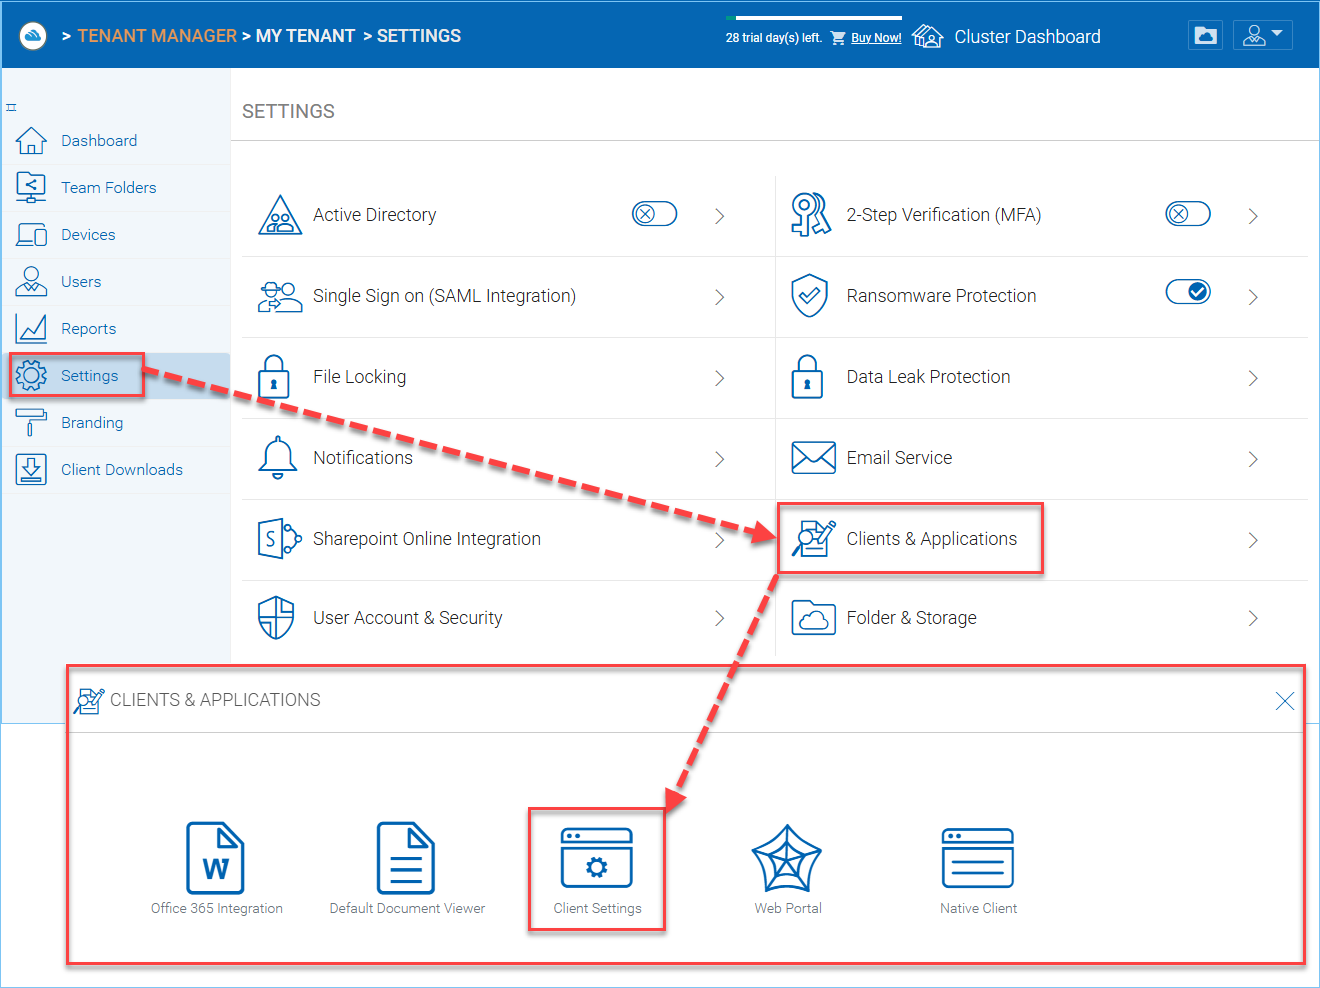
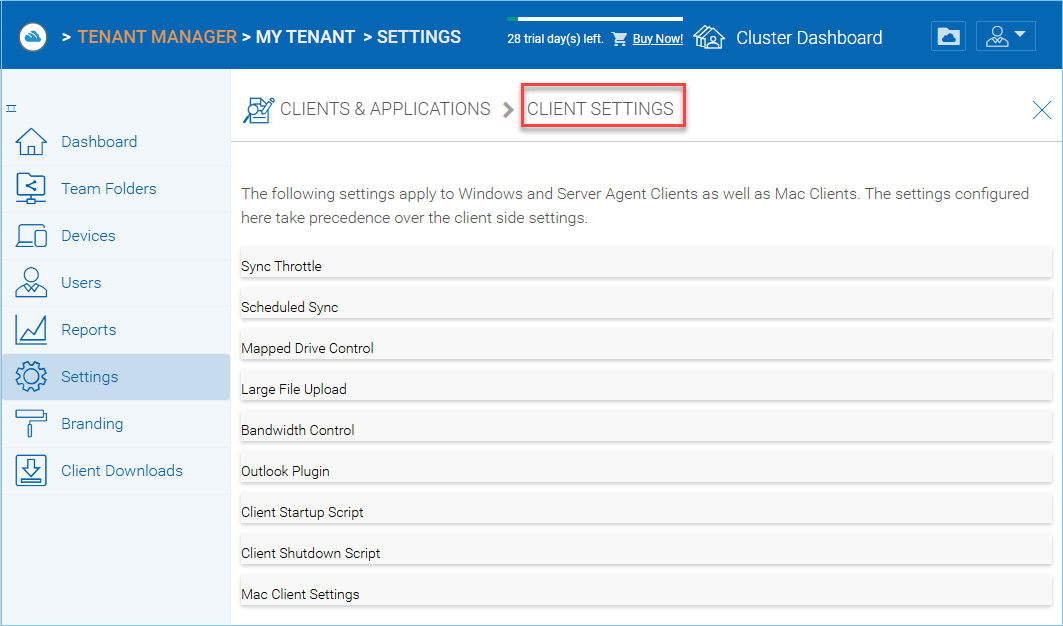
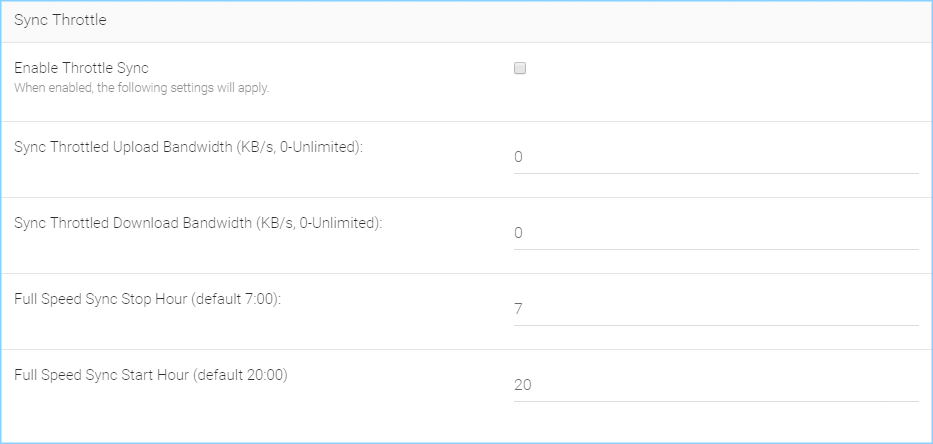
This setting controls the download bandwidth from the client machine.
Full Speed Sync Stop Hour (default 7:00)
Full speed sync means multiple thread concurrent upload or download. This is typically good for after hour activity. We recommend default setting stop at 7am so when people return to work, the full speed sync stops so to give back more bandwidth to users who may be using the Internet for other purposes.
Full Speed Sync Start Hour (default 20:00)
Similar to the above setting, we recommend start full speed sync after working hours.
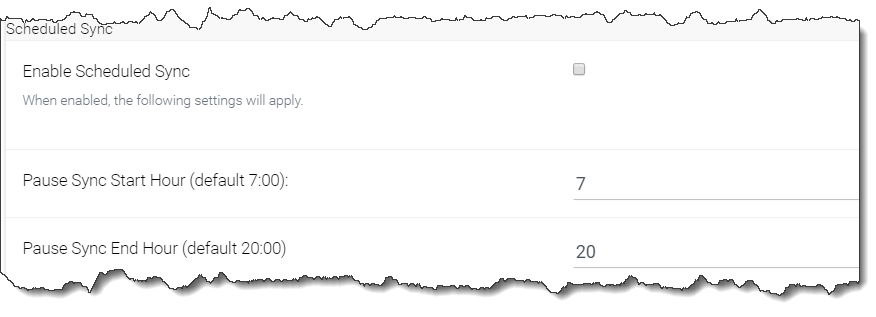
On the client side, in addition to a mapped drive (or a mac mounted volume), there is also functionality about folder synchronization. This setting can
control when to sync. For example, if the business has limited bandwidth to the Internet, avoid doing synchronization during the working hours
can save bandwidth.
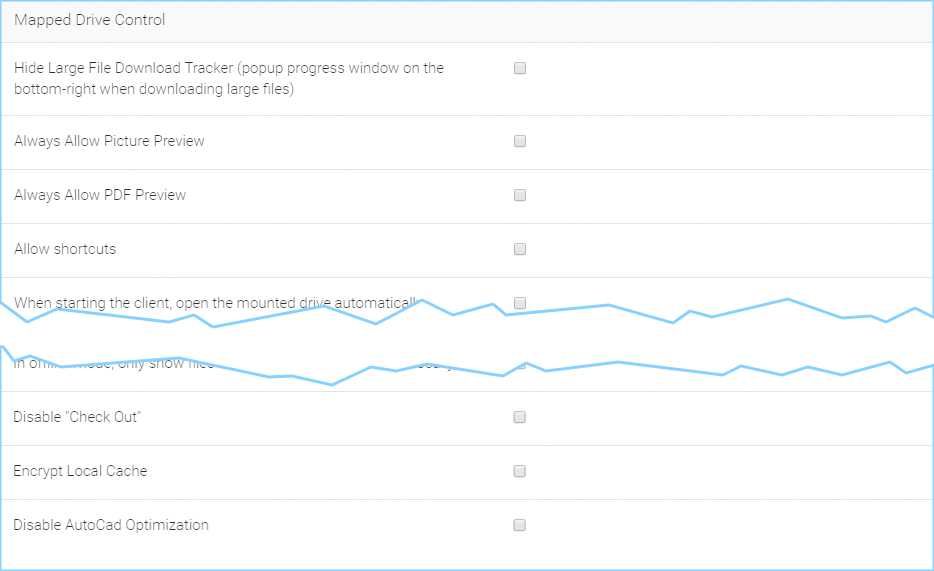
Hide Large File Download Tracker (popup progress window on the bottom-right when downloading large files)
This is usually good for usability but people may find it annoying if download is popping up a download progress dialog at the lower right corner.
Always Allow Picture Preview
Windows Explorer may want to download pictures in the background to generate thumbnails. This consumes bandwidth and may slow system down until all the preview thumbnails are generated. By default the client program disables the preview. However you can re-enable it.
Always Allow PDF Preview
Windows Explorer may want to download PDFs in the background to generate thumbnails. This consumes bandwidth and may slow system down until all the preview thumbnails are generated. By default the client program disables the preview. However you can re-enable it.
Allow shortcuts
Allow shortcuts (.lnk) files
When starting the client, open the mounted drive automatically
Enabling this opens the mounted drive in Windows Explorer when the client starts.
Do not show file change notifications
This is another feature that shows file change notification at the lower right-hand corner of the Windows desktop. People may find it annoying if the change notification comes in quite often.
Do not show file in-place editing/preview disabled notifications
This feature also shows file change notifications at the lower right-hand corner of the Windows desktop. People may find it annoying if the change notification comes in quite often.
Enable Inplace Open Zip File
Windows Explorer has a zip built-in extension that can open a zip file when double-clicked on. It may be good for the local drive but for cloud drive, that means the zip file is unzipped and re-upload back into the cloud. By default client application disables opening zip files directly in the cloud drive.
Enable Single Sign On with login windows user identity
Enable Single Sign-On with Login Windows User Identity - For a Windows client agent running on a Windows Desktop machine, the login windows user’s identity will be used for single sign-on to the CentreStack account.
Max Size of Zip File Allowed to Open In-place (MB)
Limits the size of a Zip File that can be opened in-place.
Max Size of File Allowed to Generate Thumbnail (MB)
Limits the size of Files that can be used in the generation of thumbnails.
Cloud Drive Label
What do you want to call your windows client drive.
Drive Letter
What do you want to give the drive letter to the client application.
Cache Size Limit (MB)
The Windows client maintains a client-side cache of this size (0 - unlimited)
Minimal free disk space (GB)
This setting is used to establish a minimum amount of disk space used for the windows client drive.
Purge logging db n days old (0 - don’t purge)
This limits how many days of logging are kept in the Windows client cache.
Mount Drive in global space (Windows Client Only)
A drive mounted in the global space will not be subject to UAC (User Account Control) limitations, such as when legacy applications are required to run with administrative privilege and cannot see the drive guarded by the UAC. On the other hand, drives that are mounted in the global space are visible to any other users who log in on the same Windows machine at the same time.
In offline mode, only show files that are cached and available locally
Typically there will be place-holder files and representative icons created for all of the files in the client drive. If this setting is enabled, only locally stored files will be shown.
Disable “Check Out”
Turn off the “Check Out” feature and remove it from the right-click context menu.
Encrypt Local Cache
Once enabled, when a file is downloaded to cache, it is encrypted in place. When an authorized user then accesses the file from the (M:) Mapped Cloud Drive, CentreStack automatically decrypts it on the fly and then returns it to the user.
Disable AutoCad Optimization
By default, there is an AutoCAD optimization that delays the synchronization of the updated .dwg file and schedules it to sync upwards to the cloud at a later time. Use this setting to disable this AutoCad optimization and make saving AutoCAD .dwg files act the same as saving other regular files and lets .dwg file behavior follow other policy settings.
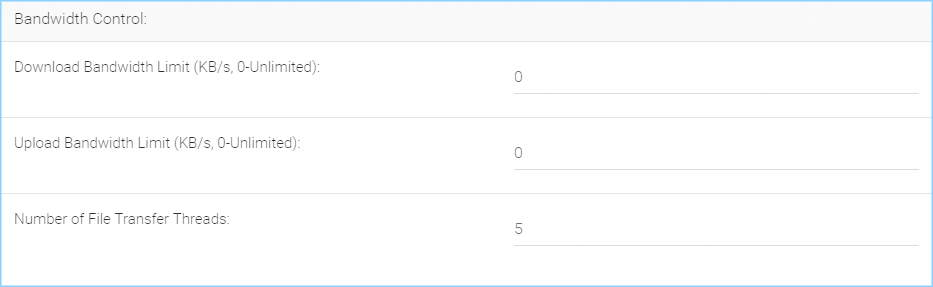
Enable chunk uploading when file size larger than (MB)
Uploading a single large file can be disrupted by an Internet glitch. This setting breaks large files into smaller chunks to increase the success rate.
Chunk file in the unit of (MB)
Works with the above setting to establish what size the chunks will be in as they are transferred.
Use Volume Shadow Copy to Upload Files being Opened
There is pro and con of using this flag. When file is open by other application, the file usually is locked and can’t be uploaded until the file is closed. However using volume shadow copy can still upload the file. The down side is when the volume shadow copy happens, the file is not known to be in a consistent state.
After the Windows client is completely started and finished loading, a command line script can be run. You can be upload that script here. For example, a script to map an additional drive letter to a specific folder inside the cloud drive.
Right before the Windows client is completely shutdown and finished running, a command line script can be run. You can upload that script here. For example, a script to clean up any reference to folders and files inside the cloud drive.
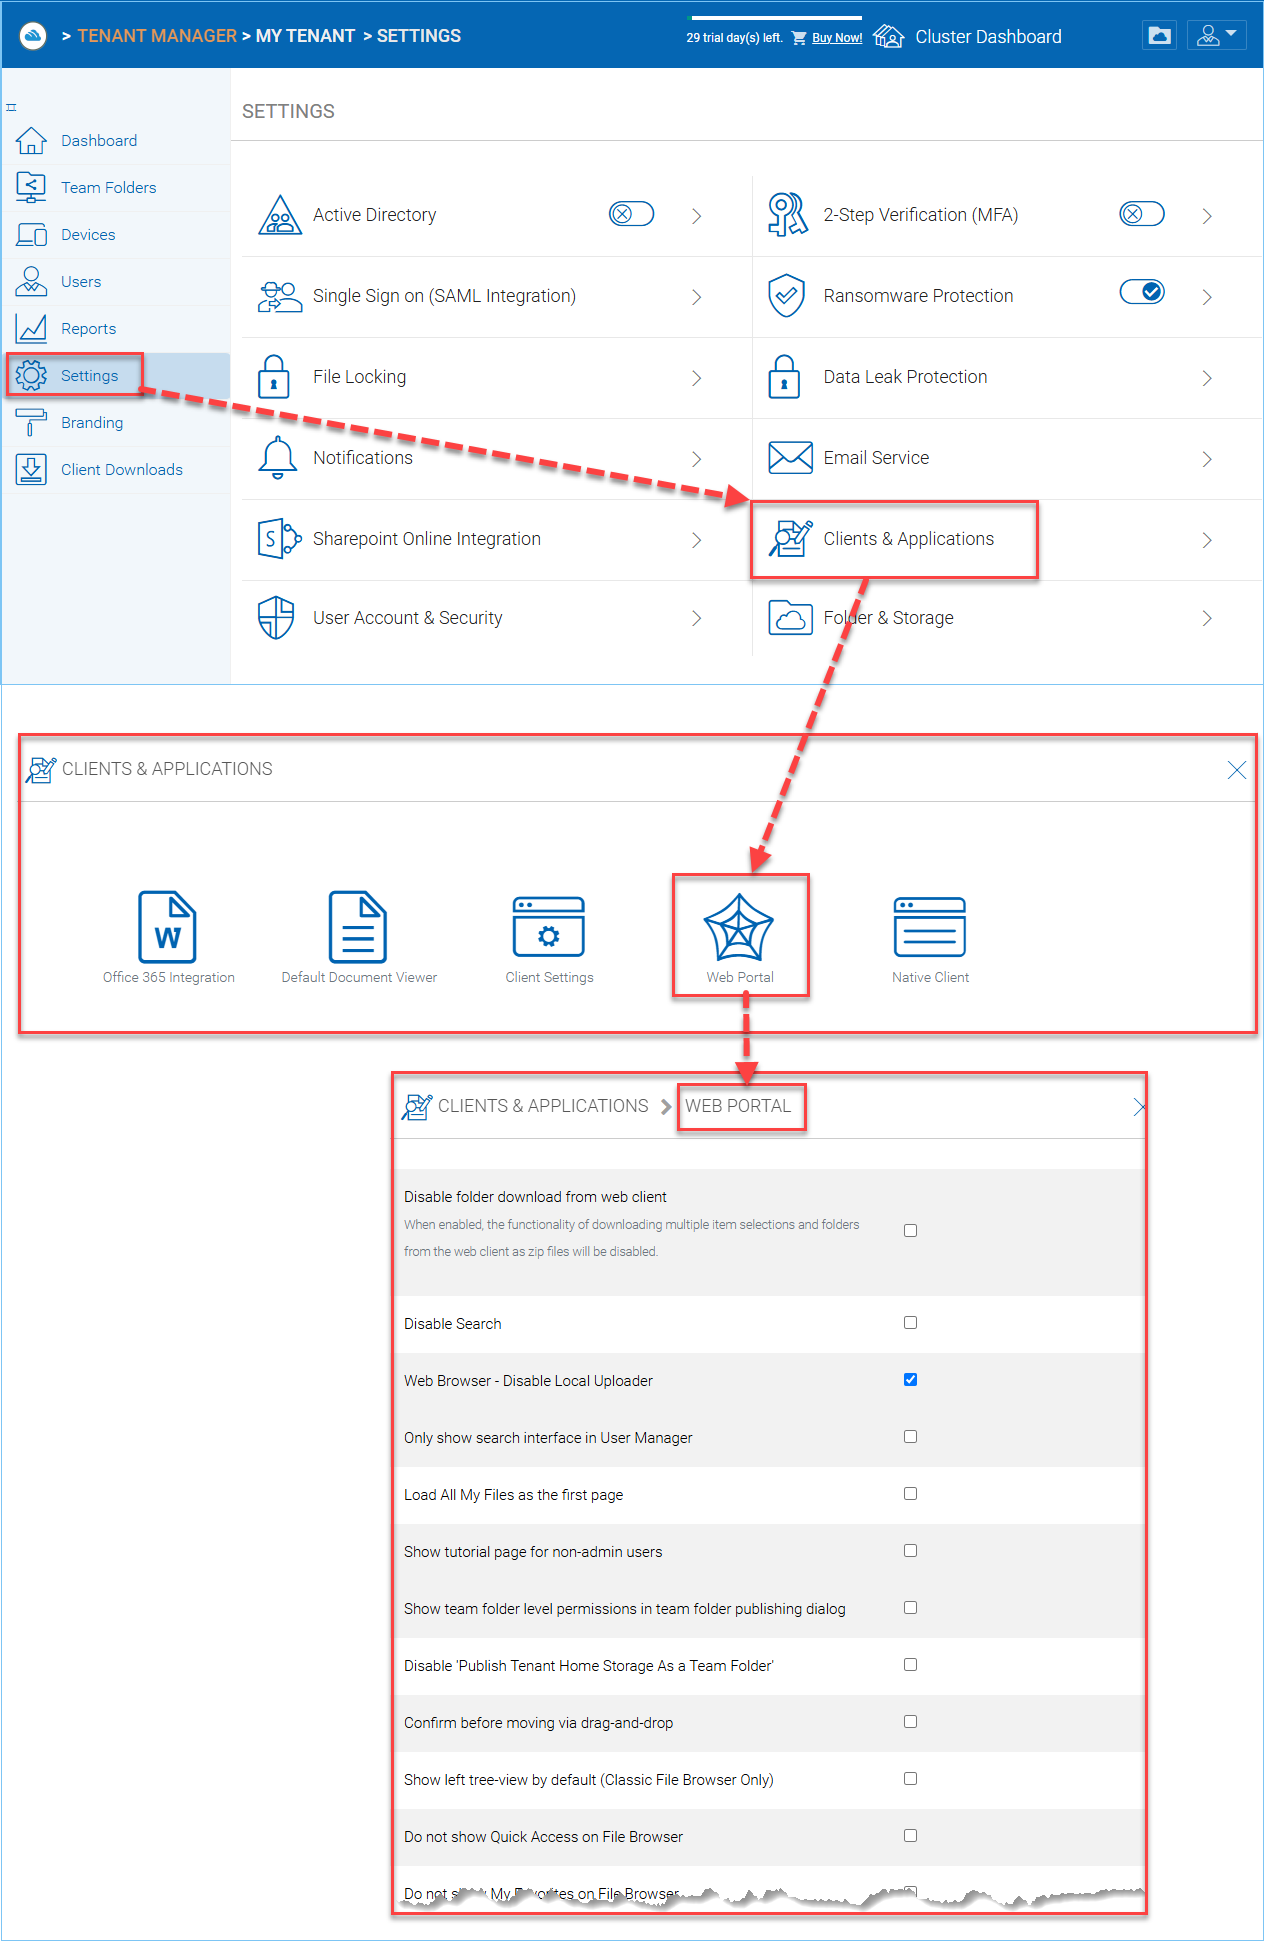
Disabled by default. The folder download from web client will zip up the folder and download it. It is CPU intensive so if you don’t want it to be consuming too much CPU, you can disable it using this setting.
Disable Search
Disabled by default. If you don’t need the search by file name feature, you can check this setting to disable it.
Web Browser - Disable Java Uploader
Some organization standardized on web browser, for example, all web browser are HTML5 compliant. In this case, Java Uploader is not necessary and could be confusing to support when different users have different Java version installed.
Web Browser - Disable Flash Uploader
Some organization standardized on web browser, for example, all web browser are HTML5 compliant. In this case, Flash Uploader is not necessary and could be confusing to support when different users have different Flash version installed. Different kind of web browser may also have different levels of Flash support, causing different behavior.
Web Browser - Disable Local Uploader
Admin can also disable local uploaded in which case the upload will happen using the browser directly.
Enable Tabbed-Browsing in User Manager
When enabled, the user manager will order users by their last name so if you have many users, you have an easy to access way to find the users.
Only show search interface in User Manager
When you have even more users, Tabbed-Browsing can’t handle it any more, you can enable search-only interface.
Show tutorial page for non-admin users
Display tutorial page for regular users when they login to the web portal.
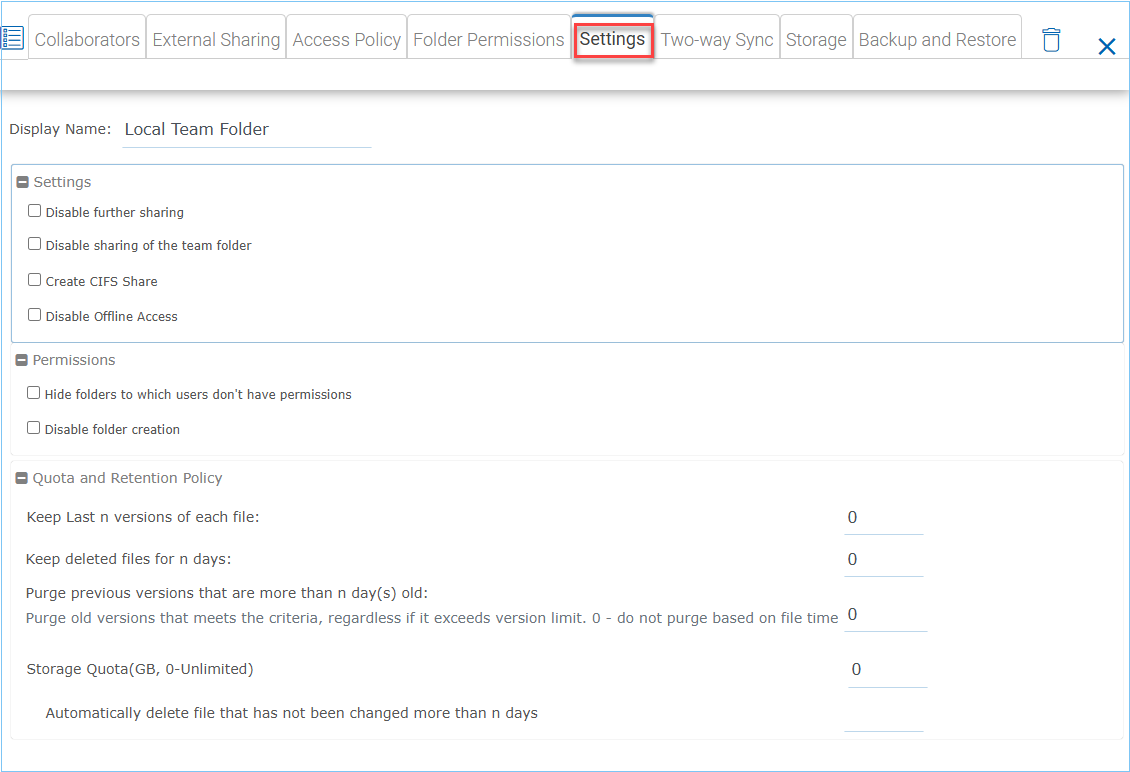
Show team folder level permissions in team folder publishing dialog
The advanced setting refers to “Create CIFS Share”, “Disable further sharing”, and “Disable Offline Access” settings.
Disable ‘Publish Tenant Home Storage As a Team Folder’
This feature can be hidden in Tenant Management Console > Team Folder > Add New Team Folder
Confirm before moving via drag-and-drop
In web portal, sometimes there can be accidental drag and drop, in this case, having a confirmation dialog can help prevent accidental drag and drop.
Show left tree view by default
Disabled by default. When enabled left-tree is displayed when you log in to the web portal.
Do not show “recent activities
Disabled by default. When enabled “recent activities” is not visible in the Show/Hide Info Panel on the right side of the Web Portal File Browser.
Show ‘link to local’ option to non-admin user
Disabled by default. When enabled, non-admin user will have access to the “Link to Local” option in the Sharing and Collaboration tab under the Show/Hide Info Panel on the right side of the Web Portal File Browser.
Show max count of file/folder items
Default files to show is 1,000. Some customers may have a very flat folder that has more than one thousand files. It is not recommended to have a cloud system have flat folder structure like this. But if customer has many files in a flat folder. This setting can be used to show all files by increasing this number as needed.
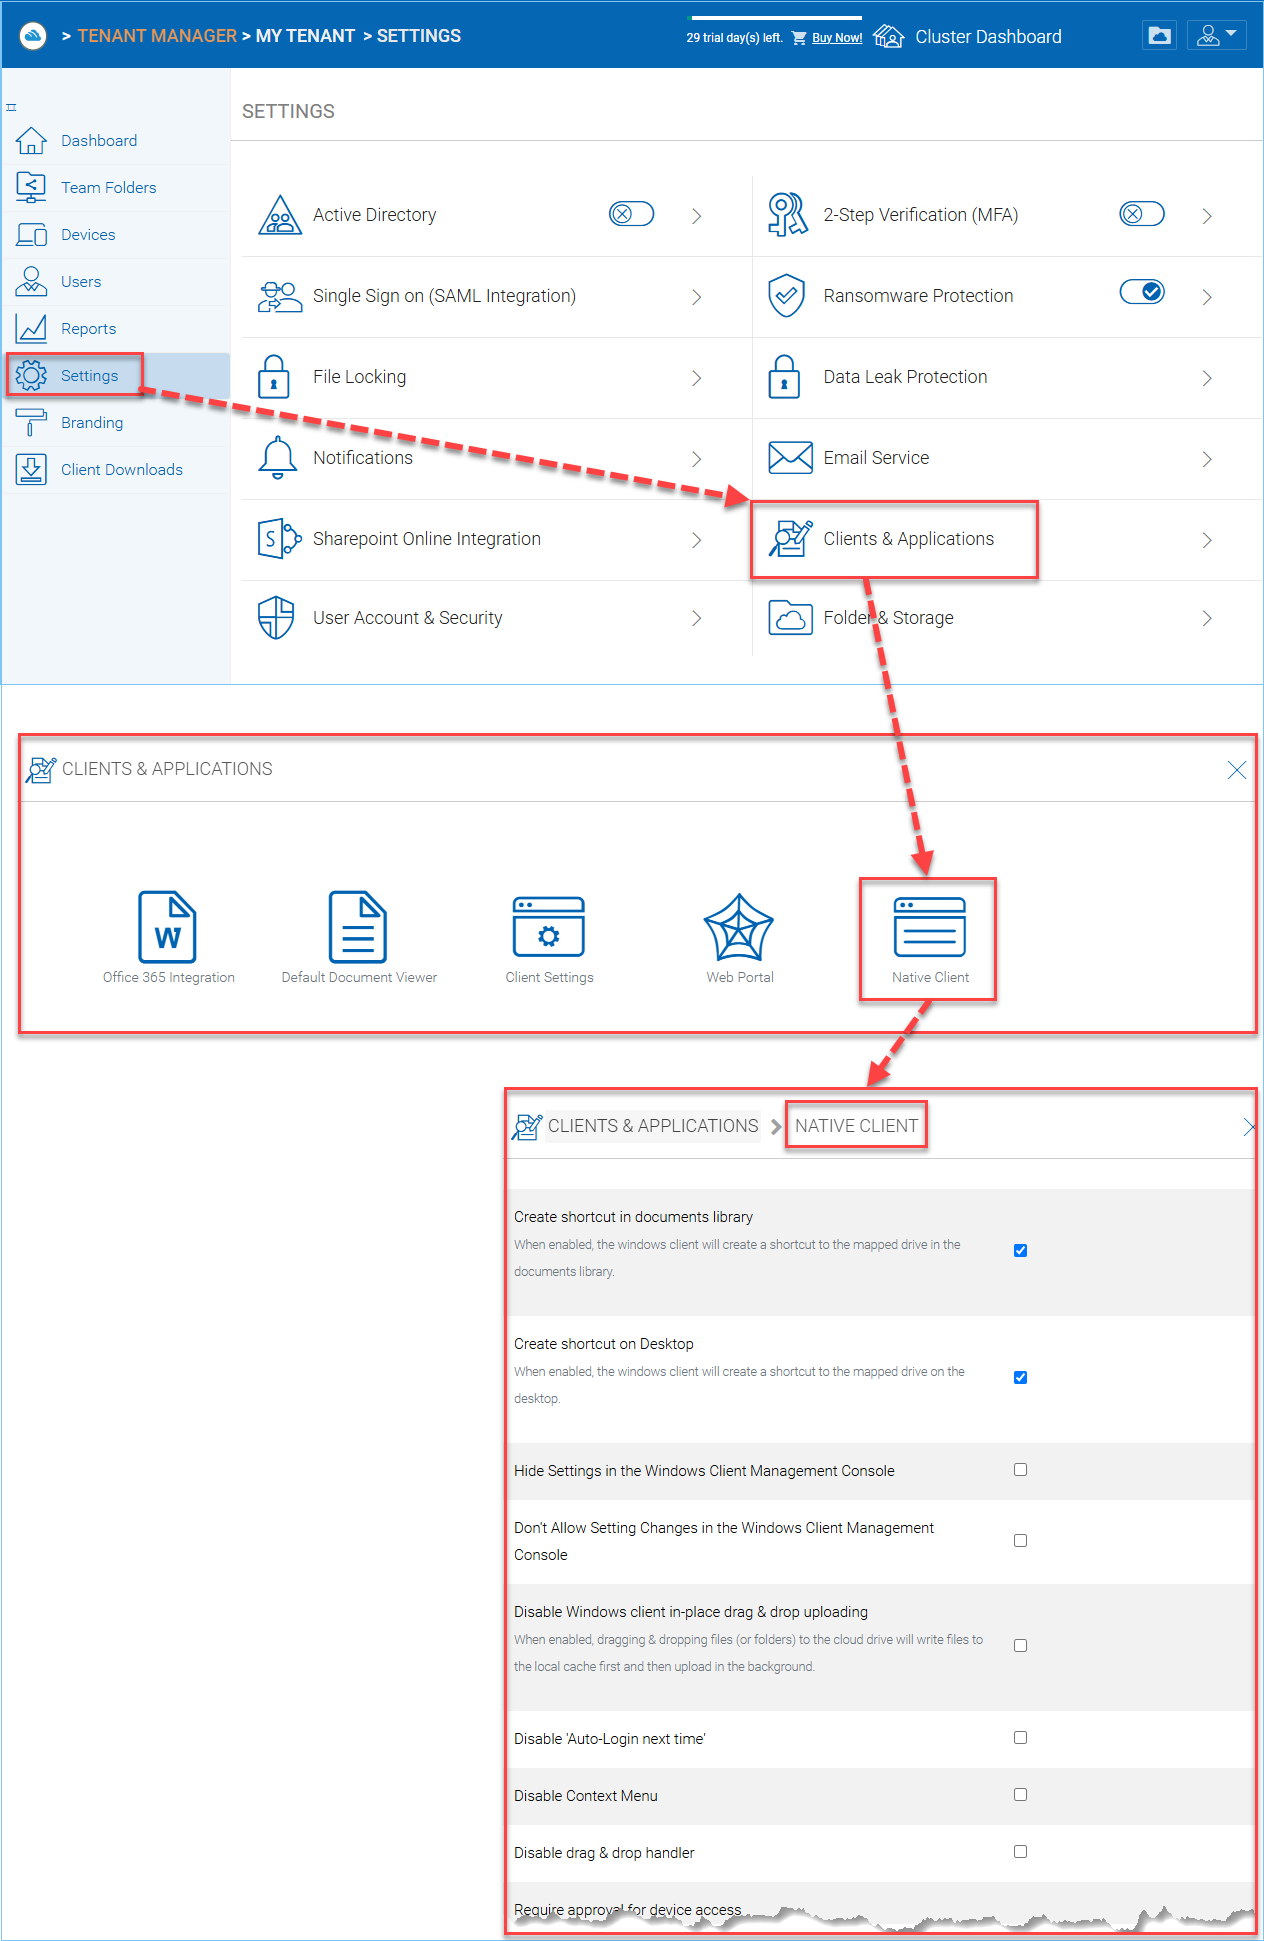
Enabled by default. This is a convenience feature to add a link to documents library to the cloud drive.
Create shortcut on desktop
Enabled by default. Same as above but the shortcut is on the desktop.
Hide Settings in Windows Client Management Console
Disabled by default. The Settings in the Windows client may be viewed as “too much information for normal user”. If that is the case, enabling this option will hide those settings.
Don’t Allow Setting Changes in Windows Client Management Console
Disabled by default. When disabled the Windows Client user can change the settings in the Windows Client Management Console.
Disable Windows client in-place drag & drop uploading
Unchecked by default. When enabled, dragging & dropping files (or folders) to the cloud drive will write files to the local cache first and then upload in the background.
Disable Auto-Login next time
Unchecked by default. When you want the user to type in username/password every time they login to the Windows client, you can check this to disable auto-login.
Disable drag & drop handler
Unchecked by default. If you check this option, the Windows file drag and drop will take over, this typically means the files will be copied into cache before upload, thus resulting in two copies of files being uploaded.
Requiring approval for device access
Disabled by default. When a user attempts to log in from a new device via native client applications, the connection will be rejected until the tenant admin approves the new device. The approval can be done from the “Client Device Manager”
Enable auto-install of Outlook Plugin
Disabled by default. The Cluster Server Windows Desktop client comes with an Outlook plug-in. If this option is enabled, the Outlook plugin will be enabled upon client startup.
Disable native client for guest users
Unchecked by default. For guest users, don’t allow them to use native client, so the guest users can only use web browser files and folder view.
Each tenant has a default backend storage. Tenant user (team user)’s home storage and other shared storage
space can be allocated from the default backend storage.
Tip
You can think of the Tenant Backend Storage as a “Black Box” managed by the Cluster Server and you shall always use the Cluster Server interface to interact with the content inside the storage. If you can’t take this “Black Box” approach for the tenant’s root backend storage, you can use the following other methods via the team folders, such as import file server network share.
However, if you already have a file server that will provide the storage, it is recommended to use “Import Network File Shares” to mount the file server network share to the tenant’s storage space. In this case, you can leave the “Default Storage” as is, or point it to an empty location and treat it as a black box storage managed at the Cluster Server level.
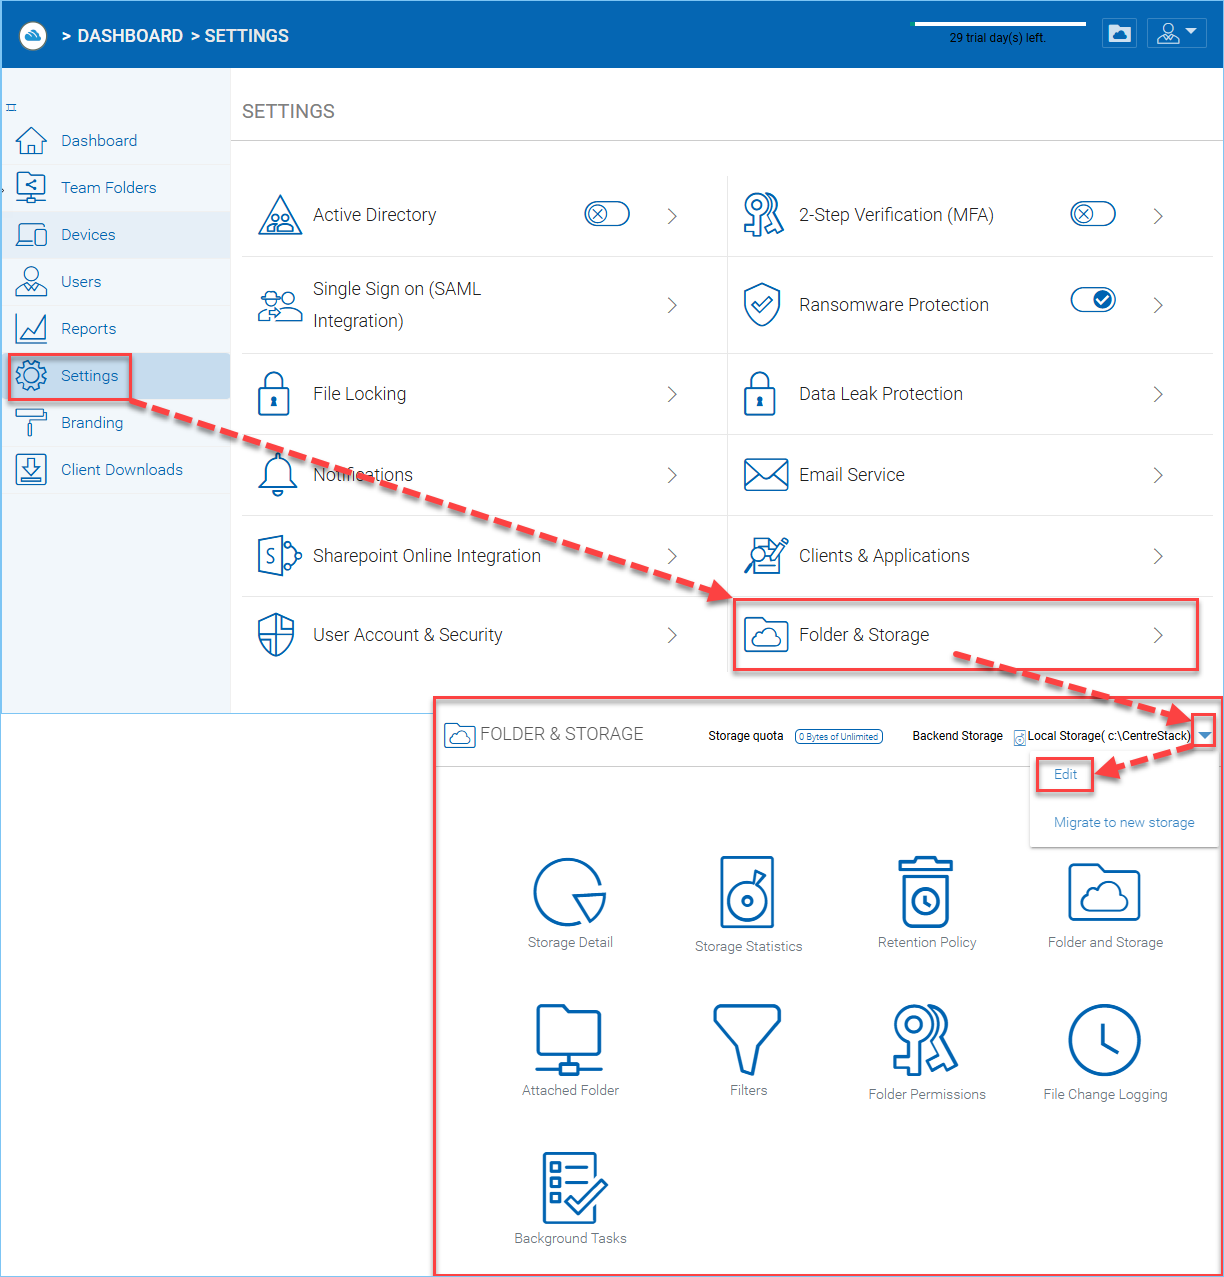
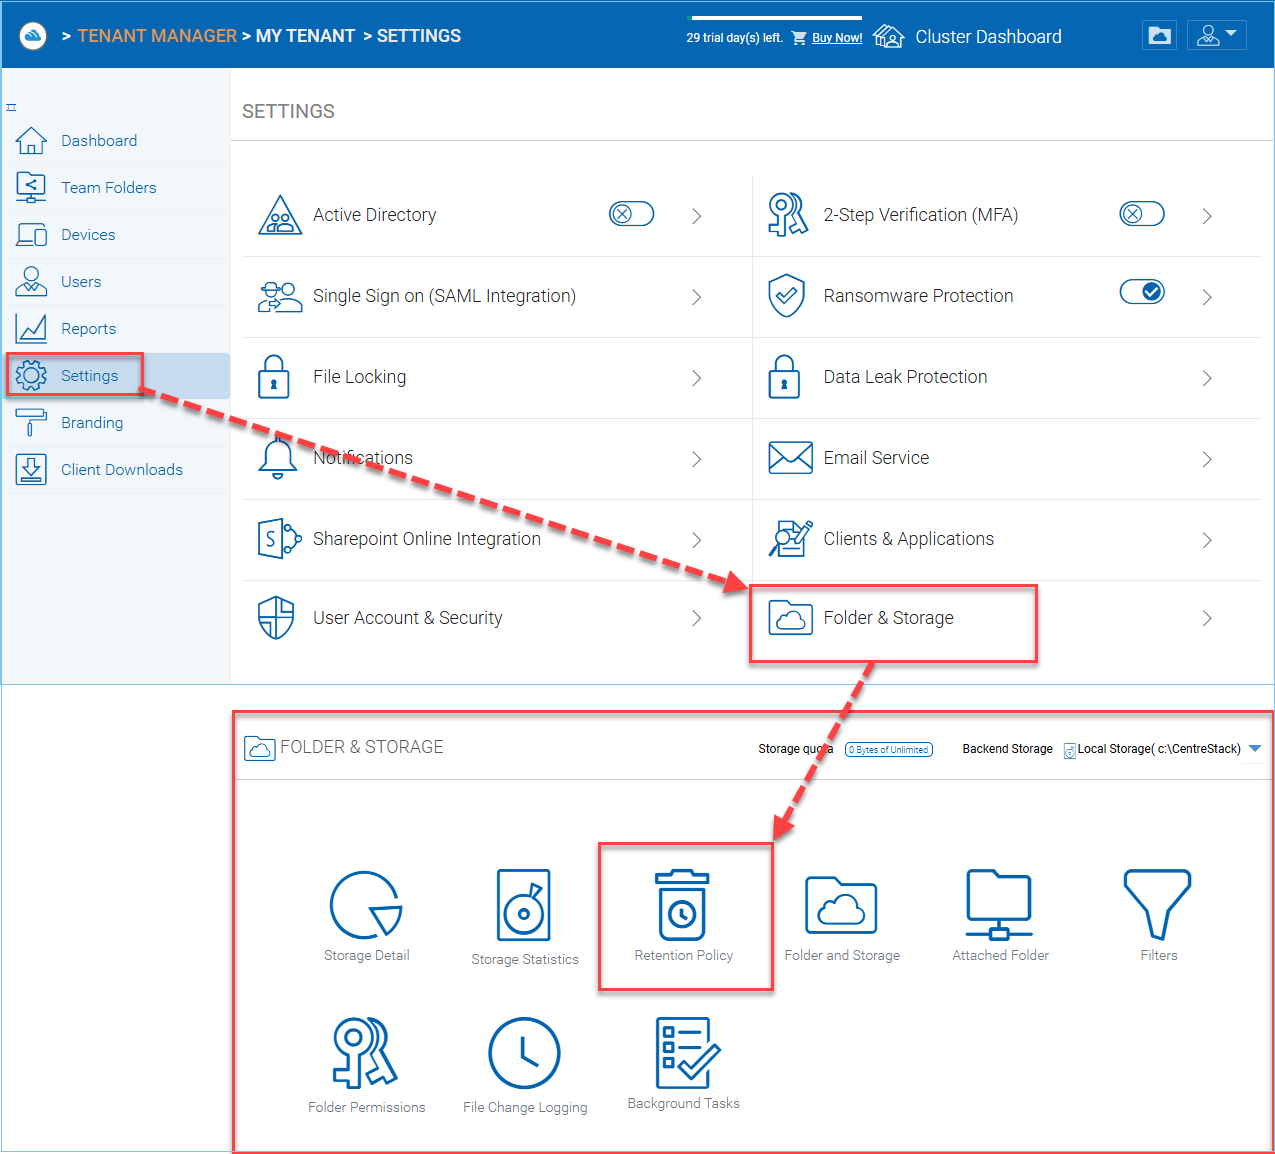
To access the Tenant Storage Manager, click “Folder & Storage” on “Settings” section. To check the backend storage information, click the dropdown at the top right corner, and select “Edit”, to edit the storage configuration details.
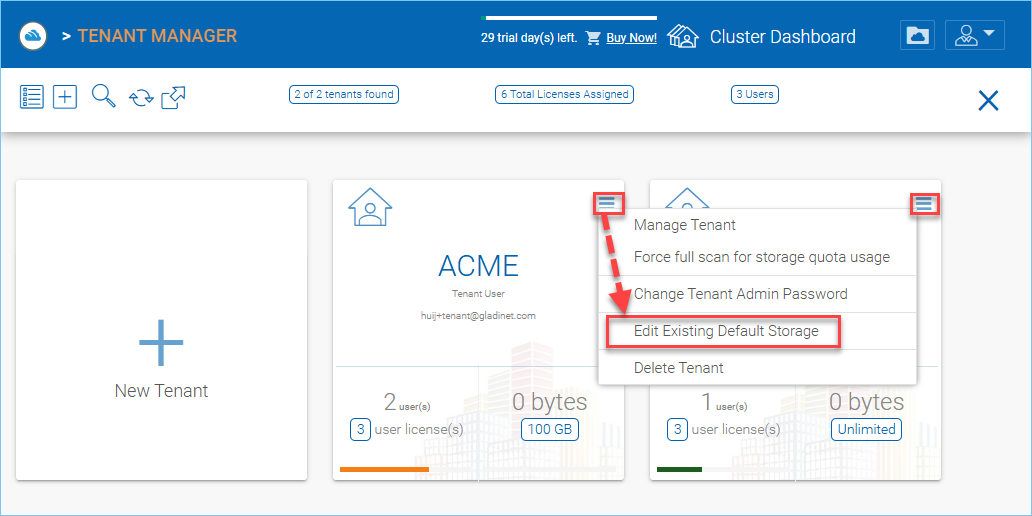
If cluster admin needs to check the backend storage for multiple tenants, go to “Tenant Manager”. Click the “hamburger” menu at the top right corner of each tenant, and then choose “Edit Existing Default Storage”.
You can mount different storage services into a single namespace (folder structure). For example, if you have multiple Amazon S3 buckets, you can mount them all in. If you have multiple OpenStack Swift accounts, you can mount them all in as well. If you have multiple file server network shares, you can add them to the storage manager.
Note
The cluster manager can define whether or not the Storage Manager is exposed to the tenant administrator.
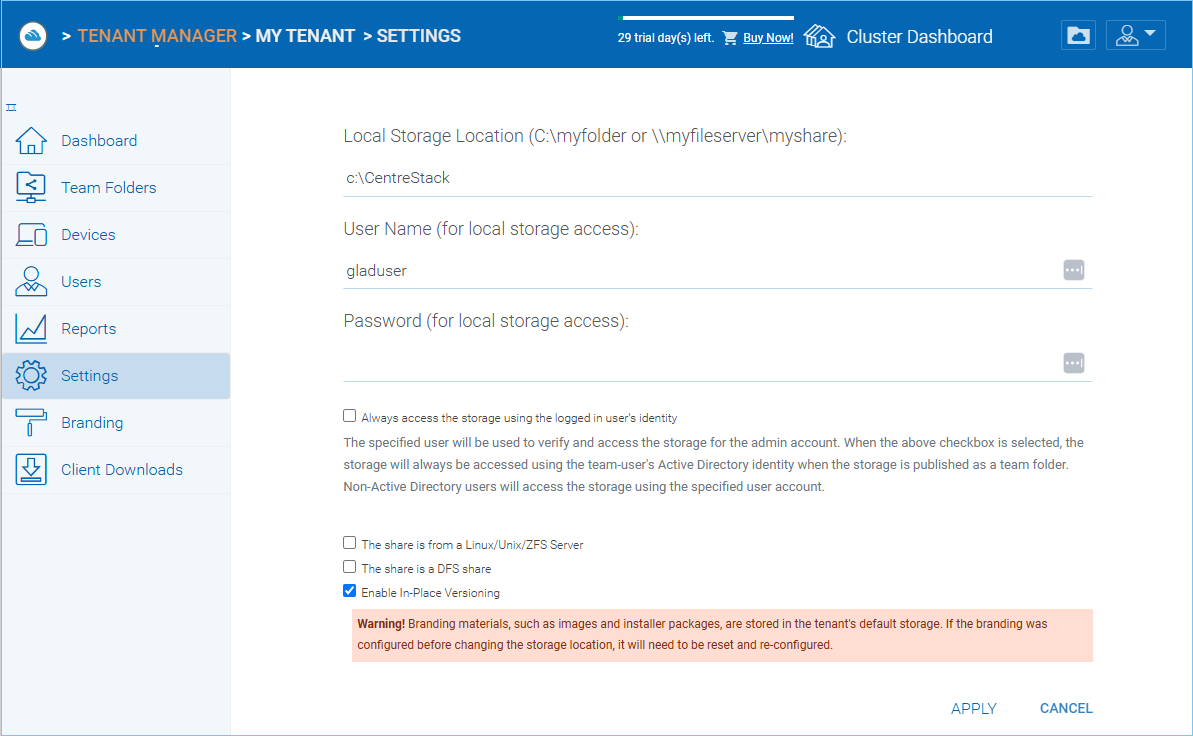
This is the file server UNC path or local windows folder path that you will connect into the tenant administrator’s root folder structure. The idea here is you will take this folder and mount the folder to the tenant administrator’s root folder structure.
User Name
The user name is the Windows username, either it being local Windows user or global Active Directory user, this is a Windows account that is capable of accessing the “Local Storage Location”.
Password
This is the password for the Windows user above.
Note
We recommend this Windows user and his credential be set up as a service account, meaning the password isn’t subject to the maximum password days via local security policy. The reason being, that, when it is time to rotate or change the user password, the connection here may be broken until the password is updated to match.
“Always access the storage using logon user identity”
When you have Active Directory Integration, and mount an existing file server network share in, you can select “Always access the storage using logon user identity” so the ACL (NTFS Permission) on the file server share will be used natively. The access permission will be checked natively against the user’s Active Directory identity that is defined by the NTFS permission.
This option only applies to the “Local Storage” such as network share, DFS share, local folder, and etc.
“The share is from a Linux/Unix/ZFS server”
Most of the time, you don’t want to check this flag because your file server share shall behave like a normal Windows Server share, even if it doesn’t come from a Windows Server.
In some small SOHO network storage devices, it may only allow one connection from one IP address, so if that is the case, you want to check this flag. Most of the time, you just don’t need to check this when the network share is capable of taking multiple connections/sessions from one single machine.
“This share is a DFS share”
If the share is a DFS share, you will check this checkbox, because DFS share has an extra layer of translation to translate back down to normal file server shares. This flag tells the Cluster Server to do an extra DFS translation back to SMB share before connecting to the share.
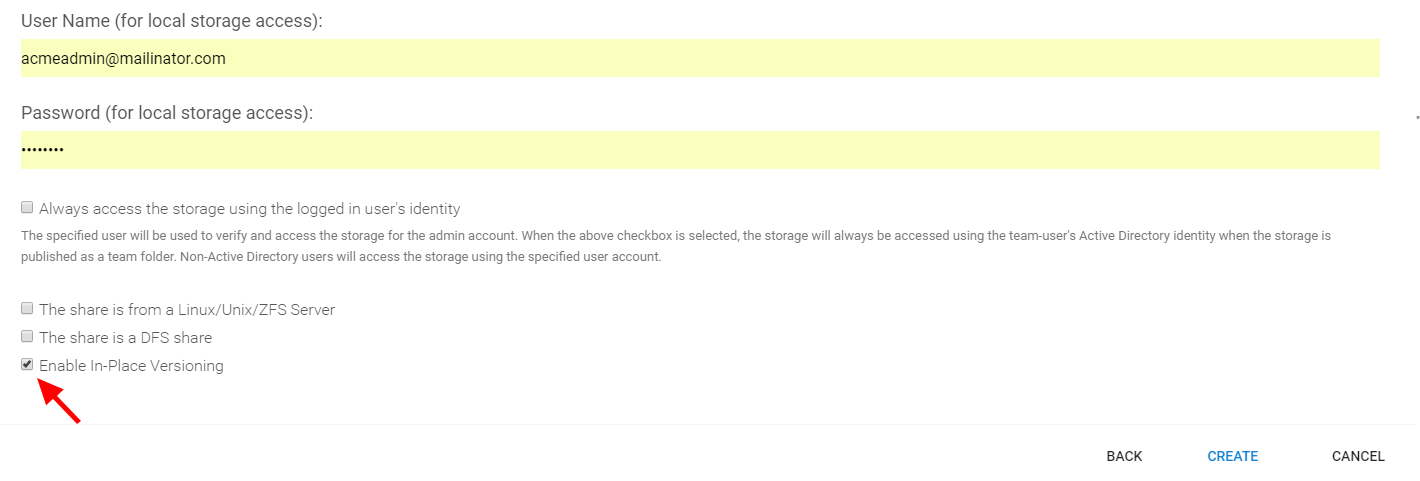
“Enable Inplace Versioning”
The underlying file server network share may not have explicit version control (it may have volume shadow copy for other purposes). This will add Cluster Server version control to the file server network share. It is independent of and not related to the volume shadow copy.
Note
In place versioning will put the older version of the file into a __ver__ subfolder in the same folder structure making the name for In-Place Versioning so the folder structure is maintained as-is, while extra old copies of the file will be stored in a specific subfolder.
Here is a demo video showing the result of “Enable Inplace Versioning” when the root folder (‘forward slash’) is mounted with the “Inplace versioning” enabled.
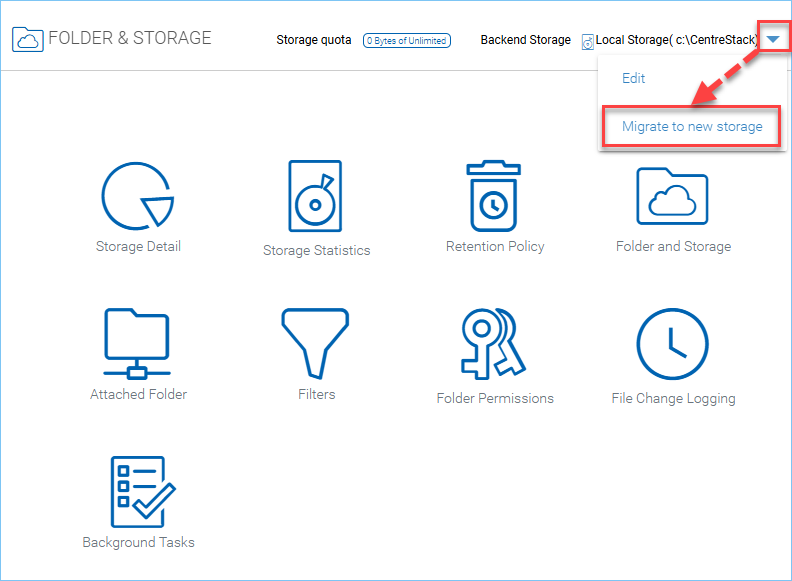
Once the tenant backend storage is set, we don’t recommend changing it until it has to be changed (e.g., migrate to other location). However when you are just setting up the tenant, you can decide where your tenant’s storage location is and can change between local file server storage or remote cloud storage service.
There are two types of storage migrations.
1. Migrate data to a different location in the same type of storage:
Identify the location of the current storage
Copy the content to the new location (for example, you can use xcopy . from the old location to the new location
Login to web portal as Cluster Admin.
Go to Tenant Manager -> Manage the specific Tenant -> Backend Storage and click on edit to point to the new location
2. Migrate data to a different type of storage:
Go to the registry using regedit
Go to HKLM\SOFTWARE\Gladinet\Enterprise\ and add a new string value called ‘CanChangeDefaultStorage’ and set the value to ‘True’ and reboot
Edit the storage type using new icon to edit storage under Cluster ManagerTenant Manager
Note
It is not recommended that you modify registry settings. Create a backup of the registry before modifying any registry settings.
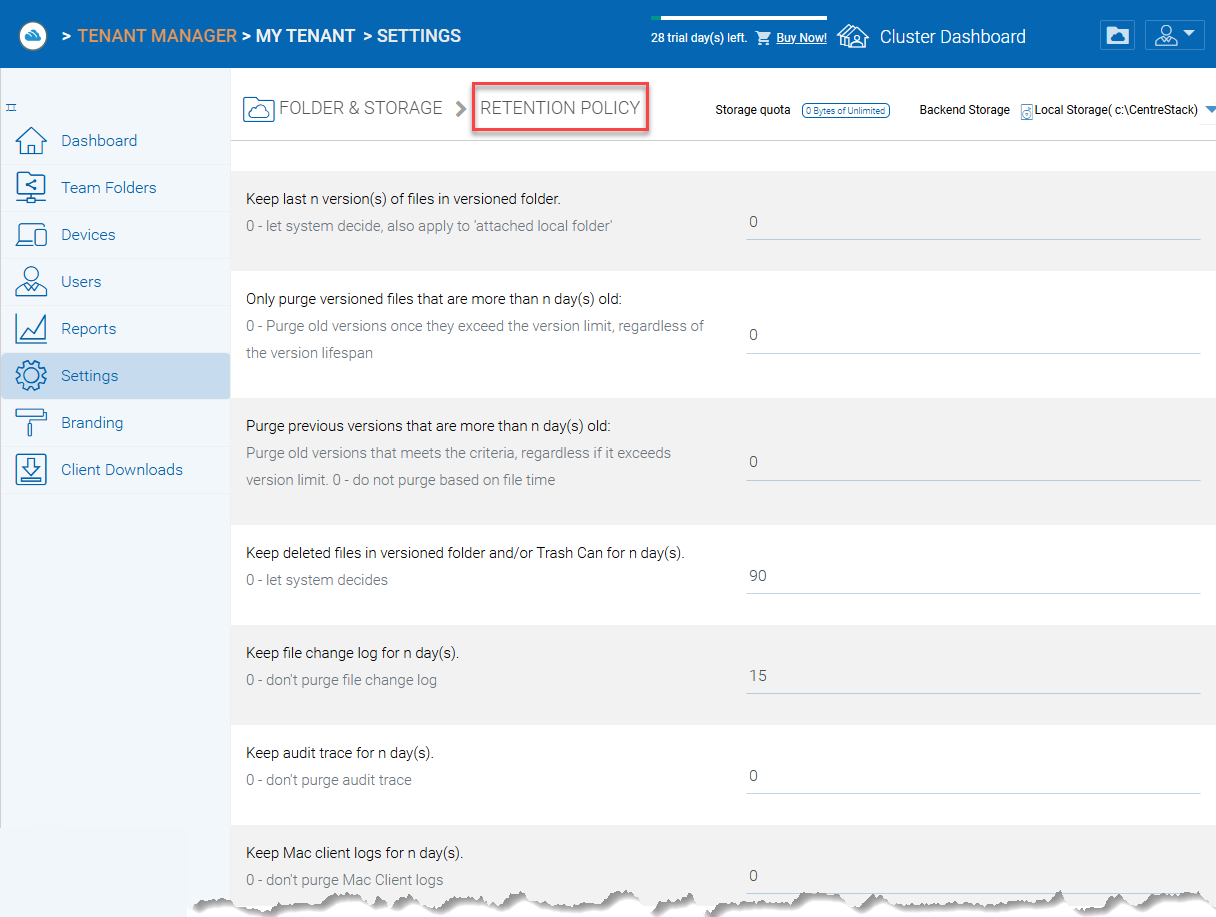
The cloud monitoring service on the Cluster Server will be responsible for the retention policy. The settings of the retention policy are described below.
Keep last n version(s) of files in versioned folder
This setting lets you decide how many versions of files to keep in the version folder. (0 - let system decide, also apply to “attached local folder’)
Only purge versioned files that are more than n day(s) old
This is a security feature. For example, there is a virus modified the same file many times so it created many versions causing good old versions to be scheduled for deletion. However, with this set, the good old versions will be kept for at least the amount of days so give enough time to recover. (0 - purge old versions once they exceed the version limit, regardless of the version lifespan)
Keep deleted files in versioned folder and/or Trash Can for n day(s)
When a file is deleted in the version folder, it is not actually deleted. It will be kept for several days defined here. The same policy also apply to
Keep file change log for n day(s)
File change log is the biggest database table and could be growing without trimming. You can decide how often you want to trim the table.
Note
There is also a cluster setting about the file change log length. The cluster setting overrides the per-tenant setting.
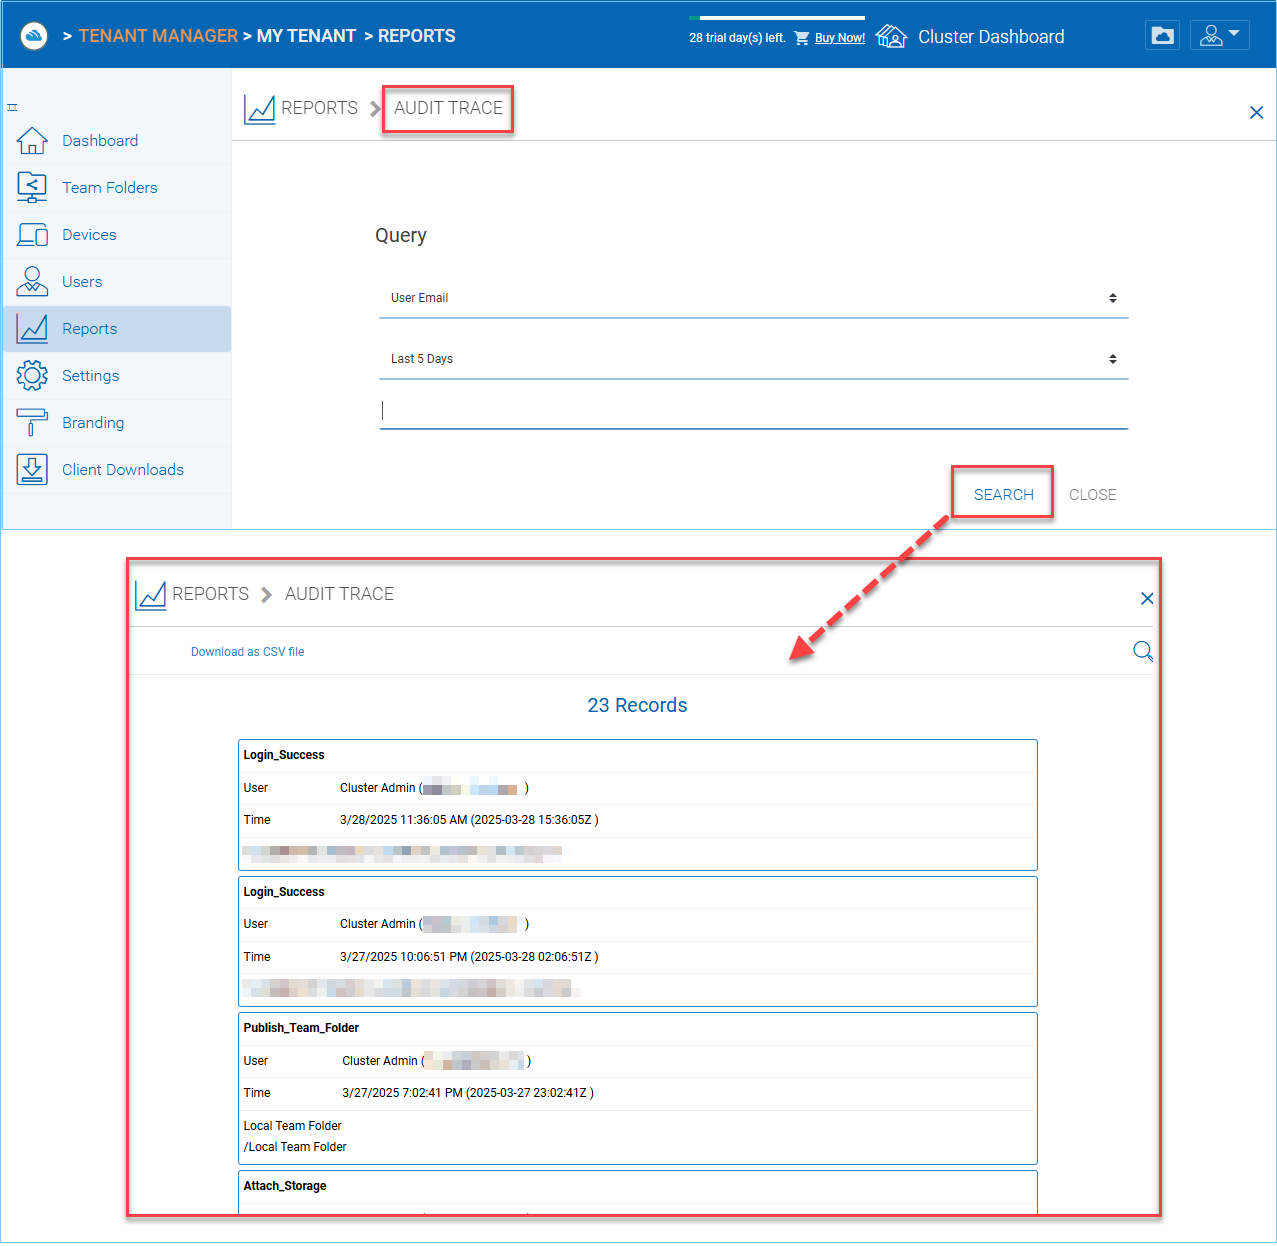
Keep audit trace for n day(s)
Audit trace log is stored in a local device directory and keeps a record of high-level activity from a device (e.g., windows client, server agent). This setting limits the number of days that are stored in the local database file.
Hide purge option from web file browser (not applicable to tenant administrator)
Do not show the purge window to users when deleting content.
Don’t send email notifications when purging deleted content
There are times when an admin would not want to send or see delete email notifications for purged contents.
Include deleted but not yet purged items in storage quota
Allows you to decide if you want to include not visible (purged) files in the storage quota that is used.
When checked, you will allow users to see storage manager
and allow them to attach external storage such as their own Amazon S3 bucket into the system.
Disable Versioned folder
Normally you will NOT disable versioned folder. Because versioned folder is the
supporting feature for “Two-way sync locally attached folder”. If you disable versioned folder, you will lose the
two-way synchronization folder feature as well.
Disable Trash Can
For folders that are not under version control, a deleted file
will be moved into Trash Can. If this feature is not useful,
you can disable it.
Don’t show folder that user doesn’t have read permission
With native Active Directory integration and
with network share as backend storage, the user’s permission to the folders are checked natively. When this option
is set, for those folders that users doesn’t have read permission, the folder will be hidden.
Don’t show team folder that the user doesn’t have read permission to the underlying folder
In the folder listing, if the user don’t have read permission, sometimes it is better off not to show
the folder to the user.
Don’t show Trash Can for non-admin user
Trash Can is a virtual folder that shows up
at the web browser portal only. This setting controls whether or not to show it for
regular team user.
Don’t append (Team Folder) to published folders
A team folder by default, when showing up in a team user’s
folder list, it will have “(Team Folder)” appended to the end of the folder name to signify it is a team folder.
This feature allows a team folder showing up as it is without the (Team Folder) suffix. The use case is that when
a network share is mounted and then turned into a team folder, since the users are already familiar with the
network share in its original name, so it is not necessary to append (team folder) to the folder name. You
shouldn’t change this setting in the middle of operation because if users have pending upload/download, changing
the name could cause those tasks to fail.
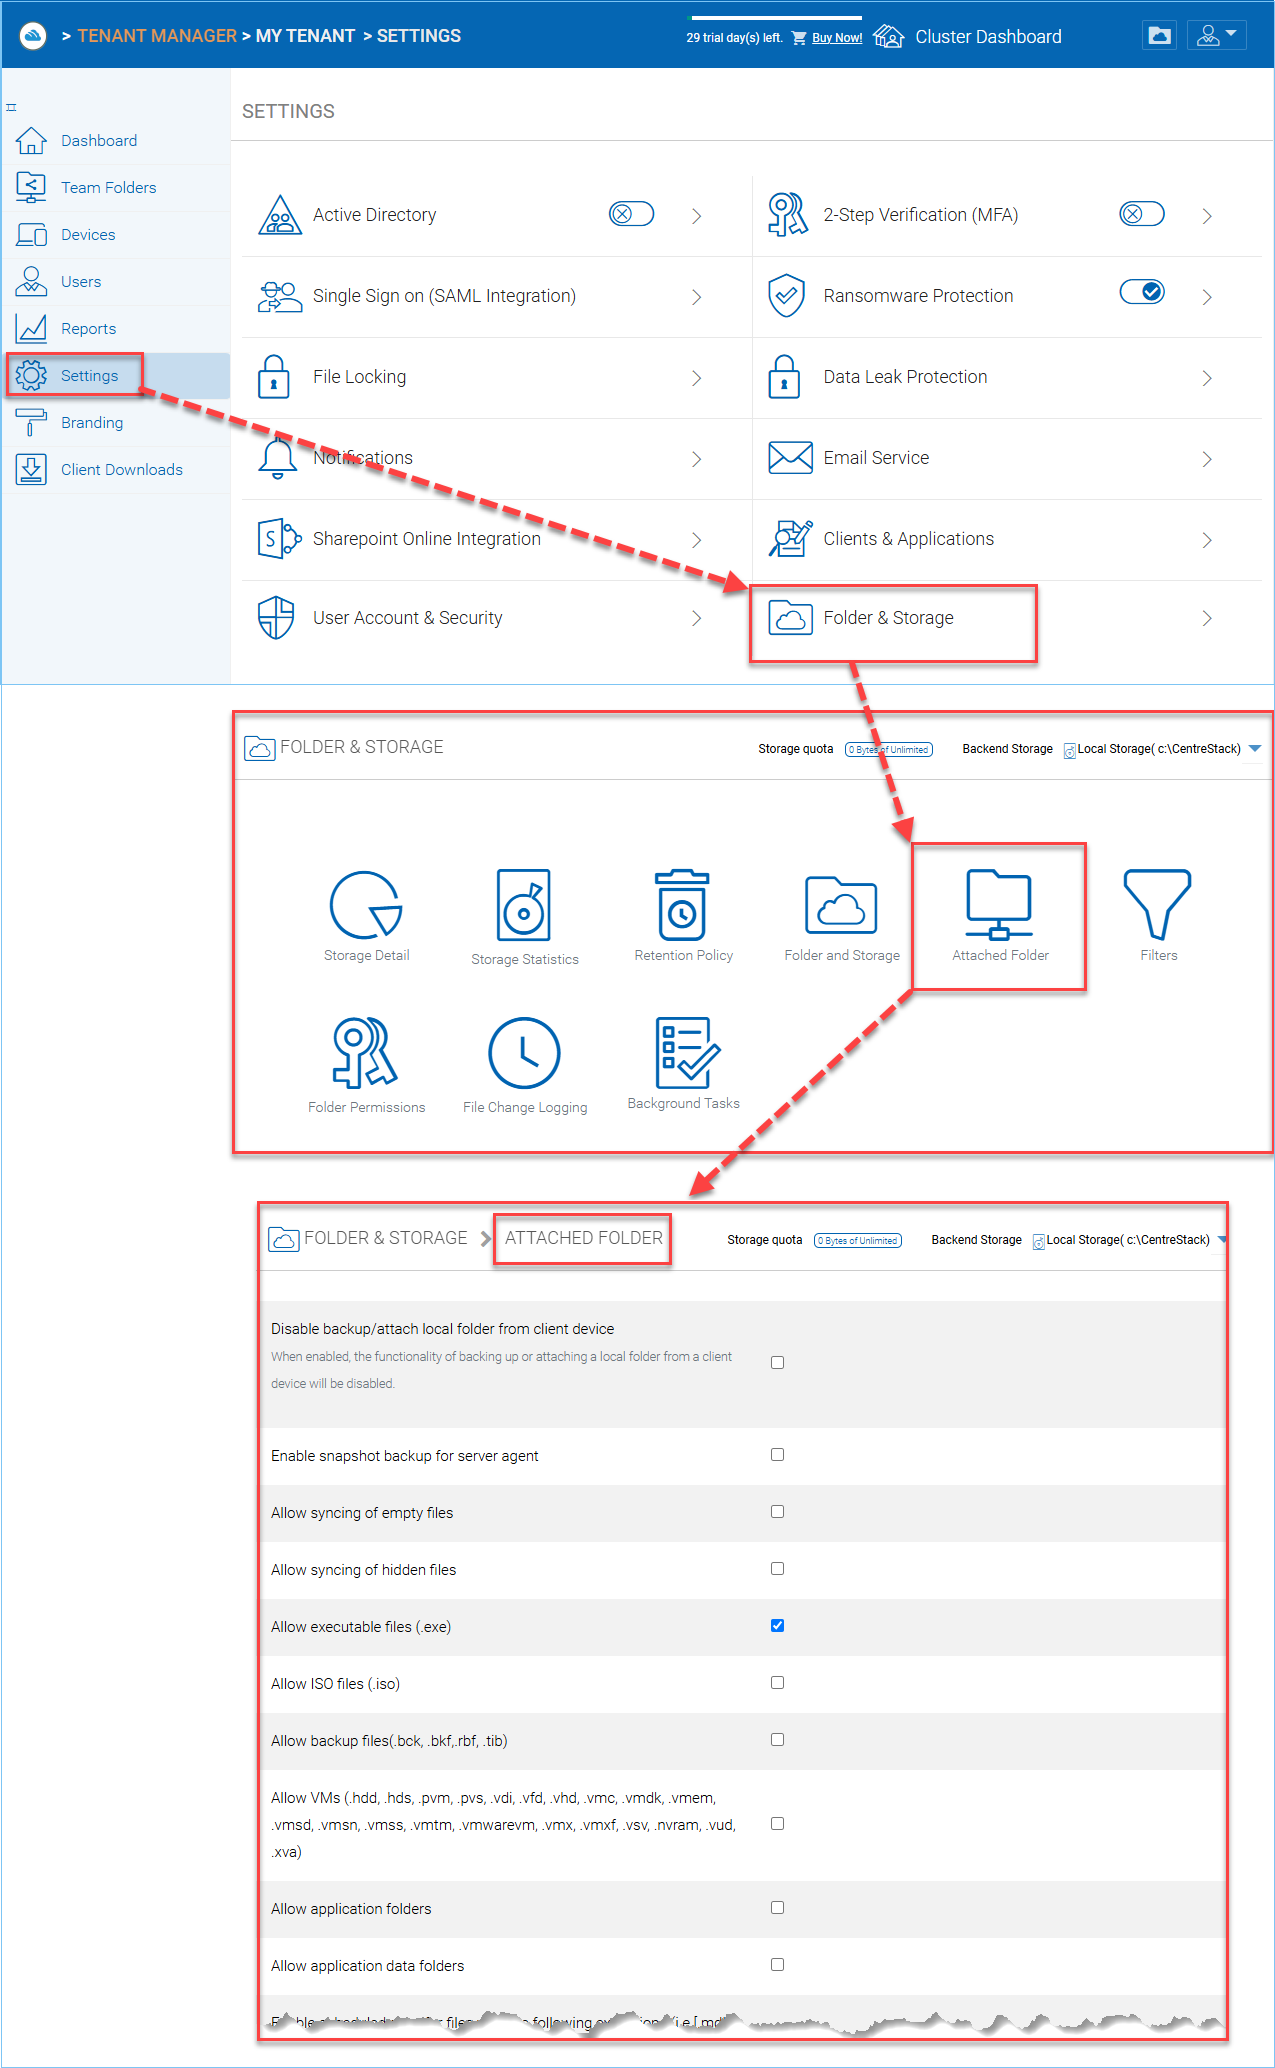
Disable backup/attach local folder from client device
Attached Local Folders are two-way synchronization
folders. In order to do version backup and two-way synchronization, there are multiple folder structures created
in the backend storage. Some organization doesn’t need this feature and want the users to work exclusively with
the cloud drive.
Enable Snapshot backup for server agent
It is a feature related to server agent on Windows 2003-2012 servers.
Allow syncing empty files
By default, empty file (0-byte) will be skipped for syncing in attached folder.
when enabled, those files will be synchronized.
Enable scheduled sync for files with following extensions
This is to help sync/upload frequently changed file such as
Microsoft access database or QuickBook files. These type of
files typically are constantly open (thus prevent other application to hold on to them)
and also changed frequently. So you can define the time
period to check back on these type of files and use volume
shadow copy to upload these files.
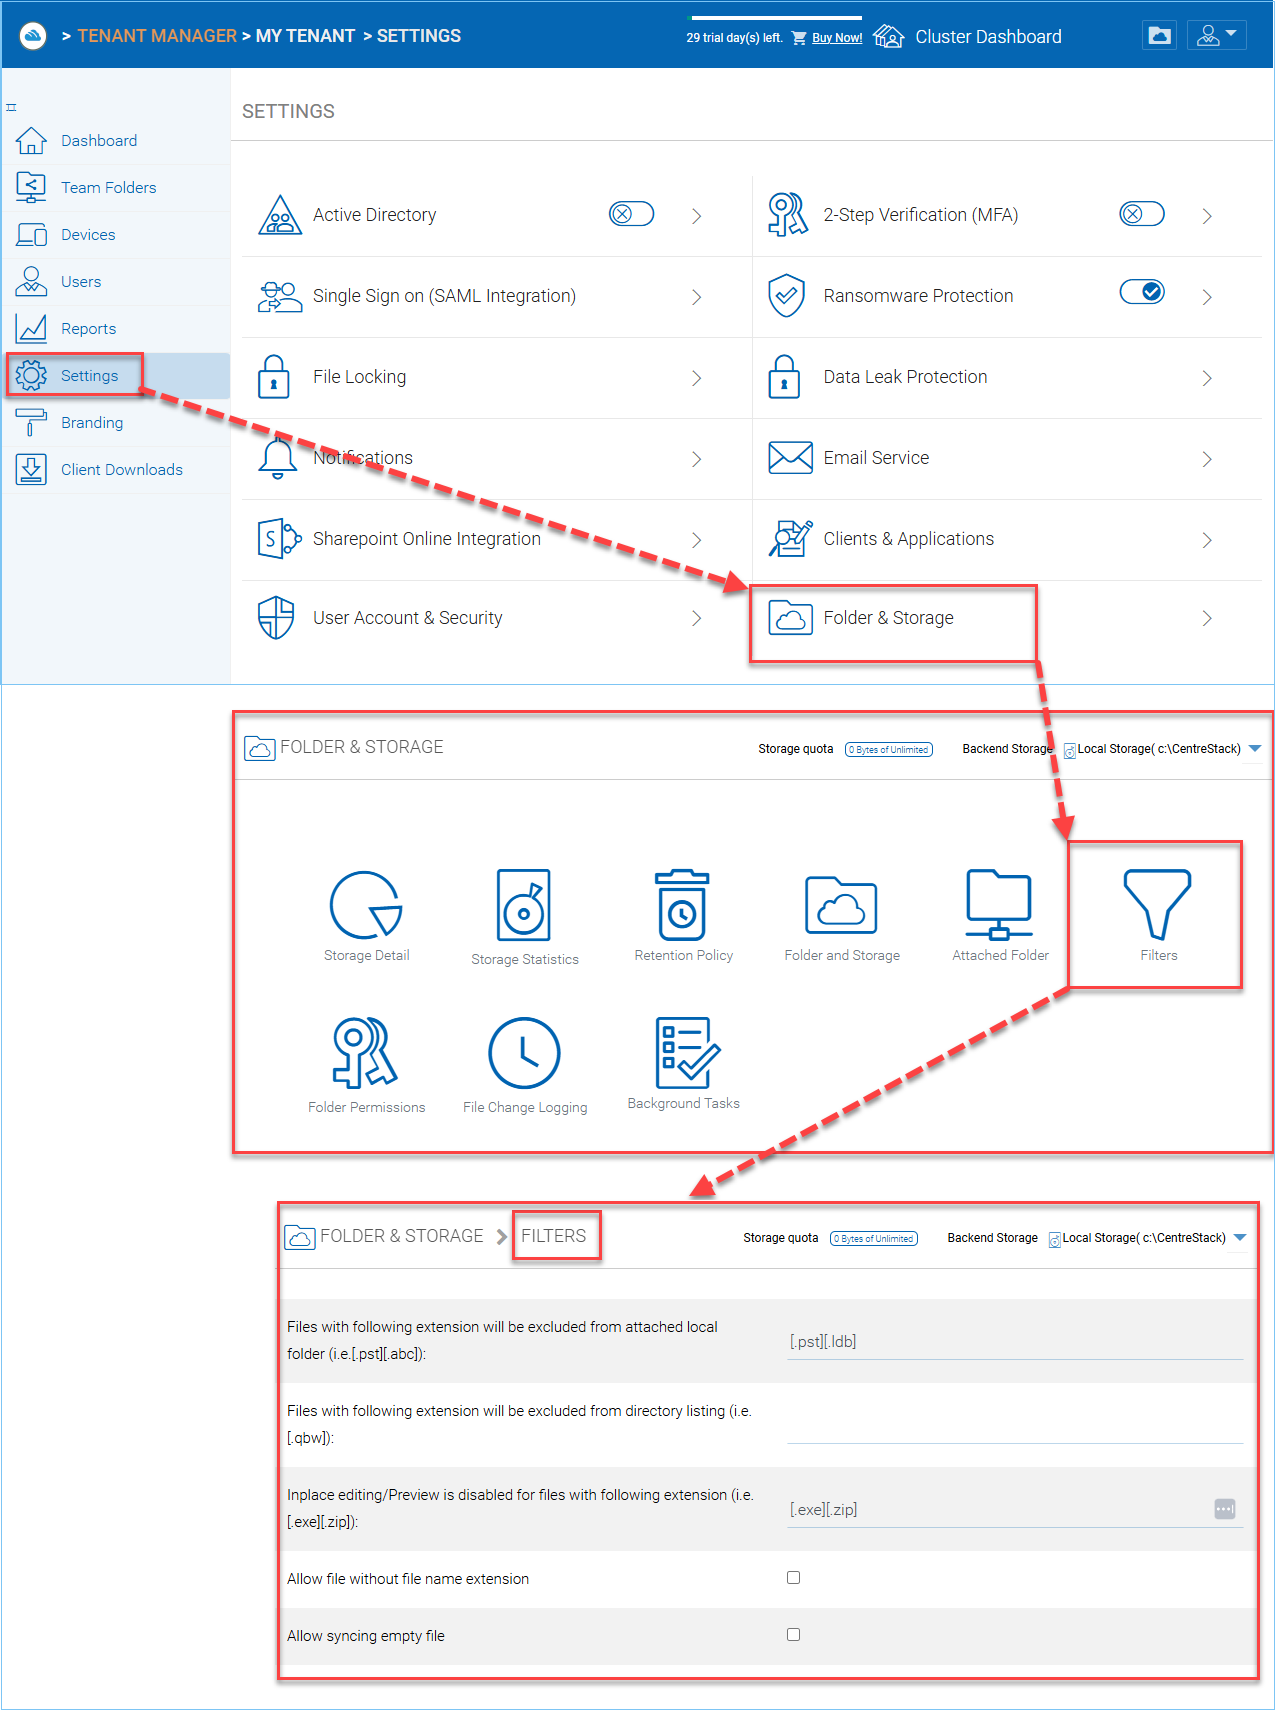
Files with the following extensions will be excluded from attached local folder
You can stop certain file types from
being uploaded. For example .pst files. These are local outlook email files, which is not necessary to upload into the
cloud storage because usually it is backed up by an exchange server.
Files with following extensions will be excluded from directory listing (i.e.[.qbw])
You can specify the executables which should not be
listed under a user’s directory.
In-place editing/Preview is disabled for files with following extension
Windows Explorer has a habit
to peek into large files to generate thumbnail and present other information. It may not be a good fit for
cloud drive files because each peek will generate a download from cloud.
Allow file without file name extension
Allow files without extension suffix to synchronize.
Allow syncing empty file
This is the same setting as in the “Attached Folder” section.
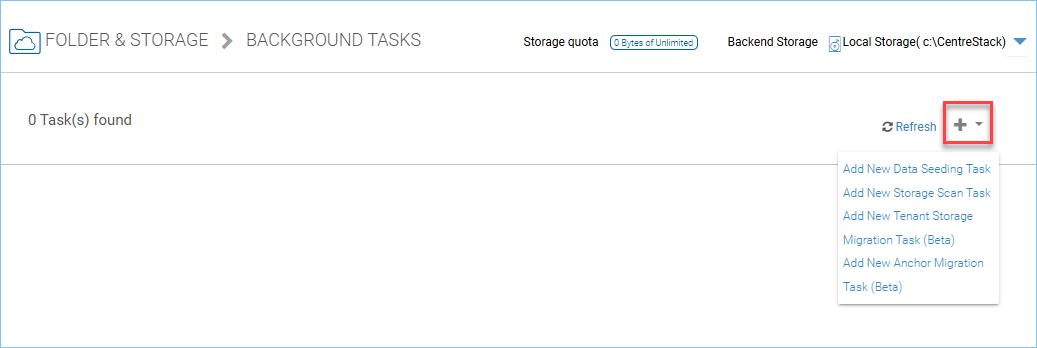
The cluster administrator can help the tenant seed the data. For example take data into a USB drive and take it to the same local area network as the Cluster Server and see the data into the tenant storage.
Data Seeding is to take a folder from a source location and seed it into a team folder.
On the left of the dialog, it is the source folder path information.
On the right side of the dialog, it is the target team folder information.
If you are seeding the data into a brand new team folder, you will first go into the team folder area and create a new team folder with empty content inside, and then come back to data seeding page and select it from the team folder drop down.
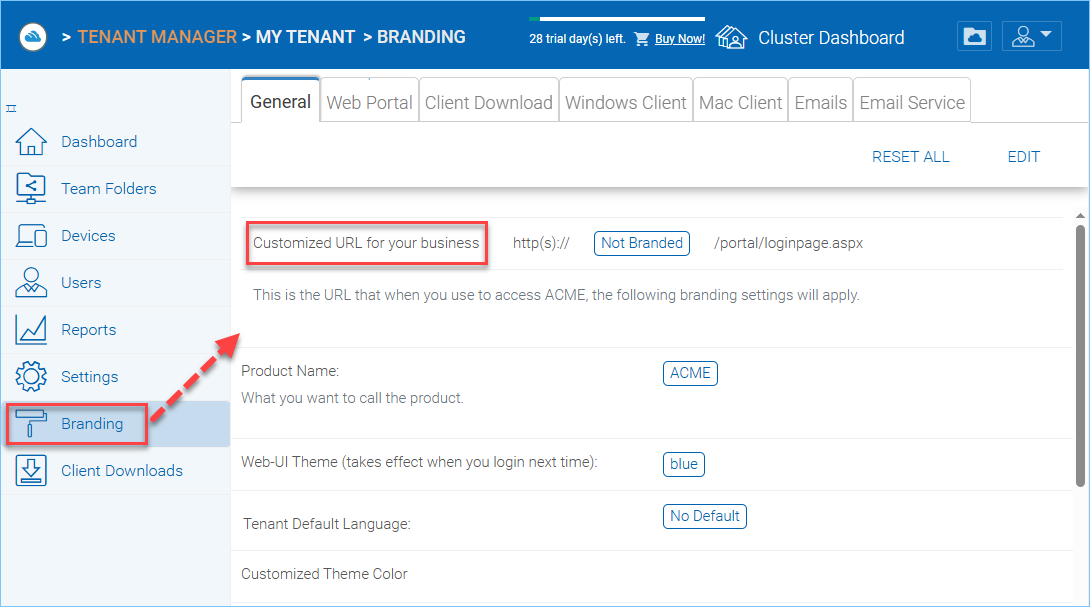
The cluster administrator can help the tenant do the tenant-specific branding in the partner portal.
The branding is applied by the customized URL.
You can think of the customized URL
as a primary key to retrieve all tenant related
branding information.
If per-tenant branding is enabled, The tenant branding section will be available.
In Windows 2012 and above (the server that has the Cluster Server running), it also allows SNI (Server name indicator) in the SSL certificate binding. So it is possible to bind multiple SSL certificates to the same IIS server. In this case, the Customized URL can be a fully qualified domain name.
Warning
If you set up per-tenant branding, make sure the customized URL is specific to each tenant and also the URL is different from the default URL.
If you don’t want to setup per-tenant branding, disable it in cluster settings and setup cluster-wide branding instead.